About This Elloth Flower Granny Square Pattern
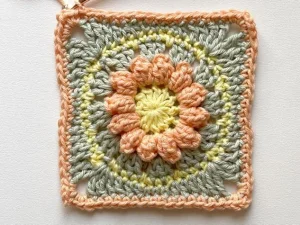
This square is a fantastic way to brighten up your home—stitch a few for a set of coasters or join dozens for a stunning heirloom blanket that will be cherished for years.
Ideal for those with basic crocheting experience, featuring slightly more advanced stitches and techniques to expand your skills.
Fits nicely into a free afternoon — 2 to 5 hours of focused, enjoyable crocheting.
A warm touch for your space that transforms ordinary corners into inviting nooks filled with handmade charm.
This square is a fantastic way to brighten up your home—stitch a few for a set of coasters or join dozens for a stunning heirloom blanket that will be cherished for years.
I honestly can't get enough of those popcorn stitches! They give the flower so much personality and a tactile feel that you just don't get with flat squares. It is a brilliant way to use up those small scraps of cotton yarn you have tucked away, and seeing the shape transform in Round 5 is like a little bit of crochet magic.
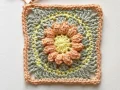

I remember the first time I tried a textured granny square; it felt like magic seeing that 3D flower pop right off the fabric. This Elloth square is exactly that kind of project. It’s small, satisfying, and honestly, a bit addictive once you get the rhythm of those popcorn stitches down. I usually keep a little basket of cotton scraps next to my couch, and this pattern is my go-to for using up those odd ends of peach, yellow, and sage green.
One thing I’ve learned the hard way with this specific design: don’t skip the blocking! Because of the popcorn center and the way we transition from a circle to a square in Round 5, the edges might look a little wavy at first. A quick pin-and-steam session makes those corners sharp and professional. If you’re planning on making a full blanket, I’d suggest joining them as you go or using a mattress stitch for a seamless look. I love how the yellow center mimics a daisy or a sunflower depending on the shades you pick. It’s the perfect little project for a sunny afternoon when you want to feel productive without committing to a massive sweater.
There is something so satisfying about a project that blooms right in your hands. This square features a gorgeous, textured floral center that pops off the background, making it perfect for adding a bit of 3D flair to your next blanket or bag. You will love how the layers of petals come together using simple stitches to create such a sophisticated look.
Begin with your first color (yellow) to create the center of the blossom.
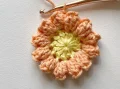
Start with a MR, ch 1, and work 12 dc into the center of the ring. Close the round by working a sl st into the top of the very first dc. Cut yarn and fasten off. (12 dc)
Switch to your second color (peach) to add the textured petals.
Attach the yarn to any dc from the previous round. Work a ch 1 and 1 popcorn st into that same st. Ch 2, then work [1 popcorn st in the next st, ch 2] 11 times. Join with a sl st to the top of the first popcorn st. Cut yarn and fasten off. (12 popcorn st, 12 ch-2 sp)
Use your third color (green) for this round.
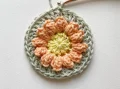
Attach the yarn with a standing dc into any ch-2 sp. Work 2 more dc into that same space. Sk the popcorn st. Repeat the sequence of [3 dc into the next ch-2 sp, sk the popcorn st] 11 times. Join with a sl st to the first dc and fasten off. (36 dc)
Return to your first color (yellow) to prep the circle for squaring.
Attach yarn with a standing sc into any gap between the 3-dc clusters. Work 1 sc into each of the next 3 stitches. Repeat the pattern of [1 sc into the gap between clusters, 1 sc into the next 3 stitches] 11 times. Join with a sl st to the first sc and fasten off. (48 sc)
Switch back to your third color (green) to transform the circle into a square shape.
Attach yarn with a standing tr into any sc that was worked into a gap between clusters. Work ch 2 and 2 more tr into that same st to form your first corner. Work 1 dc in each of the next 2 stitches, 1 hdc in the next 2 stitches, 1 sc in the next 3 stitches, 1 hdc in the next 2 stitches, and 1 dc in the next 2 stitches. Repeat the following sequence 3 times: [{2 tr, ch 2, 2 tr} in the next st to make a corner, 1 dc in the next 2 stitches, 1 hdc in the next 2 stitches, 1 sc in the next 3 stitches, 1 hdc in the next 2 stitches, 1 dc in the next 2 stitches]. To finish the first corner, work 1 tr into the very first corner space and join with a sl st to the first tr. Fasten off. (12 sc, 16 hdc, 16 dc, 16 tr, 4 ch-2 sp)
Finish the square with your second color (peach).
Attach yarn with a standing sc into any corner ch-2 sp. Work 1 sc, ch 2, and 2 more sc into that same corner space. Work 1 sc into every stitch across the side. Repeat the sequence of [{2 sc, ch 2, 2 sc} in the corner space, 1 sc in every stitch along the side] 3 times. Join with a sl st to the first sc. Fasten off and weave in all remaining tails. (76 sc, 4 ch-2 sp)
I really hope you enjoy making this square as much as I do! There is something so rewarding about finishing that final border and seeing the floral center perfectly framed. Once you have a stack of these ready, the possibilities are endless. Whether they become a new favorite bag or a cozy throw, your handmade touch makes them special. Happy crafting, and I can't wait to see the beautiful color combinations you choose for your project! 🧶 ✨
Absolutely! While cotton gives great stitch definition for the popcorn petals, a soft acrylic works wonderfully for blankets. Just keep in mind that acrylic may stretch more, so you might need to be extra careful during the blocking phase.
This usually happens if the stitch heights aren't distinct enough. Make sure your tr stitches in the corners are nice and tall, and your sc in the middle of the sides are tight. Blocking will also help significantly in defining those four corners.
To do a standing dc, start with a slip knot on your hook, yarn over, insert the hook into the space, and complete the dc as usual. It’s much cleaner than starting with a chain-3!
Yes, it's perfect for that! Each square is about 4 inches, so you can calculate how many you need based on your desired blanket size. It’s a great 'portable' project since you can work on individual squares anywhere.
