🧢 Beautiful ✨ Detailed πŸ’ Adorable

Fairytale Storybook Amigurumi Pattern

Fairytale Storybook Amigurumi Pattern
4.8β˜…Rating
5-7 HoursTime Needed
2.0KMade This
βœ‚οΈ

Advanced Level

Designed for experienced crocheters, these patterns involve intricate designs and complex techniques to challenge and inspire.

⏱️

Weekend Treat

Takes 5-7 hours, making it an enjoyable project to finish over a couple of days.

🐰

Whimsical Buddy

Playful characters full of personality, designed to spark imagination and become cherished playtime favorites.

About This Fairytale Storybook Amigurumi Pattern

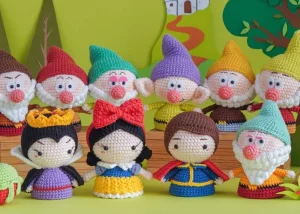
Fairytale Storybook Amigurumi Pattern crochet pattern - detailed view

These make the most wonderful handmade gifts for teachers, librarians, or any little one with a big imagination. They look just as sweet displayed on a nursery shelf as they do in the middle of a puppet show.

Why You'll Love This Fairytale Storybook Amigurumi Pattern

I honestly adore how this pattern uses a single 'Master' base for the heads and bodies. It means once you've got the rhythm down for one character, you can fly through the rest of the crew! The ability to swap between making a full doll or a quick finger puppet is such a genius touch for when you're short on time but still want to create something magical.

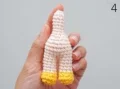
Fairytale Storybook Amigurumi Pattern step 1 Fairytale Storybook Amigurumi Pattern step 2 Fairytale Storybook Amigurumi Pattern step 3 Fairytale Storybook Amigurumi Pattern step 4

Switch Things Up

There is something so incredibly satisfying about seeing a whole set of characters come together on your craft table. I remember making my first set of these for a local preschool's story corner, and the look on the kids' faces was worth every single tiny stitch!

One thing I really want to share with you is the 'X-shape' versus 'V-shape' stitch debate mentioned in the notes. I personally swear by the 'yarn under' (X-shape) for these little guys. It creates a much denser, sturdier fabric which is exactly what you want when you're stuffing such small pieces or using them as puppets. It keeps the stuffing from peeking through and gives the dolls a really professional, clean finish.

If you're feeling adventurous, don't feel like you have to stick to the traditional Disney colors! I once saw a 'Gothic' version of this set with deep jewel tones and it was stunning. The beauty of this pattern is in the details, like the little bobble beards and the felt eye backings. They really bring the personality out of each dwarf. Just take your time with the assemblyβ€”pinning everything first is your best friend here!

Common Mistakes & How to Fix Them

βœ— If you are making the finger puppet version, don't forget to use a 1cm cylinder or the finished body as a support while stuffing the head, or it might end up too floppy to stay on a finger.βœ— Be very careful when inserting the safety eyes through the white felt ovals; if the holes in the felt are too large, the eyes won't sit flush and the 'sparkle' effect will be lost.βœ— When sewing the collar onto Snow White or the Prince, ensure you don't attach it too high up the neck, or the head won't be able to sit properly inside the body cavity.βœ— The bowtie for Snow White requires a very long yarn tail for wrapping the center; if you cut it too short, you'll have to join new yarn which can leave a bulky knot right in the middle of her bow.

Fairytale Storybook Amigurumi Pattern

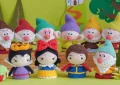
Step into a world of magic with this incredibly versatile collection that lets you bring the entire Snow White cast to life. You have the choice to create full-bodied standing dolls or adorable finger puppets perfect for interactive storytelling. You'll love the clever 'Master Pattern' approach that makes crafting each unique character a breeze while keeping your project bag organized.

Advanced 5-7 Hours

Materials Needed for Fairytale Storybook Amigurumi Pattern

β€” Main Fabric

  • 01
    Sport weight cotton blend yarn in bright yellow for the dresses and dwarf accents
  • 02
    Soft skin-tone cotton yarn for the faces, hands, and legs
  • 03
    Rich blue sport weight yarn for the royal bodices and clothing
  • 04
    Crisp white yarn for the collars and eye details
  • 05
    Light blue yarn for the delicate sleeve accents
  • 06
    Classic black yarn for the hair and the Queen's cape
  • 07
    Vibrant red yarn for the iconic bows, capes, and apple
  • 08
    Assorted earth tones like brown, orange, and turquoise for the seven dwarfs
  • 09
    Purple and lime green yarn for the Evil Queen and Dopey's unique outfits

β€” Tools Required

  • 01
    2.5mm crochet hook
  • 02
    6mm safety eyes (one pair per character)
  • 03
    Small scraps of white felt for the eye backings
  • 04
    Tapestry needle for assembly and embroidery
  • 05
    Fine brown embroidery thread for eyelashes and brows
  • 06
    Stitch markers and pins for positioning
  • 07
    Sharp scissors
  • 08
    High-quality polyester fiberfill stuffing

Progress Tracker

0% Complete

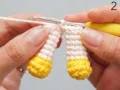
β€” 1. Master 1st Leg (Start with Yellow) :

Round 1 :

Start with ch 4, then beginning in the 2nd ch from your hook, work 2 x sc, 3 x sc into the final ch, 1 x sc along the other side, and finish with 1 x inc (8)

Round 2 :

1 x inc, 1 x sc, 3 x inc, 1 x sc, 2 x inc (14)

Round 3-4 :

14 x sc (14)

Round 5 :

2 x sc, 5 x dec, 2 x sc, then switch to your skin-tone yarn (9)

Round 6-11 :

9 x sc (9)

Round 12 :

2 x sc (2)

Info :

Cut your yarn and fasten off.

β€” 2. Master 2nd Leg (Start with Yellow) :

Round 1-11 :

Follow the same instructions as the first leg for Rounds 1 through 11.

Info :

Keep your yarn attached this time! We will join this leg to the first one to start the body.

β€” 3. Master Body (Skin Tone) :

Round 12 :

Connect to the first leg and work 9 x sc around it, then work 9 x sc around the second leg (18)

Round 13-15 :

18 x sc (18)

Round 16 :

[4 x sc, 1 x dec] repeat 3 times, then stuff the legs and lower body firmly (15)

Round 17 :

[3 x sc, 1 x dec] repeat 3 times (12)

Round 18 :

[2 x sc, 1 x dec] repeat 3 times (9)

Round 19-24 :

9 x sc (9)

Round 25 :

[1 x sc, 1 x dec] repeat 3 times (6)

Info :

Fasten off and weave the tail through the final 6 stitches to close.

β€” 4. Master Head (Skin Tone) :

Round 1 :

6 x sc into mr (6)

Round 2 :

6 x inc (12)

Round 3-11 :

12 x sc (12), then ch 1 and turn your work.

Round 12 :

Working in blo: [1 x sc, 1 x inc] repeat 6 times (18)

Round 13 :

[1 x sc, 1 x inc, 1 x sc] repeat 6 times (24)

Round 14 :

[3 x sc, 1 x inc] repeat 6 times (30)

Round 15 :

[2 x sc, 1 x inc, 2 x sc] repeat 6 times (36)

Round 16 :

[5 x sc, 1 x inc] repeat 6 times (42)

Round 17 :

[3 x sc, 1 x inc, 3 x sc] repeat 6 times (48)

Round 18-26 :

48 x sc (48)

Info :

If you are using safety eyes, place the 6mm eyes between rounds 19 and 20, leaving 8 stitches between them.

Round 27 :

[3 x sc, 1 x dec, 3 x sc] repeat 6 times (42)

Round 28 :

[5 x sc, 1 x dec] repeat 6 times (36)

Round 29 :

[2 x sc, 1 x dec, 2 x sc] repeat 6 times (30)

Round 30 :

[3 x sc, 1 x dec] repeat 6 times (24)

Round 31 :

[1 x sc, 1 x dec, 1 x sc] repeat 6 times (18)

Info :

Insert the body or a support cylinder now and stuff the head very firmly.

Round 32 :

[1 x sc, 1 x dec] repeat 6 times (12)

Round 33 :

6 x dec (6)

Info :

Fasten off and hide your yarn tail.

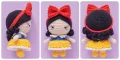
β€” 5. Snow White's Dress (Blue) :

Info :

Attach your blue yarn to the first flo stitch of Round 12 on the head.

Round 1 :

[3 x sc, 1 x inc] repeat 3 times (15)

Round 2 :

[1 x sc, 1 x inc, 1 x sc] repeat 5 times (20)

Round 3 :

[3 x sc, 1 x inc] repeat 5 times (25)

Round 4 :

[2 x sc, 1 x inc, 2 x sc] repeat 5 times (30)

Round 5 :

[5 x sc, 1 x inc] repeat 5 times (35)

Round 6 :

[3 x sc, 1 x inc, 3 x sc] repeat 5 times, then switch to White (40)

Round 7 :

Working in blo: 40 x sc (40)

Round 8-12 :

40 x sc (40)

Round 13 :

Working in flo: *ch 3, 1 x slst in the following st*, repeat from * to * until the end.

Dress Ruffle :

Attach Yellow yarn to the first flo stitch of Round 7. Round 1: *[1 x sc, ch 2, 1 x sc] in one stitch, skip 1 st*, repeat to end. Round 2: *[1 x sc, ch 2, 1 x sc] in the ch-2 space, skip 2 sts*, repeat to end.

β€” 6. Dwarf's Clothing (Color C) :

Round 1-6 :

Follow the same instructions as Snow White's Dress for Rounds 1 through 6.

Round 7-8 :

40 x sc, then switch to Black (40)

Round 9 :

18 x sc, switch to Yellow, 3 x sc, switch back to Black, 19 x sc, then switch back to your main color (40)

Round 10-12 :

40 x sc (40)

β€” 7. Long Beard (White) :

Row 1-3 :

Row 1: ch 30, start in 3rd ch, [1 x bobble, 1 x hdc] 14 times, ch 1, turn. Row 2: [5 x sc, 1 x dec] 4 times, ch 2, turn. Row 3: [1 x bobble, 1 x hdc] 12 times, ch 1, turn.

Row 4 :

ch 1, [4 x sc, 1 x dec] 4 times, ch 1, turn (20)

Row 5 :

5 x slst, ch 2, [1 x bobble, 1 x hdc] 5 times, ch 1, turn (10)

Row 6 :

1 x dec, 6 x sc, 1 x dec, ch 2, turn (8)

Row 7 :

[1 x bobble, 1 x hdc] 4 times, ch 1, turn (8)

Row 8 :

4 x dec, ch 2, turn (4)

Row 9 :

[1 x bobble, 1 x hdc] 2 times (4)

β€” 8. Dwarf's Hat (Color I) :

Round 1 :

6 x sc into mr (6)

Round 2-9 :

Increase by 3 stitches each round until you reach 30 stitches.

Round 10 :

15 x slst, 15 x sc (30)

Round 11 :

[9 x sc, 1 x inc] repeat 3 times (33)

Round 12 :

17 x slst, 16 x sc (33)

Round 13 :

[10 x sc, 1 x inc] repeat 3 times (36)

Round 14 :

19 x slst, 17 x sc (36)

Round 15-20 :

Continue increasing by 3 stitches every other round until you have 54 stitches.

Round 21-24 :

54 x sc (54)

Assembly Instructions

  • If you've opted for the doll version, slide the master body into the hollow neck of the master head and sew them securely together.
  • Position the white felt ovals on the face first, then push the safety eye posts through both the felt and the crochet fabric before snapping the washers on.
  • Sew the arms to the sides of the body at roughly Round 18, ensuring they are level with each other.
  • For the dwarfs, attach the nose directly in the center of the face, then sew the chosen beard (short or long) tucked just underneath it.
  • Wrap the finished hair pieces over the top of the head and use small, hidden stitches around the hairline to keep them in place.
  • Assemble the accessories like the Evil Queen's two-part cape or Snow White's bowtie and sew them onto the finished characters as the final touch.

Important Notes

  • πŸ’‘Stuffing is key! Use the back of your crochet hook to push fiberfill into the tiny corners of the legs and arms so they don't look deflated.
  • πŸ’‘When working the 'Master Head', the first 11 rounds create a tube that fits over your finger or the master body β€” don't skip these!
  • πŸ’‘The 'X-shape' stitch (yarn under) is highly recommended for this project to keep the fabric tight and the stitches aligned.
  • πŸ’‘Leave long yarn tails (at least 10 inches) on every piece you finish; you'll need them for sewing the parts together later.
  • πŸ’‘If the slip stitches on the hat are too tight for you to work into, feel free to crochet into the front loops only to make it easier.

I hope you have as much fun bringing these fairytale characters to life as I did! There’s nothing quite like the feeling of finishing that final dwarf and seeing the whole crew lined up. Whether they’re going to be cherished toys for a little one or a whimsical display on your bookshelf, they’re sure to bring a smile to anyone who sees them. Don't forget to take a moment to admire your hard workβ€”you've created a little bit of magic today! I can't wait to see your finished versions. Keep those hooks flying and your heart full of creativity! 🧢 ✨

You ask,

we answer.

FAQs

Can I make these into regular standing dolls instead of puppets?

Absolutely! Just follow the 'Master Body' and 'Master Leg' instructions. The head is designed with a hollow neck that fits perfectly over the body post for a sturdy doll.

What is the difference between the X-shape and V-shape stitch?

It comes down to how you grab the yarn. If you yarn UNDER the hook, you get a tighter X-shape. If you yarn OVER, it's a slightly larger V-shape. For these small dolls, the X-shape looks much cleaner.

The eyes in the photos look different than standard safety eyes. Why?

The pattern uses a small oval of white felt behind the 6mm safety eyes to give them that 'sparkly' expressive look. It's a tiny detail that makes a huge difference!

Can I use worsted weight yarn instead of sport weight?

You can, but your dolls will turn out significantly larger. You'll also need to size up your hook to a 3.5mm and use 8mm or 10mm safety eyes to keep the proportions correct.