About This Festive Snowman Amigurumi Pattern
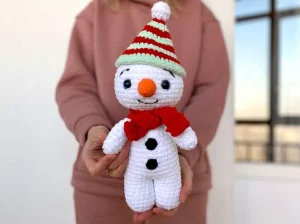
This snowman makes a genuinely thoughtful handmade gift — sweet enough for a child, charming enough to sit on an adult's holiday shelf or mantle all season long.
Ideal for those with basic crocheting experience, featuring slightly more advanced stitches and techniques to expand your skills.
Fits nicely into a free afternoon — 2 to 5 hours of focused, enjoyable crocheting.
Festive fun for the season, bringing handmade magic to celebrations and creating new family traditions.
This snowman makes a genuinely thoughtful handmade gift — sweet enough for a child, charming enough to sit on an adult's holiday shelf or mantle all season long.
I love this pattern because it's one of those rare ones where every single piece is satisfying to make on its own. The little nose especially — I've made it three times now just because I enjoy it so much. The color-switching on the striped hat feels way more impressive than it actually is, and there's something deeply cozy about crocheting a snowman in the middle of December with Christmas music on. This one always ends up being a repeat make for me.

I made this snowman for the first time in early December, right at that point in the season when I desperately needed a project that felt festive but wasn't going to take three weeks. Pulled out some white plush yarn I'd been saving, put on a Christmas playlist, and honestly had the head finished before I even knew what was happening — that's the magic of plush yarn worked in the round.
The thing I love most about this pattern is how many tiny decisions you get to make along the way. Striped hat or beret? Safety eyes or crocheted ones? It sounds small, but each version of this snowman ends up feeling genuinely different. My first one has the red and green striped hat and looks straight off a holiday card. My second one — made a week later for a friend's daughter — has the black beret and a chunkier scarf, and he looks positively distinguished.
One thing I'd tell anyone making this for the first time: don't rush the leg-joining step. Round 11 of the body is where both legs come together, and taking a slow extra minute to make sure they're lined up symmetrically saves you from a snowman who looks like he's mid-stumble. Also — stuff those legs before you start narrowing the body. I forgot on my first attempt and spent ten minutes trying to push fiberfill through a gap that was getting smaller by the round.
The nose is secretly my favorite part of this whole pattern. Nine rounds of orange cotton worked in a gentle cone — it's basically a tiny carrot and it's absolutely perfect. If you're making several of these, the nose alone is worth setting up as a little production run.
This little snowman is the kind of project that makes you want to curl up with a hot drink and just crochet the whole afternoon away. He's got that classic holiday charm — round belly, striped hat, tiny carrot nose — and he comes together faster than you'd expect. You get to choose between two hat styles and two scarf options, so he really feels like yours. Whether you're making him as a gift or keeping him on your own shelf, he's going to make people smile every single time they see him.
Use white plush yarn and the 4mm hook. Begin with a magic ring. All rounds are worked in a continuous spiral — no slip stitch to close, no starting chain.
Work 6 sc into the magic ring = 6 sts
Work 2 sc in every st around (inc in each st) = 12 sts
(sc in next st, inc in next st) repeat 6 times = 18 sts
(sc in next 2 sts, inc in next st) repeat 6 times = 24 sts
(sc in next 3 sts, inc in next st) repeat 6 times = 30 sts
(sc in next 4 sts, inc in next st) repeat 6 times = 36 sts
(sc in next 5 sts, inc in next st) repeat 6 times = 42 sts
(sc in next 6 sts, inc in next st) repeat 6 times = 48 sts
sc in every st around = 48 sts
sc in every st around = 48 sts
sc in every st around = 48 sts
If you're using 16mm safety eyes, attach them now — position them between Rounds 11 and 12 with 9 stitches between the two eyes.
sc in every st around = 48 sts
sc in every st around = 48 sts
sc in every st around = 48 sts
sc in every st around = 48 sts
(sc in next 6 sts, dec) repeat 6 times = 42 sts
(sc in next 5 sts, dec) repeat 6 times = 36 sts
(sc in next 4 sts, dec) repeat 6 times = 30 sts
(sc in next 3 sts, dec) repeat 6 times = 24 sts
(sc in next 2 sts, dec) repeat 6 times = 18 sts
Stuff the head firmly now before the opening gets too small to work with.
(sc in next st, dec) repeat 6 times = 12 sts
dec 6 times around = 6 sts
Fasten off and weave in the end.
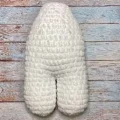
Use white plush yarn and the 4mm hook. Make a magic ring. You'll crochet both legs and then join them to form the body — do not cut the yarn after the second leg.
Work 6 sc into the magic ring = 6 sts
Work 2 sc in every st around = 12 sts
(sc in next st, inc in next st) repeat 6 times = 18 sts
sc in every st around = 18 sts
sc in every st around = 18 sts
sc in every st around = 18 sts
sc in every st around = 18 sts
sc in every st around = 18 sts
sc in every st around = 18 sts
sc in every st around = 18 sts
First leg: fasten off and leave a tail of about 10cm. Cut the yarn. Second leg: work Rounds 1–10 the same way but do NOT cut the yarn when finished.
Using the yarn still attached to the second leg, sc 18 sts around all the stitches of the first leg, then sc 18 sts around all the stitches of the second leg — this joins both legs into one piece = 36 sts
Take the yarn tail from the first leg and work 1 sl st through the inside between the two legs to close the gap that forms at the join.
sc in every st around = 36 sts
sc in every st around = 36 sts
sc in every st around = 36 sts
sc in every st around = 36 sts
sc in every st around = 36 sts
sc in every st around = 36 sts
sc in every st around = 36 sts
Stuff the legs now — it becomes very hard to get stuffing down into them later once the body narrows.
(sc in next 4 sts, dec) repeat 6 times = 30 sts
sc in every st around = 30 sts
(sc in next 3 sts, dec) repeat 6 times = 24 sts
sc in every st around = 24 sts
(sc in next 2 sts, dec) repeat 6 times = 18 sts
Stuff the body section firmly before continuing.
(sc in next st, dec) repeat 6 times = 12 sts
sc in every st around = 12 sts
Fasten off and leave a tail for sewing.
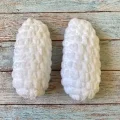
Use white plush yarn and the 4mm hook. Begin with a magic ring. Make two arms identically.
Work 6 sc into the magic ring = 6 sts
Work 2 sc in every st around = 12 sts
sc in every st around = 12 sts
sc in every st around = 12 sts
sc in every st around = 12 sts
sc in every st around = 12 sts
sc in every st around = 12 sts
sc in every st around = 12 sts
(sc in next 4 sts, dec) repeat 2 times = 10 sts
Lightly stuff the arm at this point — don't pack it in, just enough to give it a little shape.
(sc in next 3 sts, dec) repeat 2 times = 8 sts
(sc in next 2 sts, dec) repeat 2 times = 6 sts
Fold the arm flat so the two sides line up, then join them by working sc through both layers across (3 sc total). Fasten off, cut yarn, and weave in the end. Repeat all steps for the second arm.
Use black cotton yarn and the 3mm hook. Make a magic ring.
Work 6 sc into the magic ring = 6 sts
Work 2 sc in every st around = 12 sts
Fasten off and leave a long tail for sewing on. Make a second button the same way.
Use orange cotton yarn and the 3mm hook. Begin with a magic ring.
Work 6 sc into the magic ring = 6 sts
sc in every st around = 6 sts
(sc in next st, inc in next st) repeat 3 times = 9 sts
sc in every st around = 9 sts
(sc in next 2 sts, inc in next st) repeat 3 times = 12 sts
sc in every st around = 12 sts
(sc in next 3 sts, inc in next st) repeat 3 times = 15 sts
sc in every st around = 15 sts
(sc in next 4 sts, inc in next st) repeat 3 times = 18 sts
Fasten off and leave a long tail for sewing.
Use black yarn and the 3mm hook. Begin with a magic ring.
Work 6 sc into the magic ring = 6 sts
Work 2 sc in every st around = 12 sts
Join with sl st and fasten off. Leave a long tail for sewing. After attaching, add 1 or 2 small stitches in white yarn across the center to mimic a light reflection.
Use red plush yarn and the 4mm hook. Begin with a magic ring. Carry both colors up as you go — do not cut the inactive yarn when switching colors.
Work 6 sc into the magic ring in red = 6 sts
sc in every st around in red = 6 sts
Switch to green yarn. Keep the red yarn attached.
Work 2 sc in every st around in green = 12 sts
sc in every st around in green = 12 sts
Switch to red yarn. Keep the green yarn attached.
(sc in next st, inc in next st) repeat 6 times in red = 18 sts
sc in every st around in red = 18 sts
Switch to green yarn. Keep the red yarn attached.
(sc in next 2 sts, inc in next st) repeat 6 times in green = 24 sts
sc in every st around in green = 24 sts
Switch to red yarn. Keep the green yarn attached.
(sc in next 3 sts, inc in next st) repeat 6 times in red = 30 sts
sc in every st around in red = 30 sts
Switch to green yarn. Keep the red yarn attached.
(sc in next 4 sts, inc in next st) repeat 6 times in green = 36 sts
sc in every st around in green = 36 sts
Switch to red yarn. Keep the green yarn attached.
(sc in next 5 sts, inc in next st) repeat 6 times in red = 42 sts
sc in every st around in red = 42 sts
Switch to green yarn. You can now finish off the red yarn.
(sc in next 6 sts, inc in next st) repeat 6 times in green = 48 sts
sc in every st around in green = 48 sts
Fasten off, cut yarn, and weave in all ends.
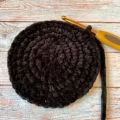
Use black plush yarn and the 4mm hook. Begin with a magic ring.
Work 6 sc into the magic ring = 6 sts
Work 2 sc in every st around = 12 sts
(sc in next st, inc in next st) repeat 6 times = 18 sts
(sc in next 2 sts, inc in next st) repeat 6 times = 24 sts
(sc in next 3 sts, inc in next st) repeat 6 times = 30 sts
(sc in next 4 sts, inc in next st) repeat 6 times = 36 sts
Working in BLO only: sc in every st around = 36 sts
sc in every st around = 36 sts
sc in every st around = 36 sts
Fasten off, cut yarn, and weave in all ends.
Use white plush yarn and the 4mm hook. Begin with a magic ring.
Work 6 sc into the magic ring = 6 sts
Work 2 sc in every st around = 12 sts
sc in every st around = 12 sts
dec 6 times around = 6 sts
Fasten off and leave a long tail. Lightly stuff the pompom if desired, then sew it firmly to the very top of the hat.
Use red plush yarn and the 4mm hook. The scarf is worked flat in rows — turn at the end of each row with ch 1 (not counted as a stitch). Start by chaining 5.
sc in the 2nd ch from the hook and in the next 3 ch, ch 1, turn = 4 sts
sc in next 4 sts, ch 1, turn = 4 sts
sc in next 4 sts, ch 1, turn = 4 sts
sc in next 4 sts, ch 1, turn = 4 sts
sc in next 4 sts, ch 1, turn = 4 sts
sc in next 4 sts, ch 1, turn = 4 sts
sc in next 4 sts, ch 1, turn = 4 sts
sc in next 4 sts, ch 1, turn = 4 sts
sc in next 4 sts, ch 1, turn = 4 sts
sc in next 4 sts, ch 1, turn = 4 sts
sc in next 4 sts, ch 1, turn = 4 sts
sc in next 4 sts, ch 1, turn = 4 sts
sc in next 4 sts, ch 1, turn = 4 sts
sc in next 4 sts, ch 1, turn = 4 sts
sc in next 4 sts, ch 1, turn = 4 sts
sc in next 4 sts, ch 1, turn = 4 sts
sc in next 4 sts, ch 1, turn = 4 sts
sc in next 4 sts, ch 1, turn = 4 sts
sc in next 4 sts, ch 1, turn = 4 sts
sc in next 4 sts, ch 1, turn = 4 sts
sc in next 4 sts, ch 1, turn = 4 sts
sc in next 4 sts, ch 1, turn = 4 sts
sc in next 4 sts, ch 1, turn = 4 sts
sc in next 4 sts, ch 1, turn = 4 sts
sc in next 4 sts, ch 1, turn = 4 sts
sc in next 4 sts, ch 1, turn = 4 sts
sc in next 4 sts, ch 1, turn = 4 sts
sc in next 4 sts, ch 1, turn = 4 sts
sc in next 4 sts, ch 1, turn = 4 sts
sc in next 4 sts, ch 1, turn = 4 sts
sc in next 4 sts, ch 1, turn = 4 sts
sc in next 4 sts, ch 1, turn = 4 sts
sc in next 4 sts, ch 1, turn = 4 sts
sc in next 4 sts, ch 1, turn = 4 sts
sc in next 4 sts, ch 1, turn = 4 sts
sc in next 4 sts, ch 1, turn = 4 sts
sc in next 4 sts, ch 1, turn = 4 sts
sc in next 4 sts, ch 1, turn = 4 sts
sc in next 4 sts, ch 1, turn = 4 sts
sc in next 4 sts = 4 sts (no turning chain)
Fasten off, cut yarn, and weave in both ends.
There's something so satisfying about this little guy coming together piece by piece — the moment you add that orange carrot nose and suddenly he has so much personality is genuinely one of my favorite things about this pattern. 🧶 He works up quickly, the construction is really clear, and you end up with something that looks genuinely impressive sitting on a shelf or wrapped up as a gift. Make him in classic red and green stripes, or go for the moody black beret — either way he's completely charming. Happy making! ✨
Absolutely — the pattern works with any bulky or chunky weight yarn. Just keep in mind the finished size will vary depending on the yarn and you'll likely get a denser, more defined stitch texture rather than that soft fluffy look. If you go down to a worsted weight, the snowman will come out smaller, around 20–22cm instead of 28cm.
Either works great. The crocheted eyes are fully explained in the pattern and look lovely — they're also the safer choice if this is going to a young child. If you do use safety eyes, make sure to insert them before Round 16 of the head because the opening gets too small after that point.
Completely normal. The legs are open at the top before Round 11 and will feel loose. The joining round is what brings them together and gives them structure. Just make sure both legs are oriented the same way (toes pointing forward) before you start that round.
The beret (Variant 2) is technically simpler since it's all one color and has no switching. The striped hat has more rounds and requires carrying two colors, but the switches happen at predictable intervals so it's very manageable once you get the rhythm. Neither is difficult — it's more a question of which look you prefer.
The main tricks are stuffing the body very firmly before sewing, and going around the seam twice with your needle rather than just once. Sewing through corresponding stitches at Round 20 of the head and Round 25 of the body gives you the most stable join.
