🧶 Beautiful ✨ Detailed 💝 Adorable

Forest Friends Stacking Donuts Amigurumi Pattern

Forest Friends Stacking Donuts Amigurumi Pattern
4.1★Rating
5-8 HoursTime Needed
2.6KMade This
✂️

Intermediate Level

Ideal for those with basic crocheting experience, featuring slightly more advanced stitches and techniques to expand your skills.

⏱️

Weekend Treat

Takes 5-7 hours, making it an enjoyable project to finish over a couple of days.

🐰

Whimsical Buddy

Playful characters full of personality, designed to spark imagination and become cherished playtime favorites.

About This Forest Friends Stacking Donuts Amigurumi Pattern

Forest Friends Stacking Donuts Amigurumi Pattern crochet pattern - detailed view

These stacking donuts make a genuinely special handmade gift — the kind someone keeps on their desk for years and smiles at every single day. Perfect for nature lovers, nursery decor, or anyone who appreciates tiny crocheted things done really well.

Why You'll Love This Forest Friends Stacking Donuts Amigurumi Pattern

I genuinely could not stop making these once I started. There's something about the donut construction that feels so different from regular amigurumi — you're working from a chain ring outward and then closing it up like a little parcel, and it's oddly addictive. I loved designing the faces most of all. Each creature has such a distinct personality even though the base shape is the same, and switching between the four characters kept things from ever feeling repetitive. Also — and I say this as someone who has made a LOT of amigurumi — the bear's two-tone inner ear detail is one of my favorite small techniques I've encountered in a pattern. Such a tiny thing, but it makes the ears look so real.

Forest Friends Stacking Donuts Amigurumi Pattern step 1 Forest Friends Stacking Donuts Amigurumi Pattern step 2 Forest Friends Stacking Donuts Amigurumi Pattern step 3 Forest Friends Stacking Donuts Amigurumi Pattern step 4

Switch Things Up

I'll be honest — when I first looked at this pattern I almost skipped it because I thought donut-shaped amigurumi were just a novelty thing. I was so wrong.

What I didn't expect was how satisfying the construction would be. Starting from a chain ring instead of a magic loop gives you this completely different rhythm, and once you get going on the spiral rows, the shape just... appears. The donut builds itself almost magically and then you fold it in half, sew it up, and suddenly there's a little creature in your hands. I made the Tree first because it's the biggest and I wanted to get a feel for the structure — and by the time I finished closing it up and adding the eyes, I was already winding yarn for the Bear.

If you want to switch things up with this pattern, try playing with unexpected color combinations. The original uses realistic woodland colors which are gorgeous, but imagine a Birdie in dusty rose and terracotta, or a Bear worked in soft lavender with a pale yellow inner ear. A pastel rainbow version of all four stacked together would be absolutely stunning as a nursery gift.

One tip I'd pass along from my own experience: do all four bodies first before you start on any of the accessories. It sounds counterintuitive but it actually helps you get really consistent at the donut construction technique, and then the little wings, ears, and leaves feel like a fun reward at the end rather than a chore. Also, lay all your safety eyes out before you start — having the right size ready to grab when you need to close each donut saves so much time and avoids that frantic rummaging through your craft supplies mid-project.

Common Mistakes & How to Fix Them

✗ When starting the donut foundation chain, it's easy to let it twist before you join — always lay the chain flat on a table and double-check it isn't spiraling before you begin Round 2.✗ The Birdie Beak is a magic loop with just 10 sc, so it's quite small — pulling the ring closed too loosely before sewing it on will leave a gap right at the center of the beak that looks messy from the front.✗ For the Bear Ears, stitches 6 and 7 in Round 3 (and stitches 6, 7, and 8 in Round 4) need to be worked in the inner ear contrast color — if you forget to switch and just sc all the way around, the ear loses its two-tone look entirely and you'll need to undo those rounds.✗ Safety eyes for each character are a different size — 7.5 mm for Birdie, 8 mm for Bunny, 9 mm for Bear, and 10.5 mm for Tree — and they're set between different rounds for each one, so double-check placement before closing the donut because you cannot reposition them once the piece is stuffed and sewn shut.✗ When sewing the donut closed, the pattern recommends stuffing as you go rather than all at once — skipping this and trying to stuff through a small remaining gap at the end usually results in an uneven, lumpy shape that doesn't sit flat.✗ The Bunny Tail is a handmade pom pom, not a crocheted piece — wrapping the yarn too few times around the cardboard (fewer than 12 wraps) results in a sparse, flat pom pom that looks nothing like a fluffy bunny tail, so take the time to wrap it fully.

Forest Friends Stacking Donuts Amigurumi Pattern

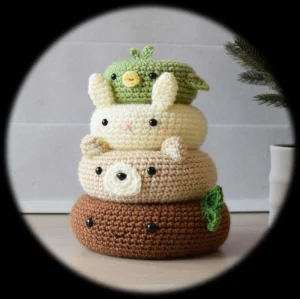
Picture four little forest creatures — a birdie, a bunny, a bear, and a tree — each worked in a sweet donut shape that stacks right on top of the other. This pattern gives you all four characters in one go, so you get to experience that satisfying mix of watching a tiny face come to life and then seeing the whole tower come together. Whether you're making these for a nursery shelf, a nature-loving friend, or just because they're genuinely irresistible, you're going to have so much fun with them. Each character has its own personality, its own little finishing details, and its own charm — and crocheting all four feels like telling a little woodland story, one round at a time.

Intermediate 5-8 Hours

Materials Needed for Forest Friends Stacking Donuts Amigurumi Pattern

— Main Fabric

  • 01
    Weight 4 worsted yarn in 'sweet pea' (green) for the Birdie body, plus a small amount in 'duckie' (yellow) for the Birdie beak
  • 02
    Weight 4 worsted yarn in 'lamb' (cream/off-white) for the Bunny body and Bear snout, plus a small amount in pink for the Bunny nose embroidery
  • 03
    Weight 4 worsted yarn in 'beige' (warm tan) for the Bear body
  • 04
    Weight 4 worsted yarn in 'chocolate' (dark brown) for the Tree body, plus 'kelly green' for the Tree leaves
  • 05
    A small amount of any matching yarn in your chosen colors for the Birdie wings, hair, and tail details

— Tools Required

  • 01
    4.25 mm crochet hook (recommended size for weight 4 yarn)
  • 02
    7.5 mm black safety eyes for Birdie
  • 03
    8 mm black safety eyes for Bunny
  • 04
    9 mm black safety eyes for Bear
  • 05
    12 mm safety nose for Bear
  • 06
    10.5 mm black safety eyes for Tree
  • 07
    Polyester fiberfill or polyfill stuffing
  • 08
    Tapestry needle for sewing pieces together and weaving in ends
  • 09
    Scissors
  • 10
    Stitch marker to track the last stitch of each round
  • 11
    A piece of sturdy cardboard or paper approximately 2 inches wide (for making the Bunny pom pom tail)

Progress Tracker

0% Complete

— 1. Birdie Body :

Info :

Use 'sweet pea' green yarn throughout the Birdie Body. Safety eyes (7.5 mm) are placed between R8 and R9. Fasten off at the end of each piece and leave a yarn tail long enough for sewing.

Round 1 :

ch 20. This forms the foundation ring of the donut — make sure it isn't twisted.

Round 2 :

sc 20. (20 st)

Round 3 :

* sc 1, inc 1 * — work this repeat 10 times total. (30 st)

Round 4 :

sc 30. (30 st)

Round 5 :

* sc 2, inc 1 * — work this repeat 10 times total. (40 st)

Round 6-15 :

sc 40. Work even with no shaping for these 10 rounds. (40 st)

Round 16 :

* sc 2, dec 1 * — work this repeat 10 times total. (30 st)

Round 17 :

sc 30. (30 st)

Round 18 :

* sc 1, dec 1 * — work this repeat 10 times total. (20 st)

Round 19 :

sc 20. Fasten off and leave a tail for sewing. (20 st)

— 2. Birdie Beak :

Info :

Use 'duckie' yellow yarn for the beak. This is a tiny circular piece.

Round 1 :

Start with a magic loop and work 10 sc into it. Pull the loop closed. Fasten off and leave a tail for sewing. (10 st)

— 3. Birdie Wings (make two) :

Info :

Use 'sweet pea' green yarn. Make two identical wings.

Round 1 :

ch 5.

Round 2 :

Starting at the 2nd chain from the hook, work along the first side: sc, dc, dc, sc.

Round 3 :

Continue along the other side of the foundation chain: sc, dc, dc, sc. Fasten off and leave a tail for sewing.

— 4. Birdie Hair :

Info :

Use 'sweet pea' green yarn. The hair is made of two separate little chain pieces.

Piece 1 :

ch 4, then starting at the 2nd chain from the hook: slst 3. Fasten off and leave a tail.

Piece 2 :

ch 3, then starting at the 2nd chain from the hook: slst 3. Fasten off and leave a tail.

— 5. Birdie Tail :

Info :

Use 'sweet pea' green yarn. The tail is made of three separate chain pieces.

Piece 1 :

ch 5, then starting at the 2nd loop from the hook: slst 4. Fasten off and leave a tail.

Piece 2 :

ch 5, then starting at the 2nd loop from the hook: slst 5. Fasten off and leave a tail.

Piece 3 :

ch 5, then starting at the 2nd loop from the hook: slst 5. Fasten off and leave a tail.

— 6. Bunny Body :

Info :

Use 'lamb' cream yarn for the Bunny Body. Safety eyes (8 mm) are placed between R10 and R11. Embroider the nose in pink before closing the donut. Fasten off at the end and leave a tail for sewing.

Round 1 :

ch 30. Keep the chain flat and untwisted.

Round 2 :

sc 30. (30 st)

Round 3 :

* sc 2, inc 1 * — work this repeat 10 times. (40 st)

Round 4 :

sc 40. (40 st)

Round 5 :

* sc 3, inc 1 * — work this repeat 10 times. (50 st)

Round 6-17 :

sc 50. Work even with no shaping for these 12 rounds. (50 st)

Round 18 :

* sc 3, dec 1 * — work this repeat 10 times. (40 st)

Round 19 :

sc 40. (40 st)

Round 20 :

* sc 2, dec 1 * — work this repeat 10 times. (30 st)

Round 21 :

sc 30. Fasten off and leave a tail for sewing. (30 st)

— 7. Bunny Ears (make two) :

Info :

Use 'lamb' cream yarn. Make two identical ears.

Round 1 :

Start with a magic loop and work 5 sc into it. Pull the loop closed. (5 st)

Round 2 :

sc 5. (5 st)

Round 3 :

inc in every stitch — 5 inc total. (10 st)

Round 4 :

sc 10. (10 st)

Round 5 :

* sc 3, dec 1 * — work this repeat 2 times. (8 st)

Round 6 :

sc 8. (8 st)

Round 7 :

* sc 2, dec 1 * — work this repeat 2 times. Fasten off and leave a tail for sewing. (6 st)

— 8. Bunny Tail (Pom Pom) :

Info :

Use 'lamb' cream yarn (or white if preferred). This tail is a hand-wound pom pom, not a crocheted piece.

Step 1 :

Wind your yarn around a piece of firm cardboard that measures about 2 inches wide, going around approximately 12 times.

Step 2 :

Carefully slide the wound yarn off the cardboard, keeping the loops together, then tie a separate piece of yarn tightly around the very center.

Step 3 :

Pull the center tie as tight as you can and secure it with several extra knots so it won't loosen.

Step 4 :

Cut through every loop on both sides.

Step 5 :

The pom pom will look scraggly at this stage — that's completely normal.

Step 6 :

Trim all around the pom pom, snipping any uneven ends until you have a nice, round fluffy ball.

Step 7 :

Leave the tails from the center tie long — you'll use these to sew the pom pom onto the bunny's back end.

— 9. Bear Body :

Info :

Use 'beige' yarn for the Bear Body. Safety eyes (9 mm) are placed between R10 and R11. The 12 mm safety nose goes one row below the eyes. Fasten off at the end and leave a tail for sewing.

Round 1 :

ch 40. Keep the chain flat and untwisted.

Round 2 :

sc 40. (40 st)

Round 3 :

* sc 3, inc 1 * — work this repeat 10 times. (50 st)

Round 4 :

sc 50. (50 st)

Round 5 :

* sc 4, inc 1 * — work this repeat 10 times. (60 st)

Round 6-19 :

sc 60. Work even with no shaping for these 14 rounds. (60 st)

Round 20 :

* sc 4, dec 1 * — work this repeat 10 times. (50 st)

Round 21 :

sc 50. (50 st)

Round 22 :

* sc 3, dec 1 * — work this repeat 10 times. (40 st)

Round 23 :

sc 40. Fasten off and leave a tail for sewing. (40 st)

— 10. Bear Ears (make two) :

Info :

Use 'beige' yarn as the main color. You'll also need a small amount of 'lamb' (or a lighter contrast color) for the inner ear detail in R3 and R4. Make two identical ears.

Round 1 :

Start with a magic loop and work 5 sc into it. Pull the loop closed. (5 st)

Round 2 :

inc in every stitch — 5 inc total. (10 st)

Round 3 :

sc 10, but work stitches 6 and 7 in your inner ear contrast color. (10 st)

Round 4 :

sc 10, but work stitches 6, 7, and 8 in the inner ear contrast color. Fasten off and leave a tail for sewing. (10 st)

— 11. Bear Snout :

Info :

Use 'lamb' cream yarn for the snout. This is a small oval piece.

Round 1 :

Start with a magic loop and work 6 sc into it. Pull the loop closed. (6 st)

Round 2 :

inc in every stitch — 6 inc total. (12 st)

Round 3 :

sc, sc, work 3 sc into the next stitch, sc, sc, sc, sc, work 3 sc into the next stitch, sc, slst. Fasten off and leave a tail for sewing.

— 12. Bear Tail :

Info :

Use 'lamb' cream yarn or a color that contrasts slightly with the beige body.

Round 1 :

Start with a magic loop and work 5 sc into it. Pull the loop closed. (5 st)

Round 2 :

inc in every stitch — 5 inc total. (10 st)

Round 3 :

sc 10. (10 st)

Round 4 :

* sc 3, dec 1 * — work this repeat 2 times. Fasten off and leave a tail for sewing. (8 st)

— 13. Tree Body :

Info :

Use 'chocolate' dark brown yarn for the Tree Body. Safety eyes (10.5 mm) are placed between R12 and R13. Fasten off at the end and leave a tail for sewing.

Round 1 :

ch 50. Keep the chain flat and untwisted — this is the largest foundation ring in the set.

Round 2 :

sc 50. (50 st)

Round 3 :

* sc 4, inc 1 * — work this repeat 10 times. (60 st)

Round 4 :

sc 60. (60 st)

Round 5 :

* sc 5, inc 1 * — work this repeat 10 times. (70 st)

Round 6-21 :

sc 70. Work even with no shaping for these 16 rounds. (70 st)

Round 22 :

* sc 5, dec 1 * — work this repeat 10 times. (60 st)

Round 23 :

sc 60. (60 st)

Round 24 :

* sc 4, dec 1 * — work this repeat 10 times. (50 st)

Round 25 :

sc 50. Fasten off and leave a tail for sewing. (50 st)

— 14. Tree Leaves (make two) :

Info :

Use 'kelly green' yarn. Make two identical leaf shapes.

Round 1 :

ch 6.

Round 2 :

Work along the first side of the chain, starting at the 2nd loop from the hook: slst, sc, dc, dc, sc.

Round 3 :

Continue along the other side of the foundation chain: sc, dc, dc, sc, sc, slst. Fasten off and leave a tail for sewing.

Assembly Instructions

  • For each character, once the body donut is complete, fold the piece so the top and bottom circles line up with each other. Use your tapestry needle and a length of matching yarn to begin sewing the edges together, working one stitch from the bottom ring and one stitch from the top ring alternately.
  • After sewing roughly 10% of the way around, begin adding fiberfill stuffing through the remaining gap. Continue sewing and stuffing at the same time as you work around the donut — don't wait until the end to stuff or you won't be able to fill it evenly.
  • Before closing the last few stitches of each donut, attach the safety eyes at the correct placement for each character (Birdie: between R8 and R9; Bunny: between R10 and R11; Bear: between R10 and R11 for eyes and one row below for the 12 mm nose; Tree: between R12 and R13). Once the eyes are secured inside, finish sewing the donut completely shut.
  • Sew the Birdie's yellow beak (the small magic loop circle) to the front of the Birdie body, centered below the eyes. Then sew the two green wings to either side of the body. Attach the hair pieces and the three tail pieces to the top and back of the Birdie respectively.
  • For the Bunny, sew the two ears to the top of the body, spacing them evenly. Stitch the pom pom tail to the back side of the Bunny donut using the long center tie tails. Embroider the small pink nose with a few stitches between the eyes.
  • For the Bear, center the cream snout on the front of the Bear donut below the eyes and nose hardware, and sew it in place all the way around. Attach both ears to the top of the donut, then sew the small cream tail to the back.
  • For the Tree, sew both green leaves to one side of the Tree donut — positioning them slightly off-center gives the most natural look. Once all four characters are complete, stack them Tree at the base, then Bear, then Bunny, then Birdie on top.

Important Notes

  • 💡All four donuts begin with a foundation chain rather than a magic ring — make absolutely sure this chain is not twisted before you sc along it in Round 2, because a twist at this stage cannot be undone once you're several rounds in.
  • 💡The pattern recommends skipping a stitch rather than working a standard sc2tog decrease — this gives a much cleaner, less visible decrease line on the finished donut, so it's worth doing even if you're used to the sc2tog method.
  • 💡Each character uses a different safety eye size (7.5 mm, 8 mm, 9 mm, and 10.5 mm) — sort them out before you start crocheting so you're not hunting through your supplies mid-project when you need to close the donut.
  • 💡Work in a continuous spiral throughout — do not join or turn at the end of each round. Use a stitch marker in the last stitch of every round so you always know where one round ends and the next begins.
  • 💡The Bear's inner ear color detail is easy to forget — switch to your contrast color for just stitches 6 and 7 in Round 3, and stitches 6, 7, and 8 in Round 4, then switch back. It only takes a few seconds but makes a big difference in the finished look.
  • 💡Leave generous yarn tails (at least 15–20 cm) when fastening off each piece — the donuts have a lot of surface area to sew through and you don't want to run out of tail halfway through attaching an ear or a wing.
  • 💡When making the Bunny pom pom tail, wrapping the yarn around the cardboard at least 12 times is the minimum for a full, round result — fewer wraps will look thin and flat against the body.

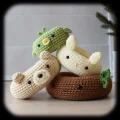
There's something really special about a project that gives you four finished characters for the price of one sitting-down session. These little forest friends are the kind of thing you'll find yourself making again in different color combinations — maybe a winter version in soft grays and blues, or a pastel spring set. However you make them, the moment you stack all four together and see that little tower sitting on your shelf... it's pretty hard not to grin. 🧶 Happy crocheting, and I hope your forest friends bring as much joy to whoever receives them as they will to you making them! ✨

You ask,

we answer.

FAQs

Do I need to use Vanna's Choice yarn specifically or can I substitute?

Any weight 4 worsted yarn will work fine — the Vanna's Choice recommendation is just for achieving the specific finished sizes listed in the pattern. If you use a different brand at the same weight with the same 4.25 mm hook, your donuts should come out very close to the same dimensions. Going up to a bulky weight will make them noticeably larger.

The pattern says to 'skip a stitch' for decreases rather than sc2tog — does that really work?

It does, and it actually looks neater on the finished donut surface than a standard sc2tog. Just insert your hook into the stitch after the one you're skipping and work a sc as normal. The skipped stitch disappears behind the fabric and the decrease is nearly invisible.

How do I keep the safety eyes from falling into the donut hole when I close the piece?

The safety eyes are attached before you fully close the donut, while there's still a gap. Push the post through from the outside, reach inside the donut with your fingers, and press the washer firmly onto the post until it clicks. The donut structure is thick enough that properly seated eyes won't shift.

Can I make just one or two of the characters instead of all four?

Absolutely — each character's instructions are completely self-contained, so you can make only the Bunny, only the Bear, or any combination. They also look great displayed on their own as individual decorative pieces rather than always stacked.

The pom pom tail instructions say to wrap around 2-inch cardboard — what if I don't have any?

You can use the spine of a small book, a folded piece of thick paper, or even two fingers held together — the key is keeping the yarn loops roughly the same diameter. Aim for a finished pom pom that's about 1 inch across so it looks proportional against the Bunny body.

My donut looks uneven after I stuff it — how do I fix it?

This usually happens when stuffing is added all at once through a small gap right at the end. The fix is to stuff gradually as you sew, adding small pinches of fiberfill and distributing them evenly before closing further. If it's already closed and lumpy, carefully open a few stitches, redistribute the stuffing with a pencil or chopstick, then re-sew.