🧶 Beautiful ✨ Detailed 💝 Adorable

Garden Garland Crochet Flower Pattern

Garden Garland Crochet Flower Pattern
4.0★Rating
3-5 HoursTime Needed
1.5KMade This
✂️

Intermediate Level

Ideal for those with basic crocheting experience, featuring slightly more advanced stitches and techniques to expand your skills.

⏱️

Quick Craft

Fits nicely into a free afternoon — 2 to 5 hours of focused, enjoyable crocheting.

🌸

Spring Bloom

Light and fresh designs for warmer days, capturing the renewal and brightness of the season.

About This Garden Garland Crochet Flower Pattern

Garden Garland Crochet Flower Pattern crochet pattern - detailed view

This garland makes a genuinely thoughtful handmade gift — sweet enough for a baby shower, charming enough for a wedding, and personal enough that someone will actually treasure it for years.

Why You'll Love This Garden Garland Crochet Flower Pattern

I love this one because it scratches every creative itch at once — I got to raid my yarn scraps, try nine different flower constructions in a single sitting, and finish with something that actually looks like it belongs in a shop. There's something so freeing about a project where every piece is tiny and there's no pressure to be perfect. Each flower is its own little experiment.

Garden Garland Crochet Flower Pattern step 1 Garden Garland Crochet Flower Pattern step 2 Garden Garland Crochet Flower Pattern step 3 Garden Garland Crochet Flower Pattern step 4

Switch Things Up

I picked up this garland pattern on a rainy afternoon when I had about six half-used balls of DK yarn sitting in a basket doing absolutely nothing. That's genuinely the best situation to be in with a project like this — because the whole point is to be scrappy and colorful and a little bit unpredictable with your palette.

What I didn't expect was how genuinely different each of the nine flower types feels to make. Flower 7 is so fast it almost feels like cheating — two rounds and you're done, and it's this sweet little petal-loop thing that looks delicate but takes maybe three minutes. Flower 5, on the other hand, has a whole separate centre piece that you sew on afterward, and I found myself really enjoying that extra step. It feels more like making a real flower when there's a distinct centre and body.

My biggest tip: before you start, pull out every small ball and scrap of DK you own and lay the colors out together. Some combinations you'd never think to try on purpose — I ended up pairing Dark Aubergine with Sky Blue because they were the only two scraps left that evening, and it turned out to be my favorite flower on the whole garland.

Color A always forms the tight little centre, so lean into contrast there. A pale Champagne White centre against a deep Tomato Red petal layer is classic and striking. A Buttercup Yellow centre against Slate Green reads more botanical and cool. The pattern lists suggested colorways but honestly, trust your eye.

I made mine as a gift for a friend who just had a baby, and I used nothing but pinks, soft mauves, and creamy whites. Hanging above the crib, it looked like something from a children's book illustration. Completely worth the afternoon.

Common Mistakes & How to Fix Them

✗ When working Flower 1's Round 2, it's tempting to pull the dtr clusters too tight — keep your tension relaxed so the petals fan out properly and don't bunch up at the base.✗ For Flower 4, the Round 3 chains are worked in front of the Round 2 petals, and it's easy to accidentally catch the wrong strand — make sure you're passing your hook in front of the petal layer before inserting into the dc below.✗ Flower 5's Round 6 creates the petal framework with long 8-ch loops, and miscounting the skipped stitches here will throw off the petal count in Round 7 — double-check that you're skipping exactly 3 sts each time.✗ Flower 6 uses three separate yarn colors across four rounds, and joining color C at the wrong chain space in Round 3 is a common slip — always slip stitch into the ch sp before starting your dc, not into the tr below.✗ When assembling the Flower 5 centre, sewing it slightly off-centre is very noticeable on this design because the centre piece is small and bold — pin it first and check from the front before stitching it down.✗ Threading the finished flowers onto the string without planning the order first often leads to a garland that feels visually unbalanced — lay all your flowers out on a flat surface and arrange them by size and color before you thread a single one.

Garden Garland Crochet Flower Pattern

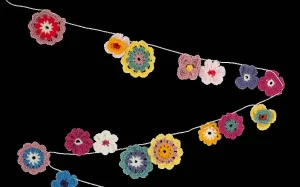
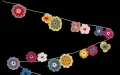
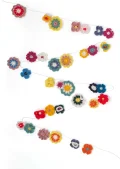
Picture a string of cheerful little blooms hanging across a mantelpiece, a nursery wall, or strung above a party table — that's exactly what you're about to make. This garland is made up of nine distinct flower designs, each worked in small amounts of DK yarn, so it's genuinely the perfect stash-buster project. You get to play with color combinations, mix and match flower types, and end up with something that looks like a proper handmade heirloom. Every single flower comes together fast, which means you'll feel that satisfying "just one more" pull all the way through.

Intermediate 3-5 Hours

Materials Needed for Garden Garland Crochet Flower Pattern

— Main Fabric

  • 01
    Small quantities of DK weight yarn in color A for Flowers 1, 2, 3, 5, 7, and 9 — choose from Champagne White, Raspberry Pink, Sailor Blue, Daffodil Yellow, Tomato Red, Buttercup Yellow, Tea Rose, Ballet Pink, Slate Green, Dark Aubergine, or Blood Orange
  • 02
    Small quantities of DK weight yarn in color B for Flowers 1, 2, 3, 5, 7, and 9 — choose from Champagne White, Raspberry Pink, Daffodil Yellow, Tomato Red, Buttercup Yellow, Tea Rose, Ballet Pink, Slate Green, Rich Mauve, Dark Aubergine, Sky Blue, Kingfisher Blue, Blood Orange, or Racing Green
  • 03
    Small quantities of DK weight yarn in color A for Flowers 4, 6, and 8 — choose from Champagne White, Raspberry Pink, Sailor Blue, Daffodil Yellow, Tomato Red, Buttercup Yellow, Tea Rose, Slate Green, Dark Aubergine, or Blood Orange
  • 04
    Small quantities of DK weight yarn in color B for Flowers 4, 6, and 8 — choose from Raspberry Pink, Daffodil Yellow, Tomato Red, Buttercup Yellow, Tea Rose, Ballet Pink, Slate Green, Rich Mauve, Dark Aubergine, Sky Blue, Kingfisher Blue, or Blood Orange
  • 05
    Small quantities of DK weight yarn in color C for Flowers 4, 6, and 8 — choose from Daffodil Yellow, Ballet Pink, Buttercup Yellow, Tea Rose, or Slate Green

— Tools Required

  • 01
    3.5mm crochet hook (UK size 9, US size E4)
  • 02
    A length of string or thin cord, approximately 450 cm (177 in) for threading the finished garland
  • 03
    Scissors for cutting yarn
  • 04
    A yarn needle for weaving in ends and sewing the Flower 5 centre piece in place

Progress Tracker

0% Complete

— 1. Flower 1 (Make 4) :

Info :

Using a 3.5mm hook and color A, ch 4 and join with ss to form a ring. Choose your color combination from the colourways listed — each flower uses colors A and B only.

Round 1 :

Using A: 1 ch (does NOT count as a st), work 10 dc into the ring, ss to the first dc. (10 sts)

Colour Change :

Cut yarn A and join color B.

Round 2 :

Using B: 4 ch, work (4 dtr, 4 ch, 1 ss) into the st at the base of the first 4 ch, *ss into the next dc, 4 ch, work (4 dtr, 4 ch, 1 ss) into that same dc; rep from * 8 more times. Fasten off. (10 petals)

— 2. Flower 2 (Make 4) :

Info :

Using a 3.5mm hook and color A, ch 4 and join with ss to form a ring. This flower uses colors A and B.

Round 1 :

Using A: 1 ch (does NOT count as a st), work 6 dc into the ring, ss to the first dc. (6 sts)

Colour Change :

Cut yarn A and join color B.

Round 2 :

Using B: work (4 ch, 4 dtr, 4 ch, 1 ss) into the st at the base of the first 4 ch, *(1 ss, 4 ch, 4 dtr, 4 ch, 1 ss) into the next dc; rep from * 4 more times. Fasten off. (6 petals)

— 3. Flower 3 (Make 5) :

Info :

Using a 3.5mm hook and color A, ch 4 and join with ss to form a ring. This flower uses colors A and B.

Round 1 :

Using A: 1 ch (does NOT count as a st), work 8 dc into the ring, ss to the first dc. (8 sts)

Colour Change :

Cut yarn A and join color B.

Round 2 :

Using B: 4 ch, work 2 dtr into the st at the base of the 4 ch, then work (2 dtr, 4 ch, 1 ss) into the next dc, *(1 ss, 4 ch, 2 dtr) into the following dc, (2 dtr, 4 ch, 1 ss) into the next dc; rep from * twice more. Fasten off. (4 petals)

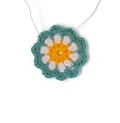
— 4. Flower 4 (Make 4) :

Info :

Using a 3.5mm hook and color A, ch 4 and join with ss to form a ring. This flower uses colors A, B, and C — it has 4 rounds and two petal layers.

Round 1 :

Using A: 1 ch (does NOT count as a st), work 8 dc into the ring, ss to the first dc. (8 sts)

Colour Change :

Cut yarn A and join color B.

Round 2 :

Using B: 4 ch, work 2 dtr into the st at the base of the 4 ch, (2 dtr, 4 ch, 1 ss) into the next dc, *(1 ss, 4 ch, 2 dtr) into the following dc, (2 dtr, 4 ch, 1 ss) into the next dc; rep from * twice more, then ss into the first dc of Round 1. (4 petals)

Colour Change :

Cut yarn B and join color C.

Round 3 :

Using C, work in front of the Round 2 petals: (4 ch, ss into the dc at the base of the next 2 petals) 3 times, then 4 ch, ss into the ss at the end of Round 2. (4 ch loops created)

Round 4 :

1 ch (does NOT count as a st), work (1 dc, 3 htr) into each 4-ch loop from Round 3, ss to the first dc. Fasten off.

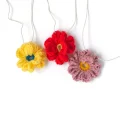
— 5. Flower 5 — Main Flower (Make 2) :

Info :

Using a 3.5mm hook and color A, ch 2. This flower is worked in two separate pieces — the main flower body and a small centre — which are then sewn together.

Round 1 :

Using A: work 8 dc into the 2nd ch from the hook, ss to the first dc. (8 sts)

Round 2 :

1 ch (does NOT count as a st), 2 dc into the st at the base of the 1 ch, (2 dc into the next dc) 7 times, ss to the first dc. (16 sts)

Round 3 :

1 ch (does NOT count as a st), 1 dc into the st at the base of the 1 ch, 1 dc into each of the next 15 dc, ss to the first dc. (16 sts)

Round 4 :

As Round 3. (16 sts)

Round 5 :

As Round 3. (16 sts)

Round 6 :

8 ch, skip the st at the base of the 8 ch and the next 3 sts, ss into the following st, (8 ch, skip 3 sts, ss into the next st) twice, 8 ch, skip 3 sts, ss into the st at the base of the first 8 ch of this round. (4 long ch loops)

Round 7 :

Work (1 dc, 2 htr, 1 tr, 1 dtr, 1 tr, 2 htr, 1 dc) into each 8-ch loop, ss to the first dc. Fasten off. (4 petals)

— 6. Flower 5 — Flower Centre (Make 2) :

Info :

Using a 3.5mm hook and color B, ch 2.

Round 1 :

Using B: work 5 dc into the 2nd ch from the hook, ss to the first dc. (5 sts)

Round 2 :

1 ch (does NOT count as a st), 3 dc into the st at the base of the 1 ch, (3 dc into the next dc) 4 times, ss to the first dc. Fasten off.

Info :

Stitch the completed centre piece firmly to the inside of the main Flower 5 body.

— 7. Flower 6 (Make 4) :

Info :

Using a 3.5mm hook and color A, ch 5 and join with ss to form a ring. This flower uses colors A, B, and C across 4 rounds.

Round 1 :

Using A: 3 ch (counts as 1 htr and 1 ch), (1 htr into ring, 1 ch) 9 times, ss into the 2nd of the 3 ch at the beg of round. (10 htr, 10 ch sps)

Colour Change :

Cut yarn A and join color B.

Round 2 :

Using B: ss into the next ch sp, 3 ch (counts as 1 tr), 1 tr into the same ch sp, (1 ch, 2 tr into the next ch sp) 9 times, 1 ch, ss to the top of the 3 ch at the beg of round. (20 tr, 10 ch sps)

Colour Change :

Cut yarn B and join color C.

Round 3 :

Using C: ss into the next ch sp, 1 ch (does NOT count as a st), 1 dc into the same ch sp, (5 ch, 1 dc into the next ch sp) 9 times, 5 ch, ss to the first dc. (10 ch loops)

Round 4 :

Using C: ss into the next 5-ch loop, work (1 dc, 1 htr, 1 tr, 1 htr, 1 dc) into each 5-ch loop around, ss to the first dc. Fasten off. (10 petals)

— 8. Flower 7 (Make 3) :

Info :

Using a 3.5mm hook and color A, ch 5 and join with ss to form a ring. This flower uses colors A and B only and is the smallest in the garland.

Round 1 :

Using A: 3 ch (counts as 1 htr and 1 ch), (1 htr into ring, 1 ch) 9 times, ss into the 2nd of the 3 ch at the beg of round. (10 htr, 10 ch sps)

Colour Change :

Cut yarn A and join color B.

Round 2 :

Using B: ss into the next ch sp, 1 ch (does NOT count as a st), 1 dc into the same ch sp, (5 ch, 1 dc into the next ch sp) 9 times, 5 ch, ss to the first dc. Fasten off. (10 petal loops)

— 9. Flower 8 (Make 4) :

Info :

Using a 3.5mm hook and color A, ch 5 and join with ss to form a ring. This flower uses colors A, B, and C and is the largest in the garland at approximately 6.5 cm.

Round 1 :

Using A: 3 ch (counts as 1 htr and 1 ch), (1 htr into ring, 1 ch) 9 times, ss into the 2nd of the 3 ch at the beg of round. (10 htr, 10 ch sps)

Colour Change :

Cut yarn A and join color B.

Round 2 :

Using B: ss into the next ch sp, 3 ch (counts as 1 tr), 1 tr into the same ch sp, (1 ch, 2 tr into the next ch sp) 9 times, 1 ch, ss to the top of the 3 ch at the beg of round. (20 tr, 10 ch sps)

Colour Change :

Cut yarn B and join color C.

Round 3 :

Using C: ss into the next ch sp, 1 ch (does NOT count as a st), work (1 dc, 1 htr, 1 tr, 1 htr, 1 dc) into the same ch sp, *(1 dc, 1 htr, 1 tr, 1 htr, 1 dc) into the next ch sp; rep from * 8 more times, ss to the first dc. Fasten off. (10 petals)

— 10. Flower 9 (Make 3) :

Info :

Using a 3.5mm hook and color A, ch 5 and join with ss to form a ring. This flower uses colors A and B and is worked in 2 rounds.

Round 1 :

Using A: 4 ch (counts as 1 tr and 1 ch), (1 tr into ring, 1 ch) 9 times, ss into the 3rd of the 4 ch at the beg of round. (10 tr, 10 ch sps)

Colour Change :

Cut yarn A and join color B.

Round 2 :

Using B: ss into the next ch sp, 1 ch (does NOT count as a st), work (1 dc, 1 htr, 1 tr, 1 htr, 1 dc) into the same ch sp, *(1 dc, 1 htr, 1 tr, 1 htr, 1 dc) into the next ch sp; rep from * 8 more times, ss to the first dc. Fasten off. (10 petals)

Assembly Instructions

  • Complete all 30 flowers before starting assembly: 4 each of Flowers 1, 2, 4, 6, and 8; 5 of Flower 3; 2 each of Flowers 5 and 9; and 3 each of Flowers 7.
  • Weave in all yarn ends securely on every flower — loose tails will be nearly impossible to deal with once the flowers are threaded on the string.
  • For Flower 5, sew the small centre piece to the middle of the main flower body before doing anything else, checking from the front to confirm it sits centred over the gap.
  • Lay all 30 flowers out flat on a table and arrange them in your preferred order, mixing flower types and color families for a balanced, garden-like spread.
  • Cut a length of string to approximately 450 cm (177 in), leaving extra at each end for hanging loops or tying off.
  • Thread each flower onto the string one at a time, using the photograph on the pattern cover as a loose guide for spacing and variety.
  • Once all flowers are threaded, space them evenly across the string and knot or tie off the ends so the flowers stay in position when the garland is hung.

Important Notes

  • 💡Tension really matters here — if your flowers are coming out noticeably larger or smaller than the stated measurements, swap to a thicker or thinner hook before making all 30.
  • 💡The pattern is written in UK crochet terminology, with US equivalents in brackets throughout. Double-check which system you're working in before you start — what the pattern calls a tr is a dc in US terms.
  • 💡Color A always forms the centre of each flower; color B forms the petals or outer layer. Keeping this clear in your head will save a lot of unravelling.
  • 💡For flowers that use a starting ring of 4 or 5 chains, pull the slip-stitch join snugly so the centre hole closes up neatly — a visible gap in the middle of a tiny flower is hard to hide.
  • 💡Yarn amounts are only approximate. If you're pulling from scraps, even a very small quantity goes a long way on these miniature motifs — most flowers use just a few meters per color.
  • 💡The garland works beautifully as nursery decor — try softer, pastel combinations of Ballet Pink, Champagne White, and Pale Lilac for a baby-friendly palette.

By the time you thread that last flower onto the string, you'll have made something genuinely lovely from almost nothing — a few yarn scraps and an afternoon. That's one of my favorite things about garland projects: the whole is so much more than the sum of its parts. Hang it above a crib, drape it across a shelf, or bundle it up as a gift — however it ends up displayed, someone is going to ask you where you bought it. 🌸 Enjoy every single stitch! 🧶✨

You ask,

we answer.

FAQs

Can I use a different yarn brand for this garland?

Absolutely — the key is sticking to DK weight yarn and a 3.5mm hook. If your tension matches the stated flower measurements (between 4.5 cm and 8 cm depending on the flower type), you're in good shape. Going up to worsted weight will make each flower noticeably larger and the garland will end up heavier on the string.

Do I have to make all 9 flower types, or can I just repeat my favorites?

You can absolutely repeat your favorites — the pattern doesn't require all 9 types. Just keep in mind that mixing different sizes and petal shapes is what gives the garland that lush, varied look. If you only use one or two flower styles, the finished piece will look more uniform and less garden-like.

How do I keep the flowers from sliding around on the string once they're threaded?

A small knot or a dab of fabric glue on either side of each flower will hold them in place. Alternatively, if your string is slightly textured or fuzzy, the flowers naturally grip it better than they would a smooth nylon cord.

Flower 4 has a Round 3 worked in front of the petals — what does that mean exactly?

It means you hold the Round 2 petals toward you (toward the front of the work) and insert your hook from the front to reach the dc stitches sitting behind them in Round 1. You're essentially creating a second layer of petals that sits behind the first. It helps to use a stitch marker on the dc stitches in Round 1 before working Round 2 so you can find them easily.

Is this pattern suitable for a confident beginner?

It sits at the easier end of intermediate. You'll need to be comfortable with dc, htr, tr, and dtr, and you need to be able to join yarn and change colors between rounds. If you've made a basic granny square before, you have the skills needed. The flowers themselves are small and quick, so mistakes are easy to spot and fix early.

How long is the finished garland?

The pattern uses approximately 450 cm (177 in) of string, so the finished garland will be close to that length once the flowers are spaced along it. You can make it shorter by using less string and fewer flowers, or extend it by making extra flowers and using a longer cord.