🧢 Beautiful ✨ Detailed πŸ’ Adorable

Plush Reindeer Pillow Amigurumi Pattern

Plush Reindeer Pillow Amigurumi Pattern
4.3β˜…Rating
5-7 HoursTime Needed
1.8KMade This
βœ‚οΈ

Intermediate Level

Ideal for those with basic crocheting experience, featuring slightly more advanced stitches and techniques to expand your skills.

⏱️

Weekend Treat

Takes 5-7 hours, making it an enjoyable project to finish over a couple of days.

🏑

Cozy Accent

A warm touch for your space that transforms ordinary corners into inviting nooks filled with handmade charm.

About This Plush Reindeer Pillow Amigurumi Pattern

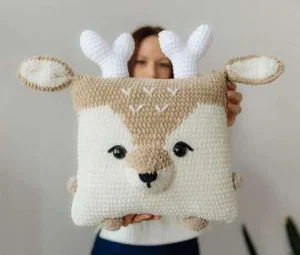
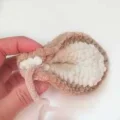
Plush Reindeer Pillow Amigurumi Pattern crochet pattern - detailed view

This project makes a standout handmade gift for baby showers or Christmas. It's substantial enough to feel like a "big" present, yet the simple shaping keeps the process stress-free.

Why You'll Love This Plush Reindeer Pillow Amigurumi Pattern

I'm obsessed with how the velvet yarn feels in my handsβ€”it's like working with a cloud! The way the face detail emerges from the color changes is so satisfying, and seeing those little antlers pop up at the end always makes me smile.

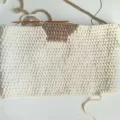
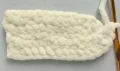
Plush Reindeer Pillow Amigurumi Pattern step 1 Plush Reindeer Pillow Amigurumi Pattern step 2 Plush Reindeer Pillow Amigurumi Pattern step 3 Plush Reindeer Pillow Amigurumi Pattern step 4

Switch Things Up

I remember the first time I worked with this specific velvet yarn; I was a bit intimidated by how slippery it felt, but once I got into the rhythm, I didn't want to stop! This reindeer pillow is one of those projects that feels like a real accomplishment because of its size, yet it’s surprisingly meditative.\n\nOne tip I always share with my friends: when you're doing the colorwork on the face, don't worry if the inside looks a bit messy. As long as your tension is consistent on the outside, the stuffing will hide everything else! If you want to customize yours, try using a soft grey instead of beige for a 'winter' reindeer look, or even add a little red yarn for a Rudolph nose.\n\nI love keeping one of these in my reading nook. There’s just something so comforting about leaning against a handmade friend while catching up on my favorite books. I hope this pattern brings as much warmth to your home as it has to mine. It's the perfect project for a rainy Sunday.

Common Mistakes & How to Fix Them

βœ— When switching colors on the pillow body, make sure to carry your yarn loosely or use the tapestry method so the fabric doesn't pull and distort the square shape.βœ— The antlers consist of two pieces joined together; if you don't sew the small gap between them after the joining round, the stuffing might peek through later.βœ— If you place the safety eyes too close together, the reindeer loses its 'kawaii' lookβ€”aim for that 12-13 stitch gap to keep the face balanced.βœ— Forgetting to stuff the corners of the pillow firmly will result in a rounded shape rather than the crisp rectangular look shown in the photos.

Plush Reindeer Pillow Amigurumi Pattern

Snuggle up with this adorable velvet reindeer! It's the perfect cozy companion for a nursery or a festive living room accent. You'll love how the chunky yarn makes it come together quickly, and the colorwork adds such a sweet, professional look. Grab your hook and let's make something cuddly!

Intermediate 5-7 Hours

Materials Needed for Plush Reindeer Pillow Amigurumi Pattern

β€” Main Fabric

  • 01
    Two skeins of super bulky velvet yarn in a soft beige shade
  • 02
    One skein of chocolate brown super bulky velvet yarn
  • 03
    Less than one skein of white velvet yarn for the antlers
  • 04
    A small amount of black yarn for the facial embroidery

β€” Tools Required

  • 01
    3.5 mm or 4.0 mm crochet hook
  • 02
    Polyester fiberfill for a plush finish
  • 03
    A pair of 22-24mm black safety eyes or loop-back buttons
  • 04
    Large-eyed tapestry needle for assembly
  • 05
    Stitch markers to track the 90-stitch rounds
  • 06
    Scissors

Progress Tracker

0% Complete

β€” 1. Main Pillow Body :

Round 1 :

Start by making a foundation ch of 90.

Round 2 :

Join into a circle by working 1 sc into the first ch, then continue with 89 sc around (90).

Round 3 :

90 sc (90).

Round 4 :

90 sc (90).

Round 5 :

90 sc (90).

Round 6 :

90 sc (90).

Round 7 :

90 sc (90).

Round 8 :

90 sc (90).

Round 9 :

90 sc (90).

Round 10 :

90 sc (90).

Round 11 :

90 sc (90).

Round 12 :

90 sc (90).

Round 13 :

90 sc (90).

Round 14 :

90 sc (90).

Round 15 :

90 sc (90).

Round 16 :

90 sc (90).

Round 17 :

90 sc (90).

Round 18 :

90 sc (90).

Round 19 :

90 sc (90).

Round 20 :

18 sc in beige, 8 sc in brown, 64 sc in beige (90).

Round 21 :

18 sc in beige, 8 sc in brown, 64 sc in beige (90).

Round 22 :

17 sc in beige, 10 sc in brown, 63 sc in beige (90).

Round 23 :

16 sc in beige, 12 sc in brown, 60 sc in beige, 1 sc in brown, 1 sc in beige (90).

Round 24 :

15 sc in beige, 14 sc in brown, 16 sc in beige, 1 sc in brown, 42 sc in beige, 2 sc in brown (90).

Round 25 :

14 sc in beige, 16 sc in brown, 14 sc in beige, 2 sc in brown, 42 sc in beige, 2 sc in brown (90).

Round 26 :

1 sc in brown, 12 sc in beige, 19 sc in brown, 11 sc in beige, 3 sc in brown, 42 sc in beige, 2 sc in brown (90).

Round 27 :

2 sc in brown, 10 sc in beige, 21 sc in brown, 9 sc in beige, 4 sc in brown, 42 sc in beige, 2 sc in brown (90).

Round 28 :

46 sc in brown, 42 sc in beige, 2 sc in brown (90).

Round 29 :

46 sc in brown, 42 sc in beige, 2 sc in brown (90).

Round 30 :

46 sc in brown, 42 sc in beige, 2 sc in brown (90).

Round 31 :

46 sc in brown, 42 sc in beige, 2 sc in brown (90).

Round 32 :

46 sc in brown, 42 sc in beige, 2 sc in brown (90).

Round 33 :

46 sc in brown, 42 sc in beige, 2 sc in brown (90).

Round 34 :

46 sc in brown, 42 sc in beige, 2 sc in brown (90).

Round 35 :

46 sc in brown, 42 sc in beige, 2 sc in brown (90).

Round 36 :

46 sc in brown, 42 sc in beige, 2 sc in brown (90).

Round 37 :

46 sc in brown, 42 sc in beige, 2 sc in brown (90).

Info :

Cut your yarn leaving a generous length. Use this tail to sew the top of the pillow shut, then tuck the end inside. If you are using safety eyes, place them between rounds 17 and 18, spaced 12-13 stitches apart, before you finish stuffing and closing the bottom.

β€” 2. Beige Ear Panels :

Row 1 :

ch 13.

Row 2 :

Work 11 sc starting in the 2nd ch from hook, 3 sc in the final ch, then work 12 sc along the opposite side of the ch, ch 1 & turn.

Row 3 :

Skip the first st, 13 sc, 3 sc in the next st, 12 sc, ch 1 & turn.

Row 4 :

Skip the first st, 14 sc, 3 sc in the next st, 13 sc.

Info :

Fasten off and hide your thread.

β€” 3. Brown Ear Panels :

Row 1 :

ch 13.

Row 2 :

Starting in the 2nd ch from hook, 11 sc, 3 sc in the last ch, then 12 sc along the other side of the foundation ch, ch 1 & turn.

Row 3 :

Skip the first st, 13 sc, 3 sc in the next st, 12 sc, ch 1 & turn.

Row 4 :

Skip the first st, 14 sc, 3 sc in the next st, 13 sc, ch 1.

Info :

Do not cut the yarn this time.

β€” 4. Ear Assembly :

Joining Row :

Place the beige and brown panels together. Crochet through both layers simultaneously using brown yarn: 15 sc, 3 sc in the corner st, 14 sc.

Info :

Leave a long tail for sewing. Fold the bottom edge of the ear in half and stitch the base together to create the ear shape.

β€” 5. The Muzzle :

Round 1 :

Using brown yarn, work 6 sc into a MR (6).

Round 2 :

3 inc in beige, then 3 inc in brown (12).

Round 3 :

(1 sc, 1 inc) x 3 in beige, then 6 sc in brown (15).

Round 4 :

(2 sc, 1 inc) x 3 in beige, then (1 sc, 1 inc) x 3 in brown (21).

Round 5 :

(3 sc, 1 inc) x 3 in beige, then (2 sc, 1 inc) x 3 in brown (27).

Round 6 :

(4 sc, 1 inc) x 3 in beige, then (3 sc, 1 inc) x 3 in brown (33).

Round 7 :

(5 sc, 1 inc) x 3 in beige, then (4 sc, 1 inc) x 3 in brown (39).

β€” 6. Little Legs :

Round 1 :

In brown yarn, 6 sc into a MR (6).

Round 2 :

6 inc (12).

Round 3 :

(1 sc, 1 inc) x 6 (18).

Round 4 :

18 sc (18).

Info :

Fasten off and leave a tail for attaching.

β€” 7. Little Arms :

Round 1 :

In brown yarn, 6 sc into a MR (6).

Round 2 :

6 inc (12).

Round 3 :

12 sc (12).

β€” 8. Antler - First Branch :

Round 1 :

In white yarn, 6 sc into a MR (6).

Round 2 :

6 inc (12).

Round 3 :

(1 sc, 1 inc) x 6 (18).

Round 4 :

18 sc (18).

Round 5 :

18 sc (18).

Round 6 :

18 sc (18).

Round 7 :

18 sc (18).

Info :

Keep the loop open and leave a tail for sewing.

β€” 9. Antler - Second Branch :

Round 1 :

In white yarn, 6 sc into a MR (6).

Round 2 :

6 inc (12).

Round 3 :

(1 sc, 1 inc) x 6 (18).

Round 4 :

18 sc (18).

Round 5 :

18 sc (18).

β€” 10. Antler Assembly :

Round 1 :

Connect the branches: Work 4 sc along the first piece (the first st goes through both pieces), then 1 dec, 2 sc, 1 dec, 2 sc, 1 dec, 2 sc, 1 dec. Move to the second piece: 4 sc, 1 dec, 2 sc, 1 dec, 3 sc, 1 dec, 1 sc, 1 dec (28).

Info :

Use the tail from the first branch to sew up any remaining gap between the two pieces.

Round 2 :

(2 sc, 1 dec) x 7 (21).

Round 3 :

11 sc, 1 dec, 6 sc, 1 dec (19).

Round 4 :

19 sc (19).

Round 5 :

19 sc (19).

Assembly Instructions

  • Start by stuffing the main pillow body firmly, paying extra attention to the corners, then sew the top and bottom seams closed.
  • Position the nose between rounds 10 and 18, sewing it on but leaving a small gap to facilitate the embroidery before finishing.
  • Secure the eyes between rounds 17 and 18 with about 12 to 13 stitches of space between them for the perfect expression.
  • Fold the base of each ear in half and stitch them securely to the top corners of your pillow.
  • Attach the white antlers to the very top of the head, centered between the ears, ensuring they are stuffed well so they stand upright.
  • Sew the arms between rounds 7 and 10 on the sides, then attach the legs to the bottom front to complete the look.

Important Notes

  • πŸ’‘Work in a continuous spiral unless the pattern specifically tells you to join a round.
  • πŸ’‘Use a stitch marker in the first stitch of every round; with 90 stitches per row, it's very easy to lose your place.
  • πŸ’‘When embroidering the 'V' marks on the forehead, keep your tension light so the stitches don't sink too deep into the plush yarn.
  • πŸ’‘If using loop-back buttons for eyes, ensure they are sewn on very tightly or glued for extra security if the pillow is for a small child.

I can't wait for you to feel how soft this finished reindeer is! Whether he's sitting on your sofa or tucked into a bed, he brings so much personality to the room. Don't forget to take a photo of your finished workβ€”I'd love to see the colors you chose! Happy stitching and enjoy your new cuddly friend. This project is such a joy to complete, and seeing the face come together at the very end is the best reward for all those rounds of velvet goodness. You've got this! 🧢✨🦌

You ask,

we answer.

FAQs

Can I use regular acrylic yarn instead of velvet yarn?

You definitely can, but the pillow will turn out much smaller and won't have that signature chunky, plush look. You'd likely need to double up your strands to get a similar size.

How do I make sure the color changes look neat?

The best trick is to pull the new color through on the very last loop of the stitch before the change. This creates a clean line between the beige and brown sections.

Is this pillow washable?

Since it's made with velvet yarn and fiberfill, I recommend spot cleaning or a very gentle hand wash. Avoid the dryer to keep the 'fur' looking fresh!

The antlers are floppy, how can I fix them?

Make sure you stuff them very firmly all the way to the base. If they still lean, you can add a few extra hidden stitches when sewing them to the head to anchor them better.