🧶 Beautiful ✨ Detailed 💝 Adorable

Giant Frog Plush Pillow Amigurumi Pattern

Giant Frog Plush Pillow Amigurumi Pattern
4.5★Rating
8-10 HoursTime Needed
2.0KMade This
✂️

Intermediate Level

Ideal for those with basic crocheting experience, featuring slightly more advanced stitches and techniques to expand your skills.

⏱️

All-Day Adventure

Requires 8-10 hours, ideal for a full day of immersive crocheting.

🐰

Whimsical Buddy

Playful characters full of personality, designed to spark imagination and become cherished playtime favorites.

About This Giant Frog Plush Pillow Amigurumi Pattern

Giant Frog Plush Pillow Amigurumi Pattern crochet pattern - detailed view

This project is the perfect weekend make for anyone who loves oversized amigurumi. He makes a fantastic nursery decoration or a quirky gift for the frog lover in your life who needs a soft place to rest.

Why You'll Love This Giant Frog Plush Pillow Amigurumi Pattern

I'm a sucker for projects that use chenille yarn because the progress feels so fast and the result is just so soft. The way the fingers and toes are joined together is a really neat technique that I think you'll find super satisfying once it all clicks into place.

Giant Frog Plush Pillow Amigurumi Pattern step 1 Giant Frog Plush Pillow Amigurumi Pattern step 2 Giant Frog Plush Pillow Amigurumi Pattern step 3 Giant Frog Plush Pillow Amigurumi Pattern step 4

Switch Things Up

I remember the first time I worked with this super bulky chenille yarn—it was a total game changer for my amigurumi! There’s something so satisfying about seeing a project grow this quickly. When I was making this frog, I spent a lot of time thinking about how to get the personality right. The eyes are everything! If you want a more derpy look, try placing the yellow parts slightly off-center on the green backing.

One thing I discovered while assembling the limbs is that using a slightly longer tail than you think you need for the fingers makes sewing those little gaps between them much easier. I actually prefer the side-mounted leg option because it makes the frog look like he’s really lounging. If you’re making this for a kid’s room, maybe try a soft blue or even a lavender instead of green for a more fantasy frog vibe. Just make sure you have plenty of stuffing on hand—this guy is a bit of a poly-fill hog, but that’s what makes him the perfect pillow!

Common Mistakes & How to Fix Them

✗ When joining the foundation chain for the body in Round 2, it's very easy for the 90 chains to twist—lay it flat on a table before joining to ensure your stitches all face the same way.✗ The color changes on the belly require cutting the yarn each time; if you don't leave long enough tails to weave in securely, the tension might pull and create gaps in the fabric.✗ If you stuff the fingers too firmly before joining them into the hand or foot, it becomes difficult to get your hook into the stitches for the joining round.✗ Placement of the eyes is key for the frog's expression—if you sew them too far apart or too low, he'll look more like a flat fish than a perky frog, so use pins to test the look first.

Giant Frog Plush Pillow Amigurumi Pattern

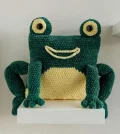
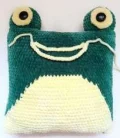
You're going to love how squishy this big guy is! I designed this pattern to be the ultimate couch companion—he’s part pillow, part plushie, and 100% personality. We're using super bulky yarn to make him extra huggable, and the color-work on the belly gives him that classic storybook frog look. Whether he's sitting on a nursery shelf or hanging out in your living room, he's bound to be the star of the show.

Intermediate 8-10 Hours

Materials Needed for Giant Frog Plush Pillow Amigurumi Pattern

— Main Fabric

  • 01
    3.5 skeins of Green Himalaya Dolphin Baby or YarnArt Dolce (Super Bulky chenille yarn)
  • 02
    1 skein of Yellow Himalaya Dolphin Baby or YarnArt Dolce (Super Bulky chenille yarn)
  • 03
    Premium polyester fiberfill for a squishy finish

— Tools Required

  • 01
    3.5mm (E) crochet hook or size needed to achieve a tight fabric
  • 02
    Two 22-24mm shank buttons for the eyes
  • 03
    Tapestry needle with a large eye for bulky yarn
  • 04
    Sharp scissors
  • 05
    Stitch markers to keep track of continuous rounds

Progress Tracker

0% Complete

— 1. Body :

Round 1 :

Using green yarn, ch 90.

Round 2 :

Connect the ch into a ring by working 1 sc into the first ch, making sure it isn't twisted. Work 43 sc in green, then switch to yellow and work 46 sc (90).

Info :

For every color change from here on, cut the previous thread and start fresh with the new color.

Round 3 :

Work 44 sc in green, then 46 sc in yellow (90).

Round 4 :

Work 44 sc in green, then 46 sc in yellow (90).

Round 5 :

Work 45 sc in green, 44 sc in yellow, and 1 sc in green (90).

Round 6 :

Work 46 sc in green, 43 sc in yellow, and 1 sc in green (90).

Round 7 :

Work 47 sc in green, 41 sc in yellow, and 2 sc in green (90).

Round 8 :

Work 48 sc in green, 40 sc in yellow, and 2 sc in green (90).

Round 9 :

Work 49 sc in green, 38 sc in yellow, and 3 sc in green (90).

Round 10 :

Work 50 sc in green, 37 sc in yellow, and 3 sc in green (90).

Round 11 :

Work 51 sc in green, 35 sc in yellow, and 4 sc in green (90).

Round 12 :

Work 52 sc in green, 34 sc in yellow, and 4 sc in green (90).

Round 13 :

Work 53 sc in green, 32 sc in yellow, and 5 sc in green (90).

Round 14 :

Work 54 sc in green, 31 sc in yellow, and 5 sc in green (90).

Round 15 :

Work 55 sc in green, 29 sc in yellow, and 6 sc in green (90).

Round 16 :

Work 56 sc in green, 28 sc in yellow, and 6 sc in green (90).

Round 17 :

Work 57 sc in green, 26 sc in yellow, and 7 sc in green (90).

Round 18 :

Work 58 sc in green, 25 sc in yellow, and 7 sc in green (90).

Round 19 :

Work 59 sc in green, 23 sc in yellow, and 8 sc in green (90).

Round 20 :

Work 60 sc in green, 22 sc in yellow, and 8 sc in green (90).

Round 21 :

Work 62 sc in green, 19 sc in yellow, and 9 sc in green (90).

Round 22 :

Work 64 sc in green, 16 sc in yellow, and 10 sc in green (90).

Round 23 :

Work 66 sc in green, 13 sc in yellow, and 11 sc in green (90).

Round 24-41 :

Work 90 sc in green (90).

Round 42 :

Work approximately 9 sc to reach the corner of the pillow. This may vary slightly based on your tension.

Info :

Secure and weave in all loose ends. Cut a long green tail for sewing the top. Stuff the pillow firmly, paying attention to the corners. Sew the bottom edge closed, adding more stuffing as you go.

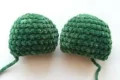
— 2. Eyes - Part 1 :

Info :

Create 2 of these using green yarn.

Round 1 :

Work 6 sc into a mr (6).

Round 2 :

Work 6 inc (12).

Round 3 :

Repeat (1 sc, 1 inc) 6 times (18).

Round 4 :

Repeat (2 sc, 1 inc) 6 times (24).

Round 5 :

Repeat (3 sc, 1 inc) 6 times (30).

Round 6-10 :

Work 30 sc (30).

Round 11 :

Repeat (3 sc, 1 dec) 6 times (24).

Info :

Fasten off and leave a long tail for assembly.

— 3. Eyes - Part 2 :

Info :

Create 2 of these using yellow yarn.

Round 1 :

Work 6 sc into a mr (6).

Round 2 :

Work 6 inc (12).

Round 3 :

Repeat (1 sc, 1 inc) 6 times (18).

Round 4 :

Repeat (2 sc, 1 inc) 6 times, then 1 sl st (24).

Info :

Fasten off and leave a long tail for assembly.

— 4. Mouth :

Info :

Using yellow yarn, make two separate chains: one with 21 stitches and one with 25 stitches. Leave long tails on both for sewing.

— 5. Arms :

Info :

Make 2 arms. For each arm, start by making 3 separate fingers in green. For the first two fingers, finish and leave a small tail. Do not cut the yarn on the third finger.

Finger Round 1 :

Work 6 sc into a mr (6).

Finger Round 2 :

Work 6 inc (12).

Finger Round 3 :

Work 6 dec (6).

Round 4 :

Connect fingers: 2 sc on 3rd finger, 3 sc on 2nd finger, 6 sc on 1st finger. Continue on the other side: 4 sc on 2nd finger, 4 sc on 3rd finger (19).

Info :

Close the small gaps between fingers using the yarn tails or by working 1 sc into the gaps.

Round 5 :

Work 19 sc (19).

Round 6 :

Work 3 sc, 1 dec, 7 sc, 1 dec, 5 sc (17).

Round 7 :

Work 3 sc, 1 dec, 6 sc, 1 dec, 4 sc (15).

Round 8 :

Work 2 sc, 1 dec, 6 sc, 1 dec, 3 sc (13).

Round 9 :

Work 6 sc, 1 inc, 5 sc, 1 inc (15).

Round 10 :

Work 7 sc, 1 inc, 6 sc, 1 inc (17).

Round 11 :

Work 17 sc (17).

Round 12-23 :

Work 17 sc (17).

Info :

Stuff the arm lightly. Flatten the top edge and crochet 8 sc through both layers to close. Leave a long tail.

— 6. Legs :

Info :

Make 2 legs. Start by making 3 fingers in green. Finish the first two and keep the third one attached to the yarn.

Finger Round 1 :

Work 6 sc into a mr (6).

Finger Round 2 :

Work 6 inc (12).

Finger Round 3 :

Repeat (1 sc, 1 inc) 6 times (18).

Finger Round 4 :

Repeat (1 sc, 1 dec) 6 times (12).

Round 5 :

Connect fingers: 5 sc on 3rd finger, 6 sc on 2nd finger, 12 sc on 1st finger. Continue on the other side: 7 sc on 2nd finger, 7 sc on 3rd finger (37).

Info :

Close the gaps between the toes using the yarn tails or 1 sc.

Round 6 :

Work 37 sc (37).

Round 7 :

Work 8 sc, 1 dec, 8 sc, 1 dec, 7 sc, 1 dec, 6 sc, 1 dec (33).

Round 8 :

Work 8 sc, 1 dec, 6 sc, 1 dec, 6 sc, 1 dec, 7 sc (30).

Round 9 :

Work 1 dec, 5 sc, 1 dec, 5 sc, 1 dec, 6 sc, 1 dec, 6 sc (26).

Round 10 :

Work 5 sc, 1 dec, 5 sc, 1 dec, 5 sc, 1 dec, 3 sc, 1 dec (22).

Round 11 :

Work 5 sc, 1 dec, 4 sc, 1 dec, 3 sc, 1 dec, 4 sc (19).

Round 12 :

Work 1 dec, 3 sc, 1 dec, 3 sc, 1 dec, 3 sc, 1 dec, 2 sc (15).

Round 13 :

Work 15 sc (15).

Round 14 :

Repeat (3 sc, 1 inc) 3 times, then 3 sc (18).

Round 15 :

Repeat (2 sc, 1 inc) 6 times (24).

Round 16 :

Work 24 sc (24).

Round 17-30 :

Work 24 sc (24).

Round 31 :

Repeat (2 sc, 1 dec) 6 times (18).

Round 32 :

Repeat (1 sc, 1 dec) 6 times (12).

Round 33 :

Repeat (1 sc, 1 inc) 6 times (18).

Round 34 :

Repeat (2 sc, 1 inc) 6 times (24).

Round 35-42 :

Work 24 sc (24).

Info :

Stuff the leg lightly. Flatten the top edge and crochet 12 sc through both layers to close. Leave a long tail.

Assembly Instructions

  • Begin by sewing the green eye covers (Part 1) to the top corners of the body, stuffing them firmly as you close the seam.
  • Attach the yellow eye circles (Part 2) directly onto the front of the green covers, then secure the shank buttons in the center of the yellow circles.
  • Using the two yellow yarn chains, sew the mouth onto the face: use the shorter chain for the upper lip and the longer one for the lower curve.
  • Position the arms on the sides of the body at Round 24 (counting from the bottom) and sew the flattened top edge securely.
  • For a sitting frog, sew the legs to the bottom corners of the body; for dangling legs, attach them to the sides at Round 18.
  • If choosing the side-mounted legs, fold them as shown in the guide and tack the bottom of the leg to the body corner to keep the sitting pose.
  • Double-check all yarn ends are woven deeply into the stuffing to prevent them from popping out during use.

Important Notes

  • 💡Since we're working in continuous rounds, a stitch marker is your best friend to avoid losing your place in those long 90-stitch rows.
  • 💡Chenille yarn can be slippery, so make sure your knots are very secure when joining new colors for the belly.
  • 💡Stuff the corners of the body first to ensure the pillow maintains a nice rectangular shape rather than becoming a ball.
  • 💡If you find the 3.5mm hook is too small and making your hands ache, you can go up a size, but watch out for stuffing peeking through the stitches.
  • 💡The shift stitches at the end of the body are just to get you to the corner for a clean finish—don't worry if your count is slightly different than mine.

There is something so rewarding about finishing a project this big! I hope your new frog friend brings a lot of joy and comfort to your home. Whether he's a gift or a treat for yourself, he's built to last through plenty of hugs. Don't forget to play around with his leg placement to give him the personality that fits your space best. Happy stitching, and I can't wait to see your finished pillows! 🧶 🐸 ✨

You ask,

we answer.

FAQs

Can I use safety eyes instead of shank buttons?

You definitely can, but because this is a large pillow, 24mm safety eyes might be harder to find. Buttons also give it a slightly more handmade heirloom look that works great with the chunky yarn.

How do I prevent the color change from looking messy?

The pattern suggests cutting the yarn for each change. To keep it tidy, pull the new color through the last two loops of the previous stitch. Secure the tails on the inside with a knot.

My frog looks smaller than the dimensions listed, what happened?

Tension varies a lot with chenille yarn! If you crochet tightly, your pillow will be smaller but sturdier. If you want it bigger, try using a 4.0mm or 4.5mm hook, just ensure the stitches stay dense.

Is this pattern suitable for a beginner?

It's best for someone who has made a few smaller toys. The limb construction (joining fingers) and the frequent color changes in the body require a bit of focus and experience with stitch placement.