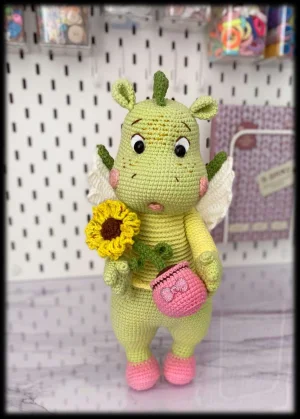
Meet Gretta, the sweetest little dragon you will ever hook! She is not your average fire-breather; she is a gentle soul who loves gardening and carrying her favorite sunflower everywhere. In this pattern, we will work through her unique shaping together, from those adorable rosy cheeks to her intricate, poseable wings. You are going to love how her personality develops with every round, making her a truly special addition to your handmade family.
Progress Tracker
0% Complete
— 1. Head :
Info :
Use light green yarn and stuff firmly as you work.
Round 1 :
Work 7 sc into a MR (7)
Round 3 :
(1 sc, inc) repeat 7 times (21)
Round 4 :
(2 sc, inc) repeat 7 times (28)
Round 5 :
(3 sc, inc) repeat 7 times (35)
Round 6 :
(4 sc, inc) repeat 7 times (42)
Round 7 :
(5 sc, inc) repeat 7 times (49)
Round 8 :
(6 sc, inc) repeat 7 times (56)
Round 9 :
(7 sc, inc) repeat 7 times (63)
Round 10 :
(8 sc, inc) repeat 7 times (70)
Round 11 :
(9 sc, inc) repeat 7 times (77)
Round 12-21 :
Work 1 sc in each st around (77)
Round 22 :
(5 sc, dec) repeat 6 times, then 35 sc (71)
Round 23 :
(4 sc, dec) repeat 6 times, then 35 sc (65)
Round 24 :
(3 sc, dec) repeat 6 times, then 35 sc (59)
Round 25-31 :
Work 1 sc in each st around (59)
Round 32 :
(17 sc, dec) repeat 2 times, 19 sc, 1 dec (56)
Round 33-34 :
Work 1 sc in each st around (56)
Round 35 :
(6 sc, dec) repeat 7 times (49)
Round 36 :
(5 sc, dec) repeat 7 times (42)
Round 37 :
(4 sc, dec) repeat 7 times (35)
Round 38 :
(3 sc, dec) repeat 7 times (28)
Round 39 :
(2 sc, dec) repeat 7 times (21)
Round 40 :
(1 sc, dec) repeat 7 times (14)
Info :
Fasten off, tighten the hole, and weave in your ends.
— 2. Ears (Make 2) :
Info :
Use light green yarn. Do not stuff these.
Round 1 :
Work 7 sc into a MR (7)
Round 3 :
(1 sc, inc) repeat 7 times (21)
Round 4-6 :
Work 1 sc in each st around (21)
Round 7 :
19 sc, 1 dec (20)
Info :
Flatten the ear and sc through both layers to close. Fold in half once more and sew the base to hold the shape. Leave a long tail for attaching.
— 3. Cheeks, Tongue & Head Crest :
Cheeks :
Using pink yarn, work 13 HDC into a MR. Sl st to join and leave a tail for sewing.
Tongue :
Using pink yarn, ch 4. Starting in 2nd ch from hook: 3 sc in first ch, 1 sc, 3 sc in last ch. Rotate to work on other side: 1 sc, sl st to join.
Crest Piece :
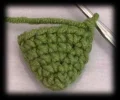
Make 5 using dark green. Round 1: 6 sc in MR. Round 2: inc, 2 sc, inc, 2 sc (8). Round 3: inc, 3 sc, inc, 3 sc (10). Round 4: inc, 4 sc, inc, 4 sc (12). Round 5: inc, 5 sc, inc, 5 sc (14). Round 6: inc, 6 sc, inc, 6 sc (16).
Crest Assembly :
Flatten each triangle and sc through both layers. Join all 5 triangles into one continuous crest using sl st along the bottom edges.
— 4. Arms (Make 2) :
Fingers :
Make 6 fingers in light green. Round 1: 8 sc in MR. Round 2-3: 8 sc. Fasten off 4 fingers; keep yarn attached to the last 2.
Hand Round 1 :
Join 3 fingers: 4 sc on first finger, 4 sc on second, 8 sc on third, 4 sc on second, 4 sc on first (24)
Round 2 :
Work 24 sc around (24)
Round 3 (Arm 1) :
20 sc, then work 4 sc through the inside of a thumb finger (24)
Round 3 (Arm 2) :
Work 4 sc through the inside of a thumb finger, then 20 sc (24)
Round 4 (Arm 1) :
20 sc, then work 4 sc around the outside of the thumb (24)
Round 4 (Arm 2) :
Work 4 sc around the outside of the thumb, then 20 sc (24)
Round 5 :
Work 24 sc around (24)
Round 6 :
(2 sc, dec) repeat 6 times (18)
Round 7-8 :
Work 18 sc around (18)
Round 9-22 :
In BLO only: 18 sc (18)
Round 23 :
In BLO only: (1 sc, dec) repeat 6 times (12)
Round 24 :
In BLO only: 12 sc (12)
Round 25 :
In BLO only: 6 dec (6). Fasten off.
Surface Sl St :
Attach yellow yarn to the 9th round and work sl st in the remaining front loops up to Round 25 to create the sleeve texture.
— 5. Legs (Make 2) :
Info :
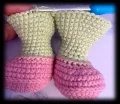
Start with pink yarn for the boots.
Round 1 :
Ch 7. From 2nd ch: 3 sc in one ch, 4 sc, 3 sc in last ch. Other side: 4 sc (14)
Round 2 :
3 x inc, 4 sc, 3 x inc, 4 sc (20)
Round 3 :
(inc, 1 sc) x 3, 4 sc, (inc, 1 sc) x 3, 4 sc (26)
Round 4 :
(inc, 2 sc) x 3, 4 sc, (inc, 2 sc) x 3, 4 sc (32)
Round 5 :
(inc, 3 sc) x 3, 4 sc, (inc, 3 sc) x 3, 4 sc (38)
Round 6 :
In BLO only: 38 sc (38)
Round 7-8 :
Work 38 sc around (38)
Info :
Work 38 sl st around the front loops of Round 6 using pink yarn.
Round 9 :
9 sc (shift marker to center heel), 11 sc, 8 dec, 11 sc (30). Then 9 sc, 6 dec, 9 sc (24).
Round 10 :
Switch to light green. In BLO only: 24 sc (24)
Round 11 :
7 sc, 5 dec, 7 sc (19)
Round 12 :
17 sc, 1 dec (18)
Info :
Work 24 sl st around front loops of Round 10 using pink yarn.
Round 13-15 :
Work 18 sc around (18)
Round 16 :
(2 sc, inc) repeat 6 times (24)
Round 17 :
Work 24 sc around (24)
Round 18 :
(3 sc, inc) repeat 6 times (30)
Round 19 :
Work 30 sc around (30)
Round 20 :
(4 sc, inc) repeat 6 times (36)
Round 21 :
Work 36 sc around (36)
Info :
Leg 1: Sc 12 to reach the inner side, fasten off. Leg 2: Sc 31, ch 1, do not cut yarn.
— 6. Body :
Round 22 :
Join Leg 2 to Leg 1: 36 sc on Leg 1, 1 sc in ch, 36 sc on Leg 2, 1 sc in ch (74)
Round 23 :
Work 74 sc around (74)
Round 24 :
(36 sc, inc) repeat 2 times (76)
Round 25 :
(37 sc, inc) repeat 2 times (78)
Round 26 :
(12 sc, inc) repeat 6 times (84)
Round 27-31 :
Work 84 sc around (84)
Round 32 :
(12 sc, dec) repeat 6 times (78)
Round 33 :
Work 78 sc around (78)
Round 34 :
(11 sc, dec) repeat 6 times (72)
Round 35 :
Work 72 sc around (72)
Round 36 :
(10 sc, dec) repeat 6 times (66)
Round 37 :
Work 66 sc around (66)
Round 38 :
(9 sc, dec) repeat 6 times (60)
Round 39 :
Work 60 sc around (60)
Round 40 :
(8 sc, dec) repeat 6 times (54)
Round 41-52 :
In BLO only: 54 sc (54)
Round 53 :
In BLO only: (7 sc, dec) repeat 6 times (48)
Round 54-56 :
In BLO only: 48 sc (48)
Round 57 :
In BLO only: (6 sc, dec) repeat 6 times (42)
Round 58 :
(5 sc, dec) repeat 6 times (36)
Round 59 :
Work 36 sc around (36)
Round 60 :
(4 sc, dec) repeat 6 times (30)
Round 61 :
(3 sc, dec) repeat 6 times (24)
Round 62 :
(2 sc, dec) repeat 6 times (18)
Round 63 :
(1 sc, dec) repeat 6 times (12)
Round 64 :
6 x dec (6). Fasten off and weave in ends.
Shells :
Attach yellow yarn to Round 41: (ch 1, skip 1, 5 DC in next st, skip 1, sc in next st) repeat around to form the ruffle.
Surface Sl St :
Attach yellow yarn to the back and work sl st around the front loops from Round 41 up to Round 57.
— 7. Tail :
Round 1 :
Using dark green, 6 sc in MR (6)
Round 3 :
3 x inc, 3 sc (9)
Round 4 :
(1 sc, inc) x 3, 3 sc (12)
Round 5 :
(2 sc, inc) x 3, 3 sc (15)
Round 7 :
(3 sc, inc) x 3, 3 sc (18)
Round 8 :
(2 sc, inc) x 6 (24)
Round 9 :
3 sc, (inc, 1 sc) x 9, 3 sc (33)
Round 10-12 :
Work 33 sc (33)
Round 13 :
(10 sc, inc) x 3 (36)
Round 14 :
(5 sc, inc) x 6 (42)
Round 15 :
FLO 7 sc, both loops 28 sc, FLO 7 sc (42)
Round 16-17 :
Work 42 sc (42)
Round 18 :
Grab one st from Round 18 and one back loop from Round 15: work 7 sc this way, then 28 sc in both loops, then repeat the fold join for 7 sc (42)
Round 19-20 :
Work 42 sc (42). Leave tail for sewing.
— 8. Wings & Frame :
Frame :
Ch 6. Row 1: 5 sc, ch 1, turn. Row 2-44: 5 sc, ch 1, turn. Insert wire and sew edges closed. Bend into a V shape.
Wing 1, Row 1 :
Using white, ch 32. From 4th ch: 9 TR, 7 DC, 4 HDC, 9 sc, ch 1, turn (29)
Row 2 :
BLO 26 sc (leave 3), ch 3, turn (26)
Row 3 :
In side loops: 8 TR, 6 DC, 3 HDC, 9 sc, ch 1, turn (26)
Row 4 :
BLO 23 sc (leave 3), ch 3, turn (23)
Row 5 :
In side loops: 7 TR, 6 DC, 3 HDC, 7 sc, ch 1, turn (23)
Row 6 :
BLO 20 sc (leave 3), ch 3, turn (20)
Row 7 :
In side loops: 6 TR, 5 DC, 4 HDC, 5 sc, ch 1, turn (20)
Row 8 :
BLO 17 sc (leave 3), ch 3, turn (17)
Row 9 :
In side loops: 5 TR, 5 DC, 4 HDC, 3 sc, ch 1, turn (17)
Row 10 :
BLO 14 sc (leave 3), ch 3, turn (14)
Row 11 :
In side loops: 5 TR, 4 DC, 2 HDC, 3 sc, ch 1, turn (14)
Row 12 :
BLO 11 sc (leave 3), ch 3, turn (11)
Row 13 :
In side loops: 4 TR, 2 DC, 2 HDC, 3 sc (11). Fasten off.
Wing 2 :
Repeat Wing 1 but use FLO for even rows and front-side loops for odd rows to create a mirrored effect.
— 9. Sunflower :
Pot Round 1 :
Using brown, 7 sc in MR (7)
Round 3 :
(1 sc, inc) x 7 (21)
Round 4 :
Switch to green. BLO 21 sc (21)
Round 5 :
(1 sc, dec) x 7 (14)
Round 6 :
7 x dec (7). Stuff pot.
Round 8-14 :
6 sc around (6)
Info :
Make leaves by chaining 8 and working 2 TR in one ch, 2 TR, 2 DC, 2 HDC along the chain. Attach to the stem.
Pot Outer :
Attach pink yarn to Round 27: BLO 36 sc, then work several rounds of 36 sc. Finish with crab stitch around the top edge.
Petals :
Attach yellow yarn to Round 4 of the flower center: (ch 6, 1 TR in same st, ch 6, sl st in same st) repeat 21 times.
I hope you have the most wonderful time bringing Gretta to life! There is nothing quite like the feeling of finishing that last stitch and seeing a character's personality shine through. Whether she is joining your own collection or heading off to a new home as a gift, Gretta is sure to spread plenty of joy and sunflower-themed cheer. Don't forget to take a moment to admire those wings—they are my favorite part! I am so happy I could share this magical little dragon journey with you. Until our next project together, keep those hooks busy and your yarn cozy! 🧶✨