🧶 Beautiful ✨ Detailed 💝 Adorable

Grumpy Mini Octopus Amigurumi Pattern

Grumpy Mini Octopus Amigurumi Pattern
4.3★Rating
2-3 HoursTime Needed
3.3KMade This
✂️

Intermediate Level

Ideal for those with basic crocheting experience, featuring slightly more advanced stitches and techniques to expand your skills.

⏱️

Quick Craft

Fits nicely into a free afternoon — 2 to 5 hours of focused, enjoyable crocheting.

🐰

Whimsical Buddy

Playful characters full of personality, designed to spark imagination and become cherished playtime favorites.

About This Grumpy Mini Octopus Amigurumi Pattern

Grumpy Mini Octopus Amigurumi Pattern crochet pattern - detailed view

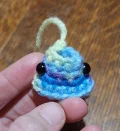
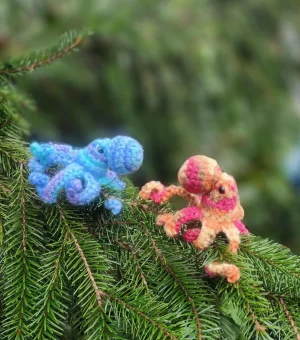
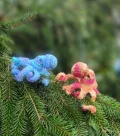
Standing just about 2 inches tall, this octopus is the perfect size for an advent calendar surprise, a quirky keychain, or a funny little ornament that can grip onto tree branches with its tentacles.

Why You'll Love This Grumpy Mini Octopus Amigurumi Pattern

I’m absolutely obsessed with how variegated yarn creates natural patterns on the arms without any extra effort. Plus, the way the arms are constructed to naturally curl is so satisfying to watch as you work—no wire needed!

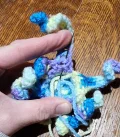
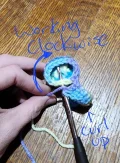
Grumpy Mini Octopus Amigurumi Pattern step 1 Grumpy Mini Octopus Amigurumi Pattern step 2 Grumpy Mini Octopus Amigurumi Pattern step 3 Grumpy Mini Octopus Amigurumi Pattern step 4

Switch Things Up

I’ve always had a soft spot for crochet projects that have a bit of 'tude, and this Grumpy Mini Octopus is exactly that. I originally started making these for my nieces—I wanted something small enough to fit inside the tiny pockets of an advent calendar, but every pattern I found was either too huge or just didn't have the right look. There are so many patterns out there with giant noses, but I wanted something scaled down that still felt like a proper character.

One of my favorite things about this design is how you can skip the ornament hooks entirely. If you’re hanging them on a tree, you can just wrap those wiggly arms right around the pine branches. It looks so much more natural! I highly recommend using a variegated yarn for these. It’s like magic—the color changes do all the heavy lifting for you, making it look like the octopus has natural spots or suckers without you having to change yarn once. If you're feeling adventurous, try working the arms in different directions to see how the curl changes. It’s a tiny detail that makes a huge difference in the final vibe of your little sea friend.

Common Mistakes & How to Fix Them

✗ Forgetting to work in the Back Loops Only during Round 6 of the body will leave you without the necessary front loops to attach the outer arm base later.✗ If your eyelids are positioned too high or are too rounded, he'll look surprised instead of grumpy; aim for a sharp 'V' shape right over the top of the safety eyes.✗ Over-stuffing the body can make him roll around like a ball; keep the stuffing light so he stays slightly flat and sits properly on a surface.✗ Losing track of your stitch direction can result in a mix of upward and downward curls, so decide if you're working clockwise or counter-clockwise before starting the arms.

Grumpy Mini Octopus Amigurumi Pattern

Need a little desk buddy with some serious attitude? This mini octopus is a blast to whip up and perfect for using up those variegated scraps in your stash. He’s got a big personality packed into a tiny frame, and his signature grumpy face is sure to make you smile. You'll love how quickly he comes together—it's the ideal project for a lazy afternoon or a quick handmade gift.

Intermediate 2-3 Hours

Materials Needed for Grumpy Mini Octopus Amigurumi Pattern

— Main Fabric

  • 01
    Approximately 2 ounces of medium weight (Category 4) acrylic yarn, ideally in a multi-colored or variegated shade like Red Heart Super Saver
  • 02
    A small scrap of matching or contrasting yarn for embroidering the grumpy eyelids

— Tools Required

  • 01
    3.5mm (E) crochet hook or the size that works best with your chosen yarn
  • 02
    One pair of 6mm safety eyes
  • 03
    Polyester fiberfill stuffing
  • 04
    Yarn needle for assembly and weaving in ends
  • 05
    Scissors
  • 06
    Stitch markers

Progress Tracker

0% Complete

— 1. The Nose :

Round 1 :

Start with a mc and work 6 sc into it (6)

Round 2 :

Work 1 inc in every st around (12)

Round 3 :

Repeat (1 sc, 1 inc) 6 times (18)

Round 4-5 :

Work 1 sc in each st around (18)

Round 6 :

Repeat (1 sc, 1 dec) 6 times (12)

Round 7 :

Repeat (2 sc, 1 dec) 3 times (9)

Info :

Fasten off but do not close the opening. Leave a long tail for sewing. Stuff the nose firmly and set it aside.

— 2. The Inner Body :

Round 1 :

ch 9 and join with a sl st to the first ch to form a ring (9)

Round 2-3 :

Work 1 sc in each st around (9)

Round 4 :

Repeat (2 sc, 1 inc) 3 times (12)

Round 5 :

Repeat (2 sc, 1 inc) 4 times (16)

Round 6 :

Work 1 sc in each st around using blo only (16)

Info :

Insert 6mm safety eyes between rounds 2 and 3, spacing them roughly 4 to 5 stitches apart. Embroider a 'V' shape over the top of each eye to create the grumpy eyelid look. Stuff the body lightly; it should remain somewhat flat.

Round 7 :

Work 8 dec around (8)

Info :

Fasten off and weave the tail through the remaining stitches to close.

— 3. The Arm Base :

Info :

Join your yarn to any flo from Round 6 of the body.

Round 6 :

Work 1 sc in each st around using flo only (16)

Round 7-8 :

Work 1 sc in each st around (16)

— 4. The Arms :

Info :

The direction you work will change the curl. Working clockwise makes them curl up; counter-clockwise makes them curl down. You will complete Arm 1 through 4, then repeat the set once more for a total of 8 arms.

Arm 1 :

ch 20, sl st in 2nd ch from hook, 5 sc, sc3tog, 2 sc, 5 hdc, 3 dc. On the body, skip 1 st and sc into the next st.

Arm 2 :

ch 15, sl st in 2nd ch from hook, 7 sc, 6 hdc. On the body, skip 1 st and sc into the next st.

Arm 3 :

ch 18, sl st in 2nd ch from hook, 3 sc, hdc3tog, 7 hdc, 3 dc. On the body, skip 1 st and sc into the next st.

Arm 4 :

ch 20, sl st in 2nd ch from hook, 4 sc, 3 hdc, hdc3tog, 5 hdc, 3 dc. On the body, skip 1 st and sc into the next st.

Info :

Repeat the instructions for Arm 1, 2, 3, and 4 one more time. After the 8th arm, sl st into the very first ch of the first arm to join. Fasten off, leaving a tail.

Info :

Thread your yarn needle with the tail and stitch through the gaps left by the skipped stitches to close up the bottom of the octopus. Weave in all remaining ends.

Assembly Instructions

  • Begin by threading the long yarn tail left from the nose onto your embroidery needle.
  • Position the nose on the front of the head, centering it between the two safety eyes.
  • Sew the top opening of the nose closed while simultaneously attaching it to the body.
  • Ensure the grumpy 'V' eyelids are angled so the octopus appears to be looking directly toward its nose.
  • Carefully tuck in any loose yarn tails from the starting chain into the body cavity.
  • Secure the nose firmly all the way around the base to ensure it doesn't wobble.
  • Double-check all knots and weave in your final ends to keep everything tidy.

Important Notes

  • 💡When working the arms, the 'skip 1 st' instruction on the body is vital for creating enough space for the tentacles to sit comfortably.
  • 💡The grumpy expression is all in the eyelids—using a slightly thinner yarn for the 'V' shape can sometimes make it look even sharper.
  • 💡If you want your octopus to be a hanging ornament, you don't actually need a hook; the arms are designed to twist around branches naturally.
  • 💡Using a variegated yarn is highly recommended as it mimics the natural texture and color changes of a real sea creature without any extra work.
  • 💡Ensure your magic circle is pulled very tight at the start of the nose to prevent any stuffing from peeking through the tip.

I really hope you enjoy bringing this little grumpy sea creature to life! There's something so satisfying about finishing a project that fits right in the palm of your hand. Don't forget to play around with different yarn colors—every octopus ends up with its own unique personality depending on how the variegation falls. Whether he's guarding your bookshelf or hanging out in a Christmas tree, he's bound to be a conversation starter. Happy stitching, and I can't wait to see your finished grumpy friends! 🧶 ✨
You ask,

we answer.

FAQs

Can I make this octopus larger or smaller?

Absolutely! To change the size, just swap your yarn weight and hook size. Using a chunky yarn with a 6mm hook will give you a much larger plushie, while crochet thread will make a tiny micro-octopus.

How do I make the arms curl in the opposite direction?

The curl depends on whether you work around the body clockwise or counter-clockwise. For downward curls, work counter-clockwise. For upward curls, work clockwise!

My octopus won't sit flat, what did I do wrong?

This usually happens if the body is over-stuffed. Try removing a little bit of fiberfill before closing Round 7 of the inner body so it retains a slightly squashed, flatter shape.

Is this pattern safe for small children?

If you are making this for a baby or toddler, I recommend embroidering the eyes with black yarn instead of using plastic safety eyes, as those can be a choking hazard.