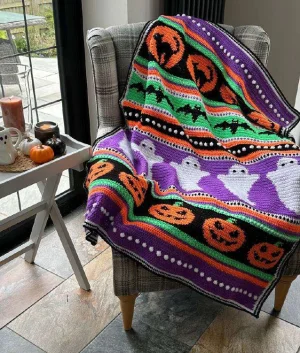
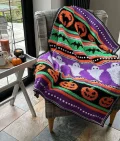
This blanket is the kind of project that makes you genuinely excited to pick up your hook every single evening. You'll work through a whole cast of Halloween characters — grinning jack-o'-lanterns, drifting ghosts, swooping bats, and mysterious black cats — all built in bold tapestry crochet against striking striped sections. The colour palette is pure Halloween magic: deep purple, vivid orange, crisp white, inky black, and electric green. Whether you drape it over a sofa or gift it to someone who goes all-out for the season, it's the kind of make that gets noticed and talked about every October.
Progress Tracker
0% Complete
— 1. Foundation & Opening Stripes (Rows 1–15) :
Foundation Chain :
Using purple and a 4mm hook, make 152 ch.
Row 1 :
1dc in the 4th ch from the hook, then 1dc in every remaining ch across. 2ch, turn. You should have 150 sts from this point forward — every row is 150 sts throughout the entire blanket.
Row 2 :
The 2ch counts as the first st. Sk the first st and 1dc in each st across. 2ch, turn.
Row 3 :
The 2ch counts as the first st. Sk the first st and 1dc in each st across. 2ch, turn.
Row 4 :
The 2ch counts as the first st. Sk the first st and 1dc in each st across. 1ch, turn.
Row 5 :
Bobble Row. The 1ch does NOT count as a st. 1sc in the first 3 sts. Join white on the last pull-through of the 3rd sc and make a bobble. [3sc in purple, make 1 bobble in white] until 2 sts remain. 1sc in each of the last 2 sts. 2ch, turn. Cut white. You will have 37 bobbles total. To make a bobble: yo, insert hook into the st and pull up a loop, yo and pull through 2 loops (2 loops remain on hook). In the same st, repeat [yo, pull up a loop, yo through 2 loops] four more times — 6 loops on hook. Using purple, yo and pull through all 6 loops to close the bobble. Always bring the purple yarn to the front before each bobble to prevent the two yarns from twisting.
Row 6 :
1dc in each st across. 2ch, turn. Note: the 2ch counts as the first st, so sk the first st and place your first dc in the top of the first bobble.
Row 7 :
Sk the first st and 1dc in each st across. 2ch, turn.
Row 8 :
Sk the first st and 1dc in each st across. 2ch, turn.
Row 9 :
Sk the first st and 1dc in each st across. Change to orange on the last pull-through. 2ch, turn.
Row 10 :
Sk the first st and 1dc in each st across. 2ch, turn.
Row 11 :
Sk the first st and 1dc in each st across. Change to purple on the last pull-through. 2ch, turn.
Row 12 :
Sk the first st and 1dc in each st across. Change to green on the last pull-through. 2ch, turn.
Row 13 :
Humbug Stripe — Row 1 of 3. Sk the first st and 1hdc in each st across. Change to white on the last pull-through. 3ch, turn.
Row 14 :
Humbug Stripe — Row 2 of 3. The 3ch counts as 1hdc plus 1ch. Sk 2 sts and 1hdc in the next st, 1ch. [Sk 1 st, 1hdc in the next st, 1ch] until 1 st remains. Fasten off white. Join green in the last st. 2ch (counts as first dc), turn.
Row 15 :
Humbug Stripe — Row 3 of 3. [1hdc in the current row, 1dc down into the skipped hdc from Row 13] across until 1 st remains. 1hdc in the last st. Fasten off green.
— 2. Pumpkins — Tapestry Crochet (Rows 16–40 / Chart Rows 1–25) :
Info :
Switch to a 4.5mm hook for this entire section. All stitches are sc. The 1ch at the start of each row does NOT count as a stitch — always place your first sc in the very first st. Work 5 repeats of the 30-stitch pumpkin chart across the row (5 x 30 = 150 sc). Read the chart from the bottom-right corner, odd rows right-to-left, even rows left-to-right. Keep the black yarn to the front and the orange yarn to the back when carrying. Always change colours on the last pull-through of the stitch before the colour change. Place stitch markers every 30 sts to track repeats. Chart rows 1–2 are entirely black; chart row 3 onwards introduces orange; green appears in chart rows 21–23 for the pumpkin stem. Cut orange at the end of chart row 20. Join green for chart row 21 and cut it at the end of chart row 23. These 25 chart rows equal blanket rows 16–40.
Chart Row 1 :
With right side facing and bobbles pointing out, join black in the first st using a 4.5mm hook. 1ch. Work chart row 1 five times across: 30 black sc x 5 = 150 sc. 1ch, turn.
Chart Row 2 :
Work chart row 2 five times across: 30 black sc x 5 = 150 sc. 1ch, turn.
Chart Row 3 :
Using black and orange, work chart row 3 five times across following the colour chart. 1ch, turn.
Chart Row 4 :
Using black and orange, work chart row 4 five times across. When turning, keep orange to the back and continue to carry it until needed. 1ch, turn.
Chart Row 5 :
Using black and orange, work chart row 5 five times across. 1ch, turn.
Chart Row 6 :
Using black and orange, work chart row 6 five times across. 1ch, turn.
Chart Row 7 :
Using black and orange, work chart row 7 five times across. 1ch, turn.
Chart Row 8 :
Using black and orange, work chart row 8 five times across. 1ch, turn.
Chart Row 9 :
Using black and orange, work chart row 9 five times across. 1ch, turn.
Chart Row 10 :
Using black and orange, work chart row 10 five times across. 1ch, turn.
Chart Row 11 :
Using black and orange, work chart row 11 five times across. 1ch, turn.
Chart Row 12 :
Using black and orange, work chart row 12 five times across. 1ch, turn.
Chart Row 13 :
Using black and orange, work chart row 13 five times across. 1ch, turn.
Chart Row 14 :
Using black and orange, work chart row 14 five times across. 1ch, turn.
Chart Row 15 :
Using black and orange, work chart row 15 five times across. 1ch, turn.
Chart Row 16 :
Using black and orange, work chart row 16 five times across. 1ch, turn.
Chart Row 17 :
Using black and orange, work chart row 17 five times across. 1ch, turn.
Chart Row 18 :
Using black and orange, work chart row 18 five times across. 1ch, turn.
Chart Row 19 :
Using black and orange, work chart row 19 five times across. 1ch, turn.
Chart Row 20 :
Using black and orange, work chart row 20 five times across. Cut orange at the end of this row. 1ch, turn.
Chart Row 21 :
Join green for the pumpkin stem stitches. Work chart row 21 five times across using black and green as charted. 1ch, turn.
Chart Row 22 :
Work chart row 22 five times across using black and green as charted. 1ch, turn.
Chart Row 23 :
Work chart row 23 five times across using black and green as charted. Cut green at the end of this row. 1ch, turn.
Chart Row 24 :
Using black only, work chart row 24 five times across: 150 black sc. 1ch, turn.
Chart Row 25 :
Using black only, work chart row 25 five times across: 150 black sc. Pumpkin section complete — rows 16–40 of the blanket are done.
— 3. Humbug Stripe & Colour Rows (Rows 41–49) :
Row 41 :
Switch back to a 4mm hook. Change to green and 2ch. Sk the first st and 1hdc in each st across. Change to white on the last pull-through. 3ch, turn.
Row 42 :
Humbug Stripe Row 2. The 3ch counts as 1hdc plus 1ch. Sk 2 sts and 1hdc in the next st, 1ch. [Sk 1 st, 1hdc in next st, 1ch] until 1 st remains. Join green in the last st. 2ch, turn.
Row 43 :
Humbug Stripe Row 3. [1hdc in current row, 1dc down into the skipped hdc from Row 41] across until 1 st remains. 1hdc in the last st. Change to purple. 2ch, turn.
Row 44 :
Sk the first st and 1dc in each st across. Change to orange. 2ch, turn.
Row 45 :
Sk the first st and 1dc in each st across. 2ch, turn.
Row 46 :
Sk the first st and 1dc in each st across. Change to white. 2ch, turn.
Row 47 :
Humbug Stripe Row 1. Sk the first st and 1hdc in each st across. Change to black. 3ch, turn.
Row 48 :
Humbug Stripe Row 2. The 3ch counts as 1hdc plus 1ch. Sk 2 sts and 1hdc in the next st, 1ch. [Sk 1 st, 1hdc in next st, 1ch] until 1 st remains. Join white in the last st. 2ch, turn.
Row 49 :
Humbug Stripe Row 3. [1hdc in current row, 1dc down into the skipped hdc from Row 47] across until 1 st remains. 1hdc in last st. Change to purple. 1ch, turn.
— 4. Ghosts — Tapestry Crochet (Rows 50–89 / Chart Rows 1–40) :
Info :
Switch to a 4.5mm hook. All stitches are sc. The 1ch at the start of each row does NOT count as a stitch. Use purple and white. Keep purple to the front and white to the back when carrying. Work 5 repeats of the 30-stitch ghost chart (5 x 30 = 150 sc) for each of the 40 chart rows. Check your stitch count is exactly 150 at the end of chart row 1 before continuing. These 40 chart rows make up blanket rows 50–89.
Chart Row 1 :
With purple, 1ch. Work chart row 1 five times: 150 sc following the ghost chart. 1ch, turn.
Chart Row 2 :
Work chart row 2 five times across using purple and white as charted. 1ch, turn.
Chart Row 3 :
Work chart row 3 five times across using purple and white as charted. 1ch, turn.
Chart Row 4 :
Work chart row 4 five times across using purple and white as charted. 1ch, turn.
Chart Row 5 :
Work chart row 5 five times across using purple and white as charted. 1ch, turn.
Chart Row 6 :
Work chart row 6 five times across using purple and white as charted. 1ch, turn.
Chart Row 7 :
Work chart row 7 five times across using purple and white as charted. 1ch, turn.
Chart Row 8 :
Work chart row 8 five times across using purple and white as charted. 1ch, turn.
Chart Row 9 :
Work chart row 9 five times across using purple and white as charted. 1ch, turn.
Chart Row 10 :
Work chart row 10 five times across using purple and white as charted. 1ch, turn.
Chart Row 11 :
Work chart row 11 five times across using purple and white as charted. 1ch, turn.
Chart Row 12 :
Work chart row 12 five times across using purple and white as charted. 1ch, turn.
Chart Row 13 :
Work chart row 13 five times across using purple and white as charted. 1ch, turn.
Chart Row 14 :
Work chart row 14 five times across using purple and white as charted. 1ch, turn.
Chart Row 15 :
Work chart row 15 five times across using purple and white as charted. 1ch, turn.
Chart Row 16 :
Work chart row 16 five times across using purple and white as charted. 1ch, turn.
Chart Row 17 :
Work chart row 17 five times across using purple and white as charted. 1ch, turn.
Chart Row 18 :
Work chart row 18 five times across using purple and white as charted. 1ch, turn.
Chart Row 19 :
Work chart row 19 five times across using purple and white as charted. 1ch, turn.
Chart Row 20 :
Work chart row 20 five times across using purple and white as charted. 1ch, turn.
Chart Row 21 :
Work chart row 21 five times across using purple and white as charted. 1ch, turn.
Chart Row 22 :
Work chart row 22 five times across using purple and white as charted. 1ch, turn.
Chart Row 23 :
Work chart row 23 five times across using purple and white as charted. 1ch, turn.
Chart Row 24 :
Work chart row 24 five times across using purple and white as charted. 1ch, turn.
Chart Row 25 :
Work chart row 25 five times across using purple and white as charted. 1ch, turn.
Chart Row 26 :
Work chart row 26 five times across using purple and white as charted. 1ch, turn.
Chart Row 27 :
Work chart row 27 five times across using purple and white as charted. 1ch, turn.
Chart Row 28 :
Work chart row 28 five times across using purple and white as charted. 1ch, turn.
Chart Row 29 :
Work chart row 29 five times across using purple and white as charted. 1ch, turn.
Chart Row 30 :
Work chart row 30 five times across using purple and white as charted. 1ch, turn.
Chart Row 31 :
Work chart row 31 five times across using purple and white as charted. 1ch, turn.
Chart Row 32 :
Work chart row 32 five times across using purple and white as charted. 1ch, turn.
Chart Row 33 :
Work chart row 33 five times across using purple and white as charted. 1ch, turn.
Chart Row 34 :
Work chart row 34 five times across using purple and white as charted. 1ch, turn.
Chart Row 35 :
Work chart row 35 five times across using purple and white as charted. 1ch, turn.
Chart Row 36 :
Work chart row 36 five times across using purple and white as charted. 1ch, turn.
Chart Row 37 :
Work chart row 37 five times across using purple and white as charted. 1ch, turn.
Chart Row 38 :
Work chart row 38 five times across using purple and white as charted. 1ch, turn.
Chart Row 39 :
Work chart row 39 five times across using purple and white as charted. 1ch, turn.
Chart Row 40 :
Work chart row 40 five times across using purple and white as charted. Ghost section complete — blanket rows 50–89 done.
— 5. Humbug Stripe & Black Bobble Section (Rows 90–104) :
Row 90 :
Switch to 4mm hook. Change to white and 2ch. Sk the first st and 1hdc in each st across. Change to black. 3ch, turn.
Row 91 :
Humbug Stripe Row 2. The 3ch counts as 1hdc plus 1ch. Sk 2 sts and 1hdc in the next st, 1ch. [Sk 1 st, 1hdc in next st, 1ch] until 1 st remains. Join white in the last st. 2ch, turn.
Row 92 :
Humbug Stripe Row 3. [1hdc in current row, 1dc down into the skipped hdc from Row 90] across until 1 st remains. 1hdc in last st. Change to orange. 2ch, turn.
Row 93 :
Sk the first st and 1dc in each st across. 2ch, turn.
Row 94 :
Sk the first st and 1dc in each st across. Change to black. 2ch, turn.
Row 95 :
Sk the first st and 1dc in each st across. 2ch, turn.
Row 96 :
Sk the first st and 1dc in each st across. 1ch, turn.
Row 97 :
Bobble Row. The 1ch does NOT count as a stitch. 1sc in the first 3 sts. Join white on the last pull-through of the 3rd sc and make a bobble. [3sc in black, make 1 bobble in white] until 2 sts remain. 1sc in each of the last 2 sts. 2ch, turn. Cut white. You will have 37 bobbles.
Row 98 :
Sk the first st and 1dc in each st across. 2ch, turn.
Row 99 :
Sk the first st and 1dc in each st across. Change to orange. 2ch, turn.
Row 100 :
Sk the first st and 1dc in each st across. 2ch, turn.
Row 101 :
Sk the first st and 1dc in each st across. Change to white. 2ch, turn.
Row 102 :
Humbug Stripe Row 1. Sk the first st and 1hdc in each st across. Change to purple. 3ch, turn.
Row 103 :
Humbug Stripe Row 2. The 3ch counts as 1hdc plus 1ch. Sk 2 sts and 1hdc in the next st, 1ch. [Sk 1 st, 1hdc in next st, 1ch] until 1 st remains. Join white in last st. 2ch, turn.
Row 104 :
Humbug Stripe Row 3. [1hdc in current row, 1dc down into the skipped hdc from Row 102] across until 1 st remains. 1hdc in last st. Do NOT turn. Join green yarn with right side facing. 1ch.
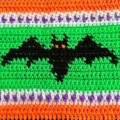
— 6. Bats — Tapestry Crochet (Rows 105–121 / Chart Rows 1–17) :
Info :
Switch to 4.5mm hook. All stitches are sc. Do not turn after Row 104 — begin the bats section with the right side still facing you. Use green and black. Keep green to the front and black to the back when carrying. Work 5 repeats of the 30-stitch bats chart (5 x 30 = 150 sc) for each of the 17 chart rows. Check stitch count is 150 at the end of chart row 1. These 17 chart rows make up blanket rows 105–121.
Chart Row 1 :
With right side facing, join green and 1ch. Work chart row 1 five times: 150 sc following the bats chart. 1ch, turn.
Chart Row 2 :
Work chart row 2 five times across using green and black as charted. 1ch, turn.
Chart Row 3 :
Work chart row 3 five times across using green and black as charted. 1ch, turn.
Chart Row 4 :
Work chart row 4 five times across using green and black as charted. 1ch, turn.
Chart Row 5 :
Work chart row 5 five times across using green and black as charted. 1ch, turn.
Chart Row 6 :
Work chart row 6 five times across using green and black as charted. 1ch, turn.
Chart Row 7 :
Work chart row 7 five times across using green and black as charted. 1ch, turn.
Chart Row 8 :
Work chart row 8 five times across using green and black as charted. 1ch, turn.
Chart Row 9 :
Work chart row 9 five times across using green and black as charted. 1ch, turn.
Chart Row 10 :
Work chart row 10 five times across using green and black as charted. 1ch, turn.
Chart Row 11 :
Work chart row 11 five times across using green and black as charted. 1ch, turn.
Chart Row 12 :
Work chart row 12 five times across using green and black as charted. 1ch, turn.
Chart Row 13 :
Work chart row 13 five times across using green and black as charted. 1ch, turn.
Chart Row 14 :
Work chart row 14 five times across using green and black as charted. 1ch, turn.
Chart Row 15 :
Work chart row 15 five times across using green and black as charted. 1ch, turn.
Chart Row 16 :
Work chart row 16 five times across using green and black as charted. 1ch, turn.
Chart Row 17 :
Work chart row 17 five times across using green and black as charted. Bats section complete — blanket rows 105–121 done.
— 7. Humbug Stripe & Colour Rows (Rows 122–130) :
Row 122 :
Switch to 4mm hook. Change to white and 2ch. Sk the first st and 1hdc in each st across. Change to purple. 3ch, turn.
Row 123 :
Humbug Stripe Row 2. The 3ch counts as 1hdc plus 1ch. Sk 2 sts and 1hdc in the next st, 1ch. [Sk 1 st, 1hdc in next st, 1ch] until 1 st remains. Join white in last st. 2ch, turn.
Row 124 :
Humbug Stripe Row 3. [1hdc in current row, 1dc down into the skipped hdc from Row 122] across until 1 st remains. 1hdc in last st. Change to orange. 2ch, turn.
Row 125 :
Sk the first st and 1dc in each st across. 2ch, turn.
Row 126 :
Sk the first st and 1dc in each st across. Change to purple. 2ch, turn.
Row 127 :
Sk the first st and 1dc in each st across. Change to green. 2ch, turn.
Row 128 :
Humbug Stripe Row 1. Sk the first st and 1hdc in each st across. Change to white. 3ch, turn.
Row 129 :
Humbug Stripe Row 2. The 3ch counts as 1hdc plus 1ch. Sk 2 sts and 1hdc in the next st, 1ch. [Sk 1 st, 1hdc in next st, 1ch] until 1 st remains. Join green in last st. 2ch, turn.
Row 130 :
Humbug Stripe Row 3. [1hdc in current row, 1dc down into the skipped hdc from Row 128] across until 1 st remains. 1hdc in last st. Change to black. 1ch, turn.
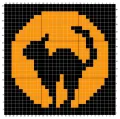
— 8. Cats — Tapestry Crochet (Rows 131–160 / Chart Rows 1–30) :
Info :
Switch to 4.5mm hook. All stitches are sc. Start with right side facing. Use black and orange. Keep black to the front and orange to the back when carrying. Work 5 repeats of the 30-stitch cats chart (5 x 30 = 150 sc) for each of the 30 chart rows. Check stitch count is 150 at the end of chart row 1. These 30 chart rows make up blanket rows 131–160.
Chart Row 1 :
With right side facing, join black and 1ch. Work chart row 1 five times: 150 sc following the cats chart. 1ch, turn.
Chart Row 2 :
Work chart row 2 five times across using black and orange as charted. 1ch, turn.
Chart Row 3 :
Work chart row 3 five times across using black and orange as charted. 1ch, turn.
Chart Row 4 :
Work chart row 4 five times across using black and orange as charted. 1ch, turn.
Chart Row 5 :
Work chart row 5 five times across using black and orange as charted. 1ch, turn.
Chart Row 6 :
Work chart row 6 five times across using black and orange as charted. 1ch, turn.
Chart Row 7 :
Work chart row 7 five times across using black and orange as charted. 1ch, turn.
Chart Row 8 :
Work chart row 8 five times across using black and orange as charted. 1ch, turn.
Chart Row 9 :
Work chart row 9 five times across using black and orange as charted. 1ch, turn.
Chart Row 10 :
Work chart row 10 five times across using black and orange as charted. 1ch, turn.
Chart Row 11 :
Work chart row 11 five times across using black and orange as charted. 1ch, turn.
Chart Row 12 :
Work chart row 12 five times across using black and orange as charted. 1ch, turn.
Chart Row 13 :
Work chart row 13 five times across using black and orange as charted. 1ch, turn.
Chart Row 14 :
Work chart row 14 five times across using black and orange as charted. 1ch, turn.
Chart Row 15 :
Work chart row 15 five times across using black and orange as charted. 1ch, turn.
Chart Row 16 :
Work chart row 16 five times across using black and orange as charted. 1ch, turn.
Chart Row 17 :
Work chart row 17 five times across using black and orange as charted. 1ch, turn.
Chart Row 18 :
Work chart row 18 five times across using black and orange as charted. 1ch, turn.
Chart Row 19 :
Work chart row 19 five times across using black and orange as charted. 1ch, turn.
Chart Row 20 :
Work chart row 20 five times across using black and orange as charted. 1ch, turn.
Chart Row 21 :
Work chart row 21 five times across using black and orange as charted. 1ch, turn.
Chart Row 22 :
Work chart row 22 five times across using black and orange as charted. 1ch, turn.
Chart Row 23 :
Work chart row 23 five times across using black and orange as charted. 1ch, turn.
Chart Row 24 :
Work chart row 24 five times across using black and orange as charted. 1ch, turn.
Chart Row 25 :
Work chart row 25 five times across using black and orange as charted. 1ch, turn.
Chart Row 26 :
Work chart row 26 five times across using black and orange as charted. 1ch, turn.
Chart Row 27 :
Work chart row 27 five times across using black and orange as charted. 1ch, turn.
Chart Row 28 :
Work chart row 28 five times across using black and orange as charted. 1ch, turn.
Chart Row 29 :
Work chart row 29 five times across using black and orange as charted. 1ch, turn.
Chart Row 30 :
Work chart row 30 five times across using black and orange as charted. Cats section complete — blanket rows 131–160 done.
— 9. Closing Stripes & Bobble Section (Rows 161–175) :
Row 161 :
Switch to 4mm hook. Join green. 2ch. Sk the first st and 1hdc in each st across. Change to white. 3ch, turn.
Row 162 :
Humbug Stripe Row 2. The 3ch counts as 1hdc plus 1ch. Sk 2 sts and 1hdc in the next st, 1ch. [Sk 1 st, 1hdc in next st, 1ch] until 1 st remains. Join green in last st. 2ch, turn.
Row 163 :
Humbug Stripe Row 3. [1hdc in current row, 1dc down into the skipped hdc from Row 161] across until 1 st remains. 1hdc in last st. Change to purple. 2ch, turn.
Row 164 :
Sk the first st and 1dc in each st across. Change to orange. 2ch, turn.
Row 165 :
Sk the first st and 1dc in each st across. 2ch, turn.
Row 166 :
Sk the first st and 1dc in each st across. Do NOT turn.
Row 167 :
Join purple with the wrong side facing. 2ch. Sk the first st and 1dc in each st across. 2ch, turn.
Row 168 :
Sk the first st and 1dc in each st across. 2ch, turn.
Row 169 :
Sk the first st and 1dc in each st across. 2ch, turn.
Row 170 :
Sk the first st and 1dc in each st across. 1ch, turn.
Row 171 :
Bobble Row. 1ch. 1sc in each of the first 3 sts. Join white to make bobble. [3sc, make bobble in white] until 2 sts remain. 1sc in each of the last 2 sts. 2ch, turn. Cut white.
Row 172 :
Sk the first st and 1dc in each st across. 2ch, turn.
Row 173 :
Sk the first st and 1dc in each st across. 2ch, turn.
Row 174 :
Sk the first st and 1dc in each st across. 2ch, turn.
Row 175 :
Sk the first st and 1dc in each st across. Fasten off. Sew in all remaining yarn tails.
— 10. Eyes Embroidery :
Info :
The eyes are added by hand after the blanket body is complete. Use leftover yarn and a yarn needle for all embroidery.
Bat Eyes :
Using leftover orange yarn, make simple cross stitches on each bat to form the eyes. On the wrong side, pass the yarn under the stitch between the two eyes so the carrying thread is invisible from the front. Fasten off between each pair of eyes.
Cat Eyes :
Using leftover green yarn, make cross stitches in the same way as the bat eyes. Pass the yarn under the stitch between eyes on the wrong side to keep the back neat.
Ghost Eyes :
Using black yarn, work horizontal stitches between two dc stitches for each eye. Make 8 stitches per eye — do not pull them tight, as a relaxed tension gives a natural rounded shape. Pass the yarn under the stitches between the two eyes on the wrong side before fastening off. A small mouth can also be added if desired.
— 11. Border :
Info :
Use a 4mm hook for the entire border. Along the long sides, work 2 sc at the end of every dc row, and 1 sc at the end of every hdc or sc row — this naturally gives the correct stitch count for a flat, straight edge without needing to count.
Round 1 :
Join white in the first st at the top right corner. 1ch (does not count as a stitch). Work [1sc, 2ch, 1sc] in the corner st to form a corner. 1sc in each st across the top edge. Work [1sc, 2ch, 1sc] in the corner st. Work down the long side using the 2-sc-per-dc-row method. Continue around all four sides in the same way. Sl st to join at the end of the round.
Round 2 :
1ch (does not count as a stitch). 1dc in the same st to start. Continue in white, working 1sc in each st around and [1sc, 2ch, 1sc] in each corner space. Fasten off.
Round 3 :
Join black in any corner space. 1ch (does not count as a stitch). [1sc, 2ch, 1sc] in the corner space. 1sc in each st around, working [1sc, 2ch, 1sc] in every corner space. Note: if you'd like a wider border, you can add extra rounds using leftovers of any blanket colour at this point.
Round 4 :
Repeat Round 3 using white.
Round 5 :
Repeat Round 3 using black. Fasten off and sew in all remaining tails.
You've just made something genuinely extraordinary. This blanket takes real commitment — all those colour changes, all those chart rows, all those little bobbles — and you saw every single one of them through. 🧶 Drape it somewhere it'll be seen, because it absolutely deserves to be. Every Halloween from now on, it'll come back out and remind you exactly what you're capable of making with a hook and some yarn. Whether it lives on your sofa, gets gifted to someone who will treasure it, or becomes the backdrop to a very spooky October — it's a project worth every hour. Be proud of this one. ✨🎃