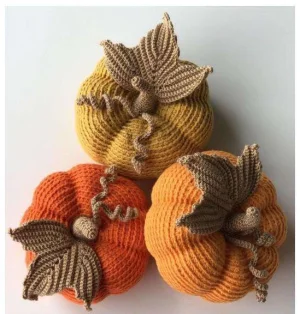
Get ready to bring the cozy vibes of autumn into your home with this beautifully textured pumpkin. You are going to love how the simple technique of working in the back loops creates those classic ridges we all associate with a crisp fall harvest. It is a wonderful project for practicing your shaping and sculpting skills, resulting in a piece that looks much more complex than it actually is. Whether you are decorating your mantle or making a thoughtful gift for a Thanksgiving host, this little gourd is the perfect companion for your favorite orange yarn.
Progress Tracker
0% Complete
— 1. Pumpkin Body :
Info :
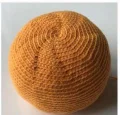
The entire pumpkin is worked in spiral rounds. To achieve the ribbed look, work every stitch in the BLO (back loops only).
Round 1 :
Start with 8 sc into a MR (8)
Round 3 :
(1 sc, inc) repeat 8 times (24)
Round 4 :
(2 sc, inc) repeat 8 times (32)
Round 5 :
(3 sc, inc) repeat 8 times (40)
Round 6 :
(4 sc, inc) repeat 8 times (48)
Round 7 :
(5 sc, inc) repeat 8 times (56)
Round 8 :
(6 sc, inc) repeat 8 times (64)
Round 9 :
(7 sc, inc) repeat 8 times (72)
Round 11 :
(8 sc, inc) repeat 8 times (80)
Round 12-13 :
80 x sc (80)
Round 14 :
(9 sc, inc) repeat 8 times (88)
Round 15-25 :
88 x sc (88)
Round 26 :
(dec, 9 sc) repeat 8 times (80)
Round 27-28 :
80 x sc (80)
Round 29 :
(dec, 8 sc) repeat 8 times (72)
Round 31 :
(dec, 7 sc) repeat 8 times (64)
Round 32 :
(dec, 6 sc) repeat 8 times (56)
Round 33 :
(dec, 5 sc) repeat 8 times (48)
Round 34 :
(dec, 4 sc) repeat 8 times (40)
Round 35 :
(dec, 3 sc) repeat 8 times (32)
Info :
Begin stuffing the pumpkin firmly but keep it pliable enough for the sculpting phase.
Round 36 :
(dec, 2 sc) repeat 8 times (24)
Round 37 :
(dec, 1 sc) repeat 8 times (16)
Info :
FO and leave a very long tail for the sculpting process.
— 2. Sculpting the Ridges :
Info :
Thread your long tail onto a needle. Insert the needle through the center hole and pull it out through the MR at the start. Go back through the center to the bottom and pull tight to flatten the ball slightly.
Info :
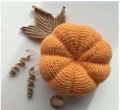
Now, create 8 distinct sections by wrapping the yarn over the outside of the ball. For each section, pass the needle under the front loops of the stitches on the surface, pulling the yarn toward the center to create deep indents. Do not worry about perfect symmetry—real pumpkins are unique!
— 3. Stem (Tail) :
Round 6 :
3 sl st, 5 sc (8)
Round 8 :
3 sl st, 5 sc (8)
Round 10 :
3 sl st, 5 sc (8)
Round 12 :
(3 sc, inc) repeat 2 times (10)
Round 13-14 :
10 x sc (10)
Round 15 :
(4 sc, inc) repeat 2 times (12)
Round 17 :
(2 sc, inc) repeat 4 times (16)
Round 18 :
(1 sc, inc) repeat 8 times (24)
Info :
FO and leave a tail for sewing.
— 4. Spiral Vines (Moustache) :
Info :
Make two of these in varying lengths.
Row 1 :
Work a chain approximately 7 cm long (or adjust to your preference).
Row 2 :
sc in each ch across. FO.
Info :
Mix PVA glue and water in a 1:1 ratio. Dip the vines in the mixture, wrap them tightly around a pencil, and let them dry completely to set the curl.
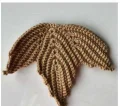
— 5. Foliage (Leaf) :
Info :
The leaf is worked in back-and-forth rows using BLO.
Row 2 :
Starting in 3rd ch from hook: 14 sc, ch 4, working back along the other side of the chain: 14 sc, ch 1.
Row 3 :
skip 1 st, 13 sc, in the ch-4 arch: (2 sc, ch 4, 2 sc), 11 sc, ch 1.
Row 4 :
skip 1 st, 12 sc, in the ch-4 arch: (2 sc, ch 4, 2 sc), 12 sc, ch 1.
Row 5 :
skip 1 st, 13 sc, in the ch-4 arch: (2 sc, ch 4, 2 sc), 11 sc, ch 1.
Row 6 :
skip 1 st, 12 sc, in the ch-4 arch: (2 sc, ch 4, 2 sc), 12 sc, ch 1.
Row 7 :
skip 1 st, 13 sc, in the ch-4 arch: (2 sc, ch 4, 2 sc), 12 sc, ch 1.
Row 8 :
skip 1 st, 13 sc, in the ch-4 arch: (2 sc, ch 4, 2 sc), 12 sc, ch 1.
Row 9 :
skip 1 st, 13 sc, in the ch-4 arch: (2 sc, ch 4, 2 sc), 12 sc, ch 1.
Row 10 :
skip 1 st, 13 sc, in the ch-4 arch: 5 sc, 12 sc.
Row 11 :
ch 5, skip 2 ch, 8 sc, ch 1, skip 1 st, 1 sc in both loops, ch 1.
Row 12 :
turn, 1 sc in the previous row's ch, 9 sc.
Row 13 :
ch 5, skip 2 ch, 14 sc, ch 1, skip 1 st, 1 sc in both loops, ch 1.
Row 14 :
turn, 1 sc in the previous row's ch, 15 sc.
Row 15 :
ch 4, skip 2 ch, 19 sc, ch 1, skip 1 st, 1 sc in both loops, ch 1.
Row 16 :
turn, 1 sc in the previous row's ch, 17 sc, ch 1.
Row 17 :
skip 1 st, 18 sc, ch 1, skip 1 st, 1 sc in both loops, ch 1.
Row 18 :
turn, 1 sc in the previous row's ch, 15 sc, ch 1.
Row 19 :
skip 1 st, 16 sc, skip 1 st, 3 sc in both loops, 14 sc.
Row 20 :
ch 5, skip 2 ch, 8 sc, ch 1, skip 1 st, 1 sc in both loops, ch 1.
Row 21 :
turn, 1 sc in the previous row's ch, 9 sc.
Row 22 :
ch 5, skip 2 ch, 14 sc, ch 1, skip 1 st, 1 sc in both loops, ch 1.
Row 23 :
turn, 1 sc in the previous row's ch, 15 sc.
Row 24 :
ch 4, skip 2 ch, 19 sc, ch 1, skip 1 st, 1 sc in both loops, ch 1.
Row 25 :
turn, 1 sc in the previous row's ch, 17 sc, ch 1.
Row 26 :
skip 1 st, 18 sc, ch 1, skip 1 st, 1 sc in both loops, ch 1.
Row 27 :
turn, 1 sc in the previous row's ch, 15 sc, ch 1.
Row 28 :
skip 1 st, 16 sc, ch 1, skip 1 st, 1 sc in both loops, 1 sl st. FO.
I hope you enjoyed making this little pumpkin as much as I did! There is something so peaceful about working on those repetitive ribbed rounds, and the final sculpting phase is always the highlight for me. Your new pumpkin is ready to brighten up a windowsill or join a festive table arrangement. If you had fun with this one, why not try making a few more in different shades of cream, muted green, or deep burgundy? They look absolutely wonderful in a little cluster! Happy crocheting, and enjoy your beautiful handmade autumn decor. 🧶 ✨ 🎃