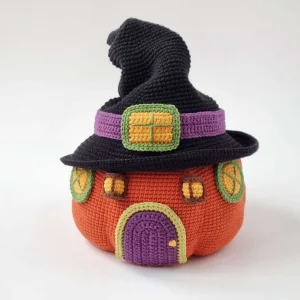
This pumpkin house is the kind of project that makes your whole crafting space feel like October. You'll build a plump two-layer terracotta pumpkin with a shaped body, then top it with a full witch's hat roof — fishing line and all — that actually holds its dramatic curved shape. Along the way you'll crochet a purple arched door, round and square windows with green frames, tiny glowing lanterns, and a whole bowl of Halloween treats to fill it with. Every piece has a personality of its own, and watching them come together into one cohesive scene is genuinely satisfying.
Progress Tracker
0% Complete
— 1. Pumpkin — Inner Layer :
Info :
Before starting, prepare a length of 1mm fishing line. Use a lighter to carefully melt one tip so a small ball forms — this anchor prevents the line from pulling out. Work the first 2 rounds with terracotta yarn only. From Round 3 onward, lay the fishing line along the inside of your work and crochet over it so it sits beneath the stitches throughout.
Round 1 :
Using terracotta yarn, work 6 sc in AR. (6)
Round 2 :
inc in every st. (12)
Info :
Begin incorporating the fishing line from this round onward. Lay it under your stitches as you work so it is enclosed within the fabric.
Round 3 :
(1 sc, inc) repeat 6 times. (18)
Round 4 :
(2 sc, inc) repeat 6 times. (24)
Round 5 :
(3 sc, inc) repeat 6 times. (30)
Round 6 :
(4 sc, inc) repeat 6 times. (36)
Round 7 :
(5 sc, inc) repeat 6 times. (42)
Round 8 :
(6 sc, inc) repeat 6 times. (48)
Round 9 :
(7 sc, inc) repeat 6 times. (54)
Round 10 :
(8 sc, inc) repeat 6 times. (60)
Round 11 :
(9 sc, inc) repeat 6 times. (66)
Round 12 :
(10 sc, inc) repeat 6 times. (72)
Round 13 :
(11 sc, inc) repeat 6 times. (78)
Round 14 :
(12 sc, inc) repeat 6 times. (84)
Round 15 :
Work this entire round through BLO only: (13 sc, inc) repeat 6 times. (90)
Round 16 :
(14 sc, inc) repeat 6 times. (96)
Round 17 :
(15 sc, inc) repeat 6 times. (102)
Round 18-37 :
Work 20 rounds even: 102 sc each round. (102)
Round 38 :
(15 sc, dec) repeat 6 times. (96)
Round 39 :
(14 sc, dec) repeat 6 times. (90)
Round 40 :
(13 sc, dec) repeat 6 times. (84)
Info :
Trim the fishing line, leaving a short tail. Hold the lighter close to melt it and quickly press the melted tip against the yarn so it bonds. Work a few more sc over the secured end to close it in. Finish this layer with a sl st and cut the yarn.
— 2. Pumpkin — Outer Layer :
Info :
Attach terracotta yarn to Round 14 of the inner layer and work through the front loops of that round — these are the loops left exposed when you worked Round 15 through back loops only. The outer layer builds outward from here to form the double-walled pumpkin shape.
Round 1 :
Working through FLO of Round 14 of the inner layer: (13 sc, inc) repeat 6 times. (90)
Round 2 :
(14 sc, inc) repeat 6 times. (96)
Round 3 :
(15 sc, inc) repeat 6 times. (102)
Round 4 :
(16 sc, inc) repeat 6 times. (108)
Round 5 :
(17 sc, inc) repeat 6 times. (114)
Round 6 :
(18 sc, inc) repeat 6 times. (120)
Round 7 :
(19 sc, inc) repeat 6 times. (126)
Round 8-30 :
Work 23 rounds even: 126 sc each round. (126)
Round 31 :
(19 sc, dec) repeat 6 times. (120)
Round 32 :
(18 sc, dec) repeat 6 times. (114)
Round 33 :
(17 sc, dec) repeat 6 times. (108). Do not cut the yarn.
Info :
Tuck a light, even amount of fiberfill into the gap between the two layers — avoid overstuffing. The filling should give the pumpkin a gentle rounded look without straining the fabric.
Round 34 :
(16 sc, dec) repeat 6 times. (102)
Round 35 :
(15 sc, dec) repeat 6 times. (96)
Round 36 :
(14 sc, dec) repeat 6 times. (90)
Round 37 :
(13 sc, dec) repeat 6 times. (84)
Info :
Align the open top edges of both layers and work 84 sc through both at the same time to join them together. Then thread your needle and, starting from the bottom of the pumpkin (roughly along the increase lines), push the needle straight through to the top edge. Pull gently and fasten the thread at the top to create a shaping line. Repeat to make 6 evenly spaced shaping lines in total, forming the classic pumpkin lobes.
— 3. Witch Hat Roof :
Info :
Work with black yarn throughout. Attach a contrasting-color yarn scrap as a stitch marker to help you track rounds — the hat has many rounds and a marker makes counting much easier.
Round 2 :
(1 sc, inc) repeat 3 times. (9)
Round 4 :
(2 sc, inc) repeat 3 times. (12)
Round 6 :
(3 sc, inc) repeat 3 times. (15)
Round 8 :
(4 sc, inc) repeat 3 times. (18)
Round 10 :
(5 sc, inc) repeat 3 times. (21)
Round 12 :
(6 sc, inc) repeat 3 times. (24)
Round 14 :
(7 sc, inc) repeat 3 times. (27)
Round 16 :
(8 sc, inc) repeat 3 times. (30)
Round 18 :
(9 sc, inc) repeat 3 times. (33)
Round 20 :
(10 sc, inc) repeat 3 times. (36)
Round 22 :
(11 sc, inc) repeat 3 times. (39)
Round 24 :
(12 sc, inc) repeat 3 times. (42)
Round 26 :
(13 sc, inc) repeat 3 times. (45)
Round 27 :
(14 sc, inc) repeat 3 times. (48)
Round 29 :
(15 sc, inc) repeat 3 times. (51)
Round 30 :
(16 sc, inc) repeat 3 times. (54)
Round 32 :
(17 sc, inc) repeat 3 times. (57)
Round 33 :
(18 sc, inc) repeat 3 times. (60)
Round 35 :
(19 sc, inc) repeat 3 times. (63)
Round 36 :
(20 sc, inc) repeat 3 times. (66)
Round 37 :
(21 sc, inc) repeat 3 times. (69)
Round 38 :
(22 sc, inc) repeat 3 times. (72)
Round 39 :
(23 sc, inc) repeat 3 times. (75)
Round 40 :
(24 sc, inc) repeat 3 times. (78)
Round 41 :
(25 sc, inc) repeat 3 times. (81)
Round 42 :
(26 sc, inc) repeat 3 times. (84)
Round 43 :
(27 sc, inc) repeat 3 times. (87)
Round 44 :
(28 sc, inc) repeat 3 times. (90)
Round 45 :
(29 sc, inc) repeat 3 times. (93)
Round 46 :
(30 sc, inc) repeat 3 times. (96)
Info :
Prepare a new length of fishing line, melt the tip to form the anchor ball as before, then begin enclosing it within your stitches.
Round 47-51 :
Work 5 rounds even, enclosing the fishing line under the stitches throughout: 96 sc each round. (96)
Info :
Trim the fishing line and seal the end against the yarn with the lighter, same method as on the pumpkin. Remove your yarn color marker. Thread black yarn onto the needle and stitch along the trail left by the marker thread, running from the fishing line area up to the tip of the crown, to shape and secure the hat's lean.
Round 52 :
Join a new fishing line. Work this round through FLO only: (11 sc, inc) repeat 8 times. (104)
Round 53 :
(12 sc, inc) repeat 8 times. (112)
Round 54 :
(13 sc, inc) repeat 8 times. (120)
Round 55 :
(14 sc, inc) repeat 8 times. (128)
Round 56 :
(15 sc, inc) repeat 8 times. (136)
Round 57 :
(16 sc, inc) repeat 8 times. (144)
Round 58 :
(17 sc, inc) repeat 8 times. (152)
Round 59 :
(18 sc, inc) repeat 8 times. (160)
Round 60 :
(19 sc, inc) repeat 8 times. (168)
Round 61 :
(20 sc, inc) repeat 8 times. (176). Cut and secure the fishing line.
Info :
Pull the yarn tail at the crown tip to create the hat's characteristic dramatic bend, then fasten the end securely at the tip.
— 4. Hat Ribbon :
Info :
Work with purple yarn in flat rows, back and forth with a turning chain at the start of each row.
Row 1-5 :
Work 5 rows of 95 sc across, turning at each end.
Info :
Steam the finished ribbon flat with an iron. Position it around the fishing-line section of the hat crown and glue or sew it in place, with the join sitting at the intended center front of the hat.
— 5. Attic Window (Square) :
Info :
Work the center panel with yellow yarn.
Row 1-7 :
Work 7 rows of 10 sc across. Cut yellow yarn.
Info :
Join green yarn and sl st around all four sides of the rectangle. Then sc around through both loops of those green sl sts, working 3 sc into each corner stitch to keep the corners square. Sl st around once more for a neat edging. Leave a long tail. Use the green tail threaded on a needle to embroider a cross frame dividing the window into four panes. Cut and secure.
— 6. Door (Arched) :
Info :
Work with purple yarn.
Round 1 :
Work along both sides of the chain: 9 sc, 3 sc in the final chain loop, 9 sc along the bottom side of the chain. (21)
Info :
Continue in U-shaped flat rows, beginning each row with a turning chain.
Row 2 :
9 sc, inc in next 3 sts, 9 sc. (24)
Row 3 :
9 sc, (1 sc, inc) repeat 3 times, 9 sc. (27)
Row 4 :
9 sc, (2 sc, inc) repeat 3 times, 9 sc. (30)
Row 5 :
9 sc, (3 sc, inc) repeat 3 times, 9 sc. (33)
Row 6 :
9 sc, (4 sc, inc) repeat 3 times, 9 sc. (36). Cut purple yarn.
Info :
Join light olive yarn and sl st around the curved edges of the door, skipping the straight bottom edge. Flip to the wrong side and sc through both loops of those olive sl sts: 9 sc, (5 sc, inc) repeat 3 times, 9 sc. (39). Turn back to the right side and sl st around the olive edge. Cut yarn. Use yellow yarn to embroider a small door knob with a few stitches.
— 7. Round Windows (make 2) :
Info :
Work the center circle with yellow yarn.
Round 2 :
inc in every st. (12)
Round 3 :
(1 sc, inc) repeat 6 times. (18)
Round 4 :
(2 sc, inc) repeat 6 times. (24). Finish with sl st. Cut yellow yarn.
Round 5 :
Join green yarn and sl st around all stitches. (24)
Round 6 :
sc through both loops of the green sl sts: (3 sc, inc) repeat 6 times. (30)
Round 7 :
sl st around. Leave a long tail.
Info :
Use the remaining green tail to embroider a cross frame across the window face. Make 2 windows total.
— 8. Lanterns (make 2) :
Info :
Work the lantern body with yellow yarn.
Round 2 :
inc in every st. (12)
Round 3-5 :
Work 3 rounds even: 12 sc each round. (12)
Round 6 :
dec in every st until the opening closes. Add a small amount of fiberfill while working the decreases to keep the shape.
Info :
Crochet 2 small circles in brown yarn for each lantern (make 4 circles total — 2 per lantern). For each brown circle: Round 1: 6 sc in AR. Round 2: inc in every st. (12). Leave a long tail on one circle per pair. Glue the brown circles to the top and bottom of each lantern. Thread the long tail on a needle and run it from one circle across to the other. Wrap the yarn back around this line several times to create a bar, then fasten. Repeat to make 4 evenly spaced vertical bar lines around each lantern. Make 2 lanterns.
— 9. Monster Cookies :
Info :
Work the cookie base with beige yarn. Do not stuff.
Round 2 :
inc in every st. (12)
Round 3 :
(1 sc, inc) repeat 6 times. (18)
Round 4 :
1 sc, inc, (2 sc, inc) repeat 5 times, 1 sc. (24)
Round 5 :
(3 sc, inc) repeat 6 times. (30)
Round 6 :
2 sc, inc, (4 sc, inc) repeat 5 times, 2 sc. (36)
Round 7 :
(5 sc, inc) repeat 6 times. (42)
Round 8 :
3 sc, inc, (6 sc, inc) repeat 5 times, 3 sc. (48)
Round 9 :
(7 sc, inc) repeat 6 times. (54)
Round 11 :
(7 sc, dec) repeat 6 times. (48)
Round 12 :
3 sc, dec, (6 sc, dec) repeat 5 times, 3 sc. (42)
Round 13 :
(5 sc, dec) repeat 6 times. (36)
Round 14 :
2 sc, dec, (4 sc, dec) repeat 5 times, 2 sc. (30)
Round 15 :
(3 sc, dec) repeat 6 times. (24)
Round 16 :
1 sc, dec, (2 sc, dec) repeat 5 times, 1 sc. (18)
Round 17 :
(1 sc, dec) repeat 6 times. (12)
Round 18 :
dec in every st. (6). Do not stuff. Leave a long end.
Info :
Thread the needle and pass it through the center of the cookie several times to flatten it slightly.
Info :
Work the icing layer with neon yellow yarn.
Icing Round 1 :
6 sc in AR. (6)
Icing Round 2 :
inc in every st. (12)
Icing Round 3 :
(1 sc, inc) repeat 6 times. (18)
Icing Round 4 :
1 sc, inc, (2 sc, inc) repeat 5 times, 1 sc. (24)
Icing Round 5 :
(3 sc, inc) repeat 6 times. (30)
Icing Round 6 :
2 sc, inc, (4 sc, inc) repeat 5 times, 2 sc. (36)
Icing Round 7 :
(5 sc, inc) repeat 6 times. (42)
Icing Round 8 :
3 sc, inc, (6 sc, inc) repeat 5 times, 3 sc. (48). Finish with sl st. Cut yarn.
Info :
Crochet small eyes in white yarn: make one 2-round circle (Rnd 1: 6 sc in AR; Rnd 2: sl st to close) and one 3-round circle (Rnd 1: 6 sc in AR; Rnd 2: inc x6; Rnd 3: sl st). Make tiny pupils in black yarn (1-round circle: 6 sc in AR, close). Glue the eyes onto the icing. Embroider a smile with black yarn. Glue the finished face onto the cookie. Make as many as you like in different icing colors.
— 10. M&M Cookies :
Info :
Crochet the cookie base the same way as the Monster Cookie (Rounds 1–18 in beige), but add a small amount of stuffing while working to give it a very slightly raised center while keeping the overall shape flat. Steam both sides with an iron once finished.
Info :
Work the M&M dragees in any colors you like.
Round 2 :
inc in every st. (12)
Round 3-4 :
Work 2 rounds even: 12 sc each round. Finish with sl st. Leave a long tail.
Info :
Thread the tail onto a needle and run it through every other back loop of the final round. Do not stuff. Pull the tail to gather the opening closed and fasten. Make as many dragees as you want in assorted colors. Glue them onto the cookie in a scattered arrangement. Fill any remaining space by embroidering small multicolored sprinkle lines with yarn.
— 11. Wrapped Candy :
Info :
Work with any color yarn you like.
Round 2 :
inc in every st. (12)
Round 3 :
(1 sc, inc) repeat 6 times. (18)
Round 4-11 :
Work 8 rounds even: 18 sc each round. (18)
Round 12 :
(1 sc, dec) repeat 6 times. (12). Add fiberfill stuffing.
Round 13 :
dec in every st. (6)
Round 14 :
ch 3, then work 2 dc into every remaining st. Close with sl st. Cut yarn and secure the end.
Info :
For the second wrapper end: ch 3, then work 12 dc in AR. Pull the ring tight to close it. Finish with sl st. Leave a long tail and sew this piece to the other end of the candy. Make as many as desired in different colors.
— 12. Striped Candy :
Info :
Start with yellow yarn. All color changes are made by completing the stitch with the new color — work the sc until 2 loops remain on the hook, then pull the new color through to finish.
Round 1 :
8 sc in AR. Do not close the round with sl st — leave the working loop open and remove the hook.
Round 2 :
Join green yarn from the center of the AR. Work 2 green sc in each yellow st around. Leave the green loop open. Return hook to the yellow loop. Work 1 yellow sc in the first st (this stitch was already half-done when you switched). Continue across: 2 green sc in the next st, 2 yellow sc in the next, alternating to the end. Total for this round: 15 sc.
Round 3-10 :
Continue alternating 2 yellow sc and 2 green sc each round. Because of the odd total stitch count, the color stripes will spiral and shift naturally to form diagonal lines. Work 8 rounds this way. (15)
Round 11 :
Add fiberfill stuffing. Work 8 dec, alternating yarn colors. (7)
Round 12 :
Drop yellow. Using green only, work 4 dec. (3)
Round 13 :
ch 3, then 3 dc in every remaining st. Close with sl st. Cut and secure both yarn ends.
Info :
Second wrapper end — in yellow yarn: ch 3, then 12 dc in AR. Pull the ring closed. Finish with sl st, leave a long tail. Sew to the other end of the candy. Make as many candies as you like in different color combinations.
— 13. Chupa Chups Lollipop :
Info :
This piece uses two yarn colors worked simultaneously from separate active loops. Start with orange yarn.
Round 1 :
6 sc in AR. Do not close with sl st. Leave the orange working loop long and remove the hook.
Round 2 :
Join brown yarn, creating a new working loop from the center of the AR. Work 2 brown sc into each orange st around. Leave the brown loop open.
Round 3 :
Return hook to the orange loop. Work (1 sc, inc) repeat 6 times. (18)
Round 4 :
Return to the brown loop. Work (2 sc, inc) repeat 6 times. (24)
Round 5 :
24 orange sc. (24)
Round 6 :
24 brown sc. (24)
Round 7 :
24 orange sc. (24)
Round 8 :
24 brown sc. (24)
Round 9 :
Orange: (2 sc, dec) repeat 6 times. (18)
Round 10 :
Brown: (1 sc, dec) repeat 6 times. (12). Add fiberfill stuffing.
Round 11 :
Orange: dec in every st. (6)
Round 12 :
Brown: dec in every st until the opening is fully closed. Cut both yarns and fasten ends.
Info :
Cut a wooden manicure stick in half. Push the sharpened end into the candy. Using white yarn: work 7 sc in AR, then crochet sc in spiral rounds for the length of the stick. Finish with sl st. Leave a long tail. Slide this white sleeve over the stick and sew it in place at the top where it meets the candy. Repeat in other color combinations as desired.
— 14. Candy Corn :
Info :
Start with yellow yarn. Chain 5 and work around both sides of the chain.
Round 1 :
3 sc in the second chain from the hook, 2 sc along the top of the chain, 3 sc in the last chain loop, 2 sc back along the bottom side. (10)
Round 2 :
inc in next 3 sts, 2 sc, inc in next 3 sts, 2 sc. (16). Close with sl st.
Round 3 :
No turning chain. Work 16 sc through BLO. Do not close — continue in spiral rounds.
Round 4-5 :
Work 2 rounds even through both loops: 16 sc each round. (16)
Round 6 :
Switch to orange yarn: 2 sc, dec, 6 sc, dec, 4 sc. (14)
Round 8 :
2 sc, dec, 5 sc, dec, 3 sc. (12)
Round 9 :
Switch to white yarn. 12 sc. (12)
Round 10 :
1 sc, dec, 4 sc, dec, 3 sc. (10). Add fiberfill stuffing.
Round 11 :
dec in every st. (5). Cut yarn. Close the opening by weaving the tail through the remaining stitches and pulling tight. Make as many as you like.
There's something genuinely magical about watching this project come together — starting from a flat orange disc and ending up with a plump, lobed pumpkin wearing a perfectly tilted witch's hat, with a little purple door and glowing windows. And then there are all the tiny treats waiting inside. Every single piece in this pattern has its own charm, and making them all is a little creative adventure in itself. Whether you set this out as a Halloween centerpiece or give it as a handmade gift, it's going to stop people in their tracks. You made that. A whole little pumpkin house. Happy crocheting and happy Halloween! 🧶🎃✨