About This Halloween Spider Web Bunting Crochet Pattern
Makes a stunning handmade Halloween gift or a keepsake decoration you'll bring out year after year — far more special than anything mass-produced.
Ideal for those with basic crocheting experience, featuring slightly more advanced stitches and techniques to expand your skills.
Fits nicely into a free afternoon — 2 to 5 hours of focused, enjoyable crocheting.
Festive fun for the season, bringing handmade magic to celebrations and creating new family traditions.
Makes a stunning handmade Halloween gift or a keepsake decoration you'll bring out year after year — far more special than anything mass-produced.
I genuinely look forward to making this every autumn. There's something almost meditative about working those long chain spaces — the web shape just emerges so naturally from the stitches, and the moment you hold it up and the silver thread catches the light, it's pure magic. I've made this as a last-minute Halloween decoration more than once because the individual webs work up faster than you'd expect. Honestly, once you've made a couple you won't want to stop at eight.

I first made this bunting a few years back on a rainy October afternoon with a horror film on in the background, and honestly it's become one of my favorite annual crafting rituals. There's something about working with thread instead of regular yarn that feels almost meditative — the stitches are tiny and precise, and you have to pay attention in a way that completely quiets your brain.
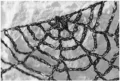
The thing that surprised me most the first time was how quickly the web shape becomes recognizable. By Row 4 or 5 you can already see exactly what it's going to be, and that's such a satisfying moment. Working the black cotton and silver metallic together as one strand is the trick that makes this pattern — separately those threads are fine, but together they have this moody, glittery quality that photographs beautifully and looks genuinely eerie in person.
If you want to play with color, deep purple cotton with gold metallic is stunning for a more witchy vibe, and I've also seen it made in white with no metallic for a ghostly, vintage look. For the metallic thread, a warm copper or bronze instead of silver gives more of an ancient, cobwebbed feel.
One practical tip I wish someone had told me early on: keep a small piece of card to wind your metallic thread around as you work. It stops it from kinking and tangling with the cotton, which can be genuinely maddening halfway through a row. Small thing, big difference.
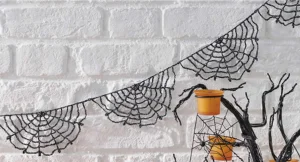
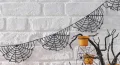
There's something so satisfying about making your own Halloween decorations — and this spider web bunting is honestly one of my all-time favorites to put up every October. You'll be working with black cotton thread and silver metallic thread held together, which gives each web this gorgeous sparkly, eerie shimmer that catches the light just right. Eight interlocking webs form a garland that stretches about 160cm long — plenty to drape across a mantle, a window, or a spooky styled shelf. The construction is straightforward once you get your rhythm going, and the result looks so much more impressive than anything you'd find in a party store.
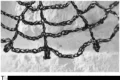
The bunting consists of 8 spider webs, each worked flat in rows. All webs are joined to one another along their final row to form the complete garland. Throughout the entire pattern, hold one strand of black cotton thread and one strand of silver metallic thread together, treating them as a single working strand.
Tension is not critical for this project, though it will affect how much thread you use overall. Each finished web measures approximately 10x20cm (4x8in). The completed bunting is approximately 160cm (63in) long.
Picot definition: ch5, then ss into the stitch at the base of that ch-5.
With black and silver held together as one strand, ch5.
RS row. Tr into the fifth ch from the hook, ch1; repeat (tr into the next ch, ch1) 3 more times, then tr into the same ch as the last tr, turn. [6 tr, 5 ch-1 sps]
WS row. Ch6 (counts as tr and ch3), (tr into the next tr, ch3) 4 times, tr into the final tr — that final tr is worked into the third ch of the beginning ch-4 from Row 1, turn. [6 tr, 5 ch-3 sps]
Ch8 (counts as tr and ch5), (tr into the next tr, ch5) 4 times, tr into the final tr, turn. [6 tr, 5 ch-5 sps]
Ch10 (counts as tr and ch7), (tr into the next tr, ch7) 4 times, tr into the final tr, turn. [6 tr, 5 ch-7 sps]
Ch12 (counts as tr and ch9), tr into the next tr, ch7, (tr, ch3, tr) all into the following tr, ch7, (tr, ch3, tr) all into the next tr, ch7, tr into the next tr, ch9, tr into the final tr, turn. [8 tr, 2 ch-9 sps, 3 ch-7 sps, 2 ch-3 sps]
Ch14 (counts as tr and ch11), tr into the next tr, (ch9, tr into the next tr, ch5, tr into the next tr) twice, ch9, tr into the next tr, ch11, tr into the final tr, turn. [8 tr, 2 ch-11 sps, 3 ch-9 sps, 2 ch-5 sps]
Ch16 (counts as tr and ch13), tr into the next tr, ch11, (tr into the next tr, ch7, tr into the next tr, ch11) twice, tr into the next tr, ch13, tr into the final tr, turn. [8 tr, 2 ch-13 sps, 3 ch-11 sps, 2 ch-7 sps]
Ch8, ss into the fifth ch from the hook (counts as tr and picot), ch15, tr into the next tr, picot, (ch13, tr into the next tr, picot, ch9, tr into the next tr, picot) twice, ch13, tr into the next tr, picot, ch15, tr into the final st, picot. [8 tr, 8 picots, 2 ch-15 sps, 3 ch-13 sps, 2 ch-9 sps] Fasten off and weave in all ends.
With black and silver held together as one strand, ch5. Each of these webs will be joined to the previous web during Row 8 to form the bunting.
Work exactly as Rows 1–7 of the First Web.
Ch8, ss into the fifth ch from the hook (counts as tr and picot), ch15, tr into the next tr, picot, (ch13, tr into the next tr, picot, ch9, tr into the next tr, picot) twice, ch13, tr into the next tr, picot, ch15, tr into the final st, ch2, ss into the first picot on the previous web, ch2, ss into the top of the tr on the current web. [8 tr, 8 picots, 7 ch-sps] Fasten off and weave in all ends.
For the best possible result, lightly block the finished bunting. This opens up the chain spaces, evens out the web shapes, and really makes the whole garland look polished and professional.
Every October I hang this bunting up and it instantly transforms the whole room — there's just something about those glittery black webs catching the lamplight that feels genuinely spooky and beautiful at the same time. 🕸️ It's the kind of decoration that gets comments every single year, and the best part is knowing you made it yourself. Whether you're dressing up a mantle, a window, or a party table, this garland earns its place. Grab your threads, put on something atmospheric, and enjoy every stitch — you're going to love how this turns out. ✨🧶
You can, but the finished webs will be much larger and the lacy chain spaces will look quite different — more chunky than delicate. The pattern was designed for fine cotton thread at 3mm, so switching to DK with a larger hook will roughly double the size of each web and you'll lose that spidery, gossamer quality that makes this decoration so effective.
The silver metallic thread is what gives the webs their sparkly haunted-house shimmer, so it's worth tracking down if you can. If you genuinely can't find it, a thin silver or grey lace-weight yarn held with the black cotton will give a similar two-tone effect, though without quite the same glittery finish.
The join happens during Row 8 of each new web — after working the final ch15 and tr sequence, you ch2, slip stitch into the outermost picot on the finished previous web, ch2, then slip stitch back into the top of your current treble. Lay both webs flat before you work that join so you can clearly see which picot to target.
It's rated intermediate because of the increasing chain lengths per row and the joining technique on Row 8 — if you've only done simple sc or dc projects, it might feel a bit fiddly at first. That said, once you understand how the turning chain system works across the rows, the pattern has a real logic to it and becomes much easier to follow.
This almost always comes down to tight tension. Try going up to a 3.5mm hook and consciously relaxing your grip on the thread. Blocking after finishing also opens the spaces dramatically — don't skip that step, especially if you're a naturally tight crocheter.
