About This Hanging Ivy Car Plant Amigurumi Pattern

This makes a fantastic housewarming gift for a new car owner or a sweet 'just because' present for your plant-loving friends who can't keep a real one alive in the heat.
Ideal for those with basic crocheting experience, featuring slightly more advanced stitches and techniques to expand your skills.
Fits nicely into a free afternoon — 2 to 5 hours of focused, enjoyable crocheting.
A warm touch for your space that transforms ordinary corners into inviting nooks filled with handmade charm.
This makes a fantastic housewarming gift for a new car owner or a sweet 'just because' present for your plant-loving friends who can't keep a real one alive in the heat.
I absolutely adore how the tiny flowers pop against the green leaves! It's one of those projects that looks super intricate once it's all put together, but the individual pieces are actually quite relaxing to stitch up while watching a movie.
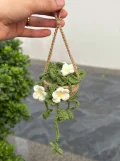
I remember the first time I saw one of these in a friend's car. It was such a bright spot in a cluttered interior! I knew I had to design one that felt lush but didn't take forever to make. The trickiest part for me was the leaves—I wanted them to look like real ivy, not just green blobs. By working them directly into the vine chain, you save so much time on sewing later. I recommend using a slightly smaller hook than you think you need for the pot itself; it helps keep the stuffing from peeking through when it's hanging in the bright sunlight. Also, try mixing up the shades of green for the vines! If you have some scrap yarn in a darker forest green and a lighter lime, use both to give the plant more depth. It’s those little details that really make the amigurumi come to life.
If you find the hanging chain is a bit too bouncy, you can always use a cotton yarn rather than an acrylic blend. Cotton has less stretch, which helps the plant stay exactly where you want it while you're driving. I also like to add a tiny drop of essential oil to the stuffing inside—it turns your cute little plant into a car freshener too! Just make sure it's an oil that won't stain the yarn.
Bring a little bit of the outdoors into your daily commute with this darling hanging plant. It's the perfect size to swing from a rearview mirror without blocking your view, and the best part? No watering required! You'll love how those tiny vines drape over the side of the pot, adding a touch of handmade charm to your car's interior.
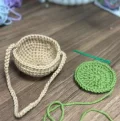
Start with a MR and ch 1. Work 10 sc into the ring, then join with a sl st to the first st. (10)
ch 1, then repeat (1 sc, 1 inc) 5 times around. Close the round with a sl st. (15)
ch 1, then repeat (2 sc, 1 inc) 5 times around. Close the round with a sl st. (20)
ch 1, then repeat (3 sc, 1 inc) 5 times around. (25)
ch 1, then repeat (4 sc, 1 inc) 5 times around. (30)
ch 1, then repeat (5 sc, 1 inc) 5 times around. (35)
ch 1, then repeat (6 sc, 1 inc) 5 times around. (40)
Work 1 sc into each of the 40 stitches around. (40)
Do not cut the yarn. sl st into the end of Round 11, then ch 60 to create the hanging strap. Attach to the opposite side of the pot and fasten off.
Begin with a MR and ch 1. Work 10 hdc into the ring. (10)
Work 2 hdc into every stitch around. (20)
Repeat (1 hdc, 1 inc) 10 times around. (30)
Repeat (2 sc, 1 inc) 10 times around. (40)
Before starting the foliage, create 5 or 6 vines by making chains of 30, 25, and 20. These will serve as the base for your leaves.
You will work between 1 and 5 leaves onto each of your vine chains.
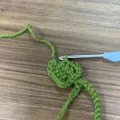
Join your green yarn to a ch on the vine with a slip knot and yo. ch 7, then work 1 sc into the 3rd ch from your hook.
Work 2 hdc and 1 dc into the following stitches. ch 3 and sl st into the next st.
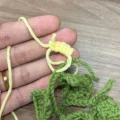
sl st into the opposite side of the foundation chain. ch 3, work 1 dc into the next st, followed by 1 dc, 2 hdc, and 1 sc.
sl st into the very first st of the leaf, then cut the yarn to finish.
Make between 5 and 8 flowers to scatter across your vines.
Using yellow yarn, create a MR directly onto a vine and work 5 sc into it. sl st to join and cut the yarn. (5)
Join white yarn to any yellow st. (ch 2, 2 dc, ch 2, sl st) all into that same st to form a petal.
sl st into the next st and repeat the petal sequence. Continue until you have 5 petals, then sl st to the first st and cut the yarn.
I really hope you have a blast making this little green companion! There's something so satisfying about seeing it swing back and forth while you're driving. It’s a small project that brings a huge amount of joy every time you hop in the car. Don't forget to share your finished plants with the community—I'd love to see the colors you choose! Happy stitching! 🧶✨🌿
You definitely can, but the pot will turn out much larger and might be too bulky for a rearview mirror. Stick to fine yarn for that delicate look.
Vary the lengths of your vine chains and space the leaves at irregular intervals to give it a more organic, wild-grown feel.
The chain of 60 is quite sturdy for such a light item, but you can always do a row of slip stitches back down the chain if you want extra security.
Ensure you are using a smaller hook for the flowers to keep the stitches tight, and pull the center magic ring as tight as possible before starting the white petals.
