About This Hungry Hamster Amigurumi Pattern
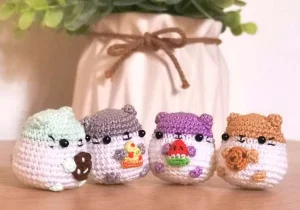
These tiny plushies make wonderful desk buddies to brighten up your workspace, or you can add a keychain ring to take your snack-loving hamster on all your daily adventures.
Ideal for those with basic crocheting experience, featuring slightly more advanced stitches and techniques to expand your skills.
Fits nicely into a free afternoon — 2 to 5 hours of focused, enjoyable crocheting.
An adorable friend to cherish, handcrafted with love to bring comfort and joy for years to come.
These tiny plushies make wonderful desk buddies to brighten up your workspace, or you can add a keychain ring to take your snack-loving hamster on all your daily adventures.
I am absolutely obsessed with how customizable these little guys are! It is so much fun to raid my scrap yarn basket to make a whole army of hamsters, each with a different snack. Plus, working on the tiny details like the little pizza toppings or the acorn cap is incredibly satisfying and keeps the project feeling fresh and exciting from start to finish.
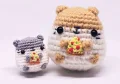
There is something so incredibly magical about making pocket-sized amigurumi. I remember the first time I made one of these little hamsters; I ended up sitting at my kitchen table for hours because I couldn't stop at just one! I kept thinking, 'Oh, this one needs a little strawberry,' and then, 'Wait, a tiny pizza slice would be hilarious.' Before I knew it, I had a whole bakery's worth of snacks and a family of chubby hamsters taking over my desk.
If you want to add a unique touch, try experimenting with variegated yarn for the hamster's head to give them a cute, mottled 'calico' fur look. Another fun trick is to blush their cheeks! Once your hamster is fully assembled, take a pink makeup blush or a pastel chalk and gently brush a tiny bit right under the eyes using a cotton swab. It instantly elevates their cuteness and gives them that sweet, bashful anime look. I can't wait to see which snack your little hammy chooses!
Meet your next pocket-sized obsession! These adorable little hamsters are incredibly quick to make and absolutely love holding their favorite treats. Whether you want to whip up a tiny cookie-munching buddy or a little guy cradling a slice of pizza, this pattern is packed with fun options. They make the perfect desk companions, keychains, or sweet handmade gifts for the animal lovers in your life. Grab your yarn stash and let's make some adorable, chubby cheeks!
Use a 2.25mm crochet hook and start with your main beige yarn.
Work 6 sc into a MR (6)
Work 1 inc in each stitch around (12)
Repeat (1 inc, 1 sc) 6 times (18)
Repeat (1 inc, 2 sc) 6 times (24)
Repeat (1 inc, 3 sc) 6 times (30)
Work 1 sc in each stitch around (30)
Work 1 sc in each stitch around (30)
Switch to white yarn for the following rounds to create the belly color.
Work 1 sc in each stitch around (30)
Work 1 sc in each stitch around (30)
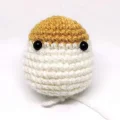
Insert safety eyes between Rounds 8 and 9, keeping them about 6 stitches apart. The top of the eyes should just touch the colored beige section.
Repeat (1 inc, 4 sc) 6 times (36)
Work 1 sc in each stitch around (36)
Work 1 sc in each stitch around (36)
Repeat (1 inc, 5 sc) 6 times (42)
Repeat (1 dec, 5 sc) 6 times (36)
Repeat (1 dec, 4 sc) 6 times (30)
Repeat (1 dec, 3 sc) 6 times (24)
Begin stuffing the body with fiberfill until it is semi-firm, shaping it nicely.
Repeat (1 dec, 2 sc) 6 times (18)
Repeat (1 dec, 1 sc) 6 times (12)
Work 6 dec (6)
Fasten off, add any extra stuffing needed to make the body well-shaped, and sew the bottom closed.
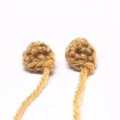
Use a 2.25mm hook and beige yarn. These pieces will serve as both the hands and the feet.
Leave a long yarn tail before starting, ch 2, then work 1 hdc in the 2nd ch from hook. Fasten off and leave a long tail for sewing.
Use a 2.25mm hook and beige yarn.
ch 2, work 4 sc in the 2nd ch from hook (4)
Repeat (1 inc, 1 sc) 2 times (6)
Cut the yarn and leave a long tail for sewing.
Use a 2.25mm hook and beige yarn.
ch 2, work 4 sc in the 2nd ch from hook (4)
Cut the yarn and leave a long tail for sewing.
Use this pattern if you only have one yarn size. Use a 2.25mm hook and brown yarn.
In a MR, ch 2, then work 8 hdc into the ring (8)
Work 1 sl st in each stitch around (8)
Fasten off and leave a long tail. Use dark brown yarn to stitch on tiny straight lines or knots for chocolate chips.
Use this pattern if you have a smaller yarn and hook than what was used for the hamster.
Work 6 sc into a MR (6)
Work 1 inc in each stitch around (12)
Repeat (1 inc, 1 sc) 6 times (18)
Work 1 sc in each stitch around in BLO (18)
Repeat (1 dec, 1 sc) 6 times (12)
Work 6 dec (6)
Fasten off and leave a long tail. Embroider small chocolate chip triangles using dark brown thread, then sew the opening closed.
Use a 1.10mm hook. For Watermelon: use red/pink for Rounds 1-4, white for Round 5, and green for Round 6. For Pizza: use yellow for Rounds 1-5 and brown/beige for Round 6.
Work 4 sc into a MR (4)
Repeat (1 inc, 1 sc) 2 times (6)
Repeat (1 inc, 2 sc) 2 times (8)
Repeat (1 inc, 3 sc) 2 times (10)
Repeat (1 inc, 4 sc) 2 times (12)
Repeat (1 inc, 5 sc) 2 times (14)
Fasten off and leave a long tail. Flatten the triangle shape so the tail is on one side. For watermelon, sew small black seeds. For pizza, embroider tiny red pepperoni circles and green diagonal pepper lines. Sew the bottom closed by threading the tail through the BLO of the last round.
Use a 1.10mm hook and pink/red yarn.
Work 6 sc into a MR (6)
Work 1 sc in each stitch around (6)
Work 1 inc in each stitch around (12)
Repeat (1 inc, 2 sc) 4 times (16)
Work 1 sc in each stitch around (16)
Repeat (1 dec, 1 sc) 4 times (12)
Work 6 dec (6)
Stuff lightly, embroider tiny seeds with white thread, sew closed, and leave a long tail for attaching.
Use a 1.10mm hook and green thread.
In a MR, repeat (ch 2, 1 sl st in the 2nd ch from hook, 1 sl st into the MR) 5 times to form the leaves. Fasten off and sew to the top of the strawberry.
Use a 1.10mm hook and light brown/orange yarn.
Work 6 sc into a MR (6)
Repeat (1 inc, 1 sc) 3 times (9)
Repeat (1 inc, 2 sc) 3 times (12)
Work 1 sc in each stitch around (12)
Repeat (1 inc, 3 sc) 3 times (15)
Work 1 sc in each stitch around in BLO (15)
Fasten off, but do not sew the bottom closed.
Use a 1.10mm hook and dark brown yarn.
Work 6 sc into a MR (6)
Work 1 inc in each stitch around (12)
Repeat (1 inc, 1 sc) 6 times (18)
Work 1 sl st in each stitch around (18)
Fasten off, leaving a long tail. Sew the front loops of the cap to the edge of the acorn body. Embroider a French knot on top of the cap to form the little stem.
I hope you have the absolute best time bringing these hungry little hamsters to life! They are such a joy to crochet, and seeing their chubby little faces hold their tiny snacks never fails to make me smile. Don't stop at just one — mix and match different yarn colors and snacks to create a whole family of hamsters! Happy crocheting, and may your days be filled with cozy stitches and adorable finishes! 🧶✨🐹
Absolutely! If you use a super bulky blanket yarn with a matching hook (like a 5.0mm or 6.0mm), your hamster will turn out much larger and incredibly huggable. Just make sure to scale up the safety eyes and snack yarn accordingly!
To get a clean color transition, complete the final pull-through of the last stitch in Round 7 with your new white yarn. This makes the first stitch of Round 8 a solid, crisp white.
The key to a steady hamster is the stuffing and foot placement. Make sure to stuff the bottom firmly to flatten the base, and sew the feet horizontally on Round 17 so they act as stabilizers.
No safety eyes, no problem! You can easily embroider the eyes using black yarn or embroidery thread. Just stitch small French knots or satin stitch circles between Rounds 8 and 9.
