🧢 Beautiful ✨ Detailed πŸ’ Adorable

Jack in Love Amigurumi Pattern

Jack in Love Amigurumi Pattern
4.6β˜…Rating
5-7 HoursTime Needed
3.2KMade This
βœ‚οΈ

Intermediate Level

Ideal for those with basic crocheting experience, featuring slightly more advanced stitches and techniques to expand your skills.

⏱️

Weekend Treat

Takes 5-7 hours, making it an enjoyable project to finish over a couple of days.

🐰

Whimsical Buddy

Playful characters full of personality, designed to spark imagination and become cherished playtime favorites.

About This Jack in Love Amigurumi Pattern

Jack in Love Amigurumi Pattern crochet pattern - detailed view

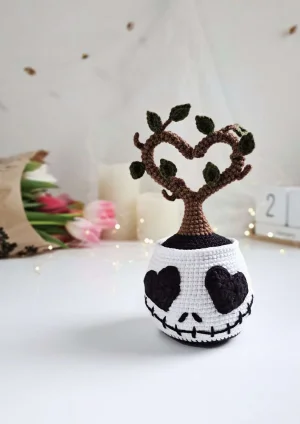
This piece makes a stunning handmade gift for fans of gothic animation. It's thoughtful enough for a special occasion but compact enough to display anywhere from a bookshelf to an office desk.

Why You'll Love This Jack in Love Amigurumi Pattern

I absolutely love how this pattern uses wire to give the branches so much personality! It's not just a stuffed toy; it's a piece of fiber art that stays exactly how you pose it. Plus, the contrast between the crisp white pot and the dark embroidery is so satisfying to finish.

Jack in Love Amigurumi Pattern step 1 Jack in Love Amigurumi Pattern step 2 Jack in Love Amigurumi Pattern step 3 Jack in Love Amigurumi Pattern step 4

Switch Things Up

When I first sat down to design this Jack-inspired tree, I really wanted to capture that balance between a spooky skeleton and a romantic heart. The trickiest part is definitely the wire armature. If you've never worked with wire in crochet before, don't be intimidated! It’s just like stuffing, but it gives you so much more control over the final shape. I found that bending the wire into a small loop at the top of the branch before closing it up is a lifesaverβ€”it keeps the sharp end from ever poking through your hard work.

For the pot, I used a semi-X stitch (yarn under) which creates those neat little 'X' shapes instead of 'V's. It makes the fabric much firmer, which is exactly what you want for a structural piece like this. If you want to change things up, try using a deep purple or a dark charcoal for the pot instead of whiteβ€”it gives it a completely different, even moodier vibe. Whatever you choose, take your time with the facial embroidery; those little stitches are what really bring Jack to life!

Common Mistakes & How to Fix Them

βœ— If your plastic base is too light or too small, the tree will be top-heavy and tip over easily once you add the wire.βœ— When inserting the wire, if you don't bend the ends into loops, they might poke through your stitches over time and ruin the fabric.βœ— Attaching the eyes too far apart can lose the heart-shaped look of the face; keep them exactly 6 stitches apart on the 14th white round.βœ— Failing to use a stitch marker when the branches split at Round 17 can lead to uneven branch lengths, making the heart look lopsided.

Jack in Love Amigurumi Pattern

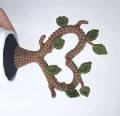
This quirky little project is the perfect blend of spooky and sweet. You will be crafting a potted tree of love inspired by everyone's favorite Pumpkin King, complete with heart-shaped eyes and a wire-framed branch that forms a heart. It's a wonderful way to bring a bit of gothic charm to your shelf or to gift to someone who loves a bit of dark whimsy in their life.

Intermediate 5-7 Hours

Materials Needed for Jack in Love Amigurumi Pattern

β€” Main Fabric

  • 01
    Approximately 20g of white sport weight cotton/acrylic blend for the pot
  • 02
    About 15g of black sport weight yarn for the base, soil, and facial details
  • 03
    Roughly 10g of brown sport weight yarn for the main tree trunk and branches
  • 04
    Small amount (5g) of green sport weight yarn for the foliage

β€” Tools Required

  • 01
    2 mm crochet hook (or size needed to achieve a tight fabric)
  • 02
    60 cm of 2 mm thick copper or aluminum wire for the internal structure
  • 03
    Polyester fiberfill for stuffing
  • 04
    A flat piece of plastic (like a container lid) for the steady base
  • 05
    Tapestry needle and sharp scissors
  • 06
    Stitch markers and sewing pins
  • 07
    Stuffing tool such as a wooden skewer or tweezers

Progress Tracker

0% Complete

β€” 1. The Base Pot :

Round 1 :

Start with black yarn and work 6 sc into a MR (6)

Round 2 :

Work 1 inc in every stitch around (12)

Round 3 :

Repeat (1 inc, 1 sc) 6 times (18)

Round 4 :

Repeat (1 inc, 2 sc) 6 times (24)

Round 5 :

Repeat (1 inc, 3 sc) 6 times (30)

Round 6 :

2 sc, (1 inc, 4 sc) 5 times, 1 inc, 2 sc (36)

Round 7 :

Repeat (1 inc, 5 sc) 6 times (42)

Round 8 :

3 sc, (1 inc, 6 sc) 5 times, 1 inc, 3 sc (48)

Round 9 :

Repeat (1 inc, 7 sc) 6 times (54)

Round 10 :

4 sc, (1 inc, 8 sc) 5 times, 1 inc, 4 sc (60)

Colour Change :

Switch to white yarn and cut the black yarn.

Round 11 :

Working in BLO only, sc in each stitch (60)

Round 12 :

Repeat (1 inc, 9 sc) 6 times (66)

Round 13 :

sc in every stitch (66)

Round 14 :

5 sc, (1 inc, 10 sc) 5 times, 1 inc, 5 sc (72)

Round 15 :

sc in every stitch (72)

Round 16 :

Repeat (1 inc, 11 sc) 6 times (78)

Round 17-21 :

sc in every stitch for 5 full rounds (78)

Round 22 :

Repeat (1 dec, 11 sc) 6 times (72)

Round 23-25 :

sc in every stitch for 3 full rounds (72)

Round 26 :

5 sc, (1 dec, 10 sc) 5 times, 1 dec, 5 sc (66)

Round 27-30 :

sc in every stitch for 4 full rounds (66)

Info :

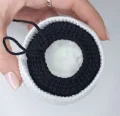
Insert your circular plastic piece into the bottom now to keep the base flat.

Round 31 :

Working in FLO only, sc in each stitch (66)

Round 32 :

sc in every stitch (66)

Note :

Fasten off and leave a 20 cm tail to finish the edge neatly.

β€” 2. Soil Surface :

Info :

Join black yarn to the remaining back loops of Round 30 on the pot.

Round 1 :

Repeat (1 dec, 9 sc) 6 times using regular decreases (60)

Round 2 :

4 sc, (1 dec, 8 sc) 5 times, 1 dec, 4 sc (54)

Round 3 :

Repeat (1 dec, 7 sc) 6 times (48)

Round 4 :

Repeat (1 dec, 6 sc) 6 times (42)

Round 5 :

Repeat (1 dec, 5 sc) 6 times (36)

Round 6 :

Repeat (1 dec, 4 sc) 6 times (30)

Info :

Stuff the pot firmly before continuing.

Round 7 :

Repeat (1 dec, 3 sc) 6 times (24)

β€” 3. The Tree Trunk :

Colour Change :

Switch to brown yarn and fasten off the black.

Round 8 :

Working in FLO only, sc in each stitch (24)

Round 9 :

Repeat (1 dec, 2 sc) 6 times (18)

Round 10-11 :

sc in every stitch for 2 rounds (18)

Round 12 :

Repeat (1 dec, 1 sc) 6 times (12)

Round 13-16 :

sc in every stitch for 4 rounds (12)

Info :

Stuff the stem firmly. We will now divide for the branches.

Round 17 :

6 sc, ch 2 (8)

β€” 4. First Branch :

Round 18 :

Work 6 sc into the previous round, then 2 sc into the BLO of the ch (8)

Round 19-27 :

sc in every stitch for 9 rounds (8)

Round 28 :

1 dec, 6 sc (7)

Round 29-32 :

sc in every stitch for 4 rounds (7)

Round 33 :

1 dec, 5 sc (6)

Round 34-43 :

sc in every stitch for 10 rounds (6)

Info :

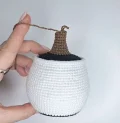
Insert your first wire piece, cut the yarn, and sew the tip closed.

β€” 5. Second Branch :

Info :

Join brown yarn to the remaining loops of the chain from Round 17.

Round 17 :

2 sc along the chain, then 6 sc around the stem (8)

Round 18 :

sc in every stitch (8)

Round 19-43 :

Repeat the same sequence of rounds as the first branch.

Info :

Insert the second wire, close the tip, and sew any gap between the branches.

β€” 6. Foliage :

Separate Leaves :

Make 4: ch 4, starting in 2nd ch: 1 sc, 2 hdc in one loop, 1 sc, ch 2, sl st in 2nd ch. Rotate and work on other side: 1 sc, 2 hdc in one loop, 1 sc, sl st in first st.

Branch Leaves :

Make 4: ch 5 and attach directly to the tree with a sl st. Work the leaf pattern as above, but use brown yarn for the final sl st to blend.

Small Twigs :

Join brown yarn to a branch, ch 6, sl st into 2nd ch and back down (5 sl st), sl st to starting point.

β€” 7. Heart Eyes :

Row 1 :

With black yarn, ch 2, work 3 sc into the 2nd ch from hook, ch 1, turn (3)

Row 2 :

1 inc, 1 sc, 1 inc, ch 1, turn (5)

Row 3 :

1 inc, 3 sc, 1 inc, ch 1, turn (7)

Row 4 :

1 inc, 5 sc, 1 inc, ch 1, turn (9)

Row 5 :

Skip 2 sts, in 3rd st work (1 hdc, 2 dc, 2 tr, 2 dc, 1 hdc). sl st in next st, skip 2 sts, in 3rd st work (1 hdc, 2 dc, 2 tr, 2 dc, 1 hdc).

Border :

Work sc around the edges of the heart to smooth it out: 3 sc on side, 3 sc in base ch, 3 sc on other side.

Assembly Instructions

  • Position the heart-shaped eyes between white rounds 8 and 18. Ensure they are exactly 6 stitches apart at their closest point.
  • Sew the eyes onto the pot using an invisible stitch, catching the pot surface and the back of the eye stitches.
  • Use pins to mark a curved guideline for the mouth, then embroider it with black yarn using a simple running stitch.
  • Add small vertical stitches across the mouth line to create the signature stitched-shut appearance.
  • Embroider two small diagonal lines for the nostrils between white rounds 6 and 8, spaced 1 stitch apart at the top and 5 at the bottom.
  • Carefully bend the wired branches toward each other and curve them into a heart shape, securing the tips together if needed.
  • Sew the separate leaves and small twigs onto the branches randomly to give the tree a natural, wild look.

Important Notes

  • πŸ’‘Use the 'semi-X' stitch (yarn under) for a denser fabric that prevents stuffing from showing through the black soil.
  • πŸ’‘When working the decreases on the soil, use regular decreases instead of invisible ones to help the top flatten out correctly.
  • πŸ’‘Ensure your wire is long enough to extend halfway down into the stuffed pot; this provides the leverage needed to keep the tree upright.
  • πŸ’‘Before sewing the eyes, align the 'dip' of the heart branch with the center of the face for a symmetrical finished look.
  • πŸ’‘If your white yarn is thinner than your black yarn, you may need to adjust your tension to keep the pot from flaring out too much.

I really hope you enjoyed making this little Jack in Love! There is something so satisfying about the way the wire armature transforms a simple crochet tube into a delicate, poseable tree. It’s the perfect project for a rainy weekend when you want to create something with a bit of personality and soul. Don't forget to play around with the leaf placement β€” every tree should be a little bit different! I'd love to see how yours turned out. Happy crafting and enjoy your new spooky companion! 🧢 ✨

You ask,

we answer.

FAQs

What kind of wire is best for the branches?

I recommend 2 mm copper wire because it is very stable but still easy to bend with your hands. Aluminum wire also works well, but avoid very thin floral wire as it won't hold the weight of the branches and leaves.

Can I use safety eyes instead of the crocheted hearts?

You can, but the heart-shaped eyes are a key part of the 'Jack' aesthetic! If you choose safety eyes, I suggest using large 12mm or 14mm black ones to maintain the character's look.

My tree keeps falling over, how can I fix it?

This usually happens if the plastic base in the pot is too small or if the pot isn't stuffed firmly enough. You can also try adding some clean pebbles or glass weights at the bottom before stuffing to lower the center of gravity.

How do I make the 'straight edge' join mentioned in the pattern?

This is a finishing technique where you skip one stitch, thread your needle through the second stitch, and then go back into the middle of the last stitch you made. it creates a seamless loop that hides the round transition.