About This Jessy and Woody Toy Story Amigurumi Pattern
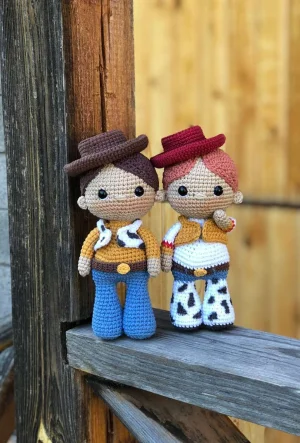
This duo is the ultimate gift for any Disney lover or a nostalgic treat for yourself. They look incredible on a nursery shelf or as a centerpiece in a toy collection.
Ideal for those with basic crocheting experience, featuring slightly more advanced stitches and techniques to expand your skills.
Requires 8-10 hours, ideal for a full day of immersive crocheting.
An adorable friend to cherish, handcrafted with love to bring comfort and joy for years to come.
This duo is the ultimate gift for any Disney lover or a nostalgic treat for yourself. They look incredible on a nursery shelf or as a centerpiece in a toy collection.
I absolutely adore how this pattern brings back so many childhood memories! There is something so satisfying about seeing Woody and Jessy's iconic outfits come together, especially when you add the little waistcoats. I love that it challenges you with different hook sizes and techniques, but the result is a pair of dolls that look like they jumped right out of the movie screen.
I still remember the first time I watched Toy Story and how much I wanted my own set of toys that came to life when I left the room. Making these dolls felt like I was finally making that childhood dream a reality. I spent so much time picking out the perfect 'jeans blue' and that specific 'mustard yellow' to make sure they looked just right.
One thing I learned while making these is that the details really are everything. Don't rush the waistcoat or the belt—those are the pieces that give them their personality! I actually found that using a slightly smaller hook for the belt made it look much crisper. If you're feeling adventurous, you can even use a fabric marker for the cow spots on the legs, but I personally love the look of tiny crocheted spots for that extra handmade touch.
These two look so sweet sitting together on a shelf. I hope you enjoy every single stitch of this project as much as I did. There is something so special about creating characters that hold so many memories. Happy crocheting, and I cannot wait to see your finished duo!
Bring the magic of the wild west into your home with this darling duo! You'll love recreating these iconic characters, from Woody's classic cowboy hat to Jessy's signature terracotta hair. This project is such a joy to work on because of all the tiny, thoughtful details that make them look just like they stepped off the screen. It's the perfect way to spend a cozy weekend with your hook and yarn.
Start with beige yarn and work 6 sc into a mr.
Work 6 inc around (12).
Repeat (1 sc, inc) six times (18).
Repeat (2 sc, inc) six times (24).
Repeat (3 sc, inc) six times (30).
Repeat (4 sc, inc) six times (36).
Repeat (5 sc, inc) six times (42).
Repeat (6 sc, inc) six times (48).
Repeat (7 sc, inc) six times (54).
Work 54 sc around (54).
Work 54 sc around (54).
Work 54 sc around (54).
Work 54 sc around (54).
Work 54 sc around (54).
Work 54 sc around (54).
Work 54 sc around (54).
Work 54 sc around (54).
Work 54 sc around (54).
Work 54 sc around (54).
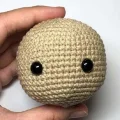
Place your 7-8mm safety eyes between Round 15 and Round 16.
Repeat (7 sc, dec) six times (48).
Repeat (6 sc, dec) six times (42).
Repeat (5 sc, dec) six times (36).
Repeat (4 sc, dec) six times (30).
Repeat (3 sc, dec) six times (24).
Repeat (2 sc, dec) six times (18).
Stuff the head firmly and leave a long tail to sew it to the body later.
Using terracotta yarn, work 6 sc into a mr.
Work 6 inc around (12).
Repeat (1 sc, inc) six times (18).
Repeat (2 sc, inc) six times (24).
Repeat (3 sc, inc) six times (30).
From here, you will stop working in rounds and begin working in turning rows to shape the hair.
Work (4 sc, inc) six times, then ch 1 and turn (36).
Work (5 sc, inc) six times, then ch 1 and turn (42).
Work (6 sc, inc) six times, then ch 1 and turn (48).
Work (7 sc, inc) six times, then ch 1 and turn (54).
Work (8 sc, inc) six times, then ch 1 and turn (60).
Work 1 dec, 56 sc, 1 dec, then ch 1 and turn (58).
Work 2 dec, 50 sc, 2 dec, then ch 1 and turn (54).
Work 2 dec, 46 sc, 2 dec, then ch 1 and turn (50).
Work 2 dec, 42 sc, 2 dec, then ch 1 and turn (46).
Work 2 dec, 38 sc, 2 dec, then ch 1 and turn (42).
Work 2 dec, 34 sc, 2 dec, then ch 1 and turn (38).
Work 38 sc across (38).
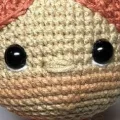
Work 24 sc along the front edge to create the bangs.
Finish with 38 sc and leave a long tail for sewing.
Using brown yarn, work 6 sc into a mr.
Work 6 inc around (12).
Repeat (1 sc, inc) six times (18).
Repeat (2 sc, inc) six times (24).
Repeat (3 sc, inc) six times (30).
Work (4 sc, inc) six times, then ch 1 and turn (36).
Work (5 sc, inc) six times, then ch 1 and turn (42).
Work (6 sc, inc) six times, then ch 1 and turn (48).
Work (7 sc, inc) six times, then ch 1 and turn (54).
Work (8 sc, inc) six times, then ch 1 and turn (60).
Work 1 dec, 56 sc, 1 dec, then ch 1 and turn (58).
Work 2 dec, 50 sc, 2 dec, then ch 1 and turn (54).
Work 2 dec, 46 sc, 2 dec, then ch 1 and turn (50).
Work 2 dec, 42 sc, 2 dec, then ch 1 and turn (46).
Work 2 dec, 38 sc, 2 dec, then ch 1 and turn (42).
Work 2 dec, 34 sc, 2 dec, then ch 1 and turn (38).
Work 38 sc across (38).
Work 24 sc along the front edge for the bangs.
Complete with 38 sc and leave a tail for assembly.
Using beige yarn, work 6 sc into a mr and fasten off, leaving a tail.
Start with dark grey yarn and work 6 sc into a mr.
Work 6 inc around (12).
Repeat (1 sc, inc) six times (18).
Repeat (2 sc, inc) six times (24).
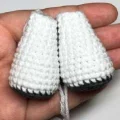
Switch to white yarn and work 24 sc into the blo (24).
Work 24 sc around (24).
Work 24 sc around (24).
Repeat (6 sc, dec) three times (21).
Work 21 sc around (21).
Work 21 sc around (21).
Repeat (5 sc, dec) three times (18).
Work 18 sc around (18).
Repeat (4 sc, dec) three times (15).
Work 15 sc around (15).
Work 15 sc around (15).
Repeat (3 sc, dec) three times (12).
Work 12 sc around (12).
Start with blue yarn and work 6 sc into a mr.
Work 6 inc around (12).
Repeat (1 sc, inc) six times (18).
Repeat (2 sc, inc) six times (24).
Work 24 sc into the blo (24).
Work 24 sc around (24).
Work 24 sc around (24).
Repeat (6 sc, dec) three times (21).
Work 21 sc around (21).
Work 21 sc around (21).
Repeat (5 sc, dec) three times (18).
Work 18 sc around (18).
Repeat (4 sc, dec) three times (15).
Work 15 sc around (15).
Work 15 sc around (15).
Repeat (3 sc, dec) three times (12).
Work 12 sc around (12).
Join the legs with a 3 ch gap: work 12 sc on the first leg, 3 sc on the ch, 12 sc on the second leg, and 3 sc on the other side of the ch (30).
Repeat (4 sc, inc) six times (36).
Repeat (5 sc, inc) six times (42).
Switch to brown and work 42 sc (42).
Work 42 sc (42).
Switch to white and work 42 sc (42).
Work 42 sc (42).
Repeat (12 sc, dec) three times (39).
Repeat (11 sc, dec) three times (36).
Repeat (10 sc, dec) three times (33).
Repeat (9 sc, dec) three times (30).
Repeat (8 sc, dec) three times (27).
Repeat (7 sc, dec) three times (24).
Repeat (6 sc, dec) three times (21).
Work 21 sc around (21).
Work 21 sc around (21).
Repeat (5 sc, dec) three times (18).
Work 18 sc around (18).
Join legs with a 3 ch gap: 12 sc on leg, 3 sc on ch, 12 sc on second leg, 3 sc on ch (30).
Repeat (4 sc, inc) six times (36).
Repeat (5 sc, inc) six times (42).
Work 42 sc (42).
Work 42 sc (42).
Work 42 sc (42).
Change to mustard yarn and work 42 sc in blo (42).
Repeat (12 sc, dec) three times (39).
Repeat (11 sc, dec) three times (36).
Repeat (10 sc, dec) three times (33).
Repeat (9 sc, dec) three times (30).
Repeat (8 sc, dec) three times (27).
Repeat (7 sc, dec) three times (24).
Repeat (6 sc, dec) three times (21).
Work 21 sc (21).
Work 21 sc (21).
Repeat (5 sc, dec) three times (18).
Work 18 sc (18).
Using yellow yarn, work 6 sc into a mr and sew to the center of the belt area.
Use brown yarn and a 1.3mm hook. Ch 4.
Work 3 sc, then ch 1 and turn. Repeat for 60 rows total to reach the desired length.
Using beige yarn, work 6 sc into a mr.
Repeat (1 sc, inc) three times (9).
Work 9 sc around for these three rounds (9).
For Woody, change to mustard yarn at Round 6 and work 9 sc for Rounds 7-16.
For Jessy, work Rounds 6-7 in yellow, Round 8 in red, and Rounds 9-16 in white.
Using mustard yarn, ch 43.
Sc in next 5 sts, ch 9, skip 9 sts, sc 14, ch 9, skip 9 sts, sc 5, ch 1 and turn (42).
Work 42 sc across, ch 1 and turn (42).
Work a border around the entire piece: 3 sc on the side, 42 sc across the top, 3 sc on the other side, and 42 sc across the bottom.
Work 6 sc into a mr using the appropriate hat color (burgundy for Jessy, brown for Woody).
Work 6 inc around (12).
Repeat (1 sc, inc) six times (18).
Repeat (2 sc, inc) six times (24).
Repeat (3 sc, inc) six times (30).
Repeat (4 sc, inc) six times (36).
Work 36 sc into the blo (36).
Work 36 sc around for these four rounds (36).
Work (5 sc, inc) six times into the blo (42).
Work 3 sc, 1 inc, then repeat (6 sc, inc) five times, finish with 3 sc (48).
Repeat (7 sc, inc) six times (54).
Work 4 sc, 1 inc, then repeat (8 sc, inc) five times, finish with 4 sc (60).
Repeat (9 sc, inc) six times (66).
Work 5 sc, 1 inc, then repeat (10 sc, inc) five times, finish with 5 sc (72).
Repeat (11 sc, inc) six times (78).
Work 78 sc around and fasten off (78).
I am so excited for you to get started on this Toy Story adventure! These dolls really come to life as you add the final details, and I promise the effort is worth it when you see them standing together. Whether they are joining a collection or becoming a favorite new toy for someone special, they carry so much heart in every stitch. Don't forget to take your time with the assembly—it's where the magic happens! I hope you have a wonderful time crafting these two. 🧶✨
The pattern suggests using an indelible black marker for the easiest application. However, if you want a more textured look, you can use a very small hook (around 1.0mm) to crochet tiny irregular 'blobs' and sew them onto the white sections.
You can, but 7-8mm eyes really capture that 'chibi' amigurumi style. If you go smaller, the face might lose some of its cute, expressive personality.
Yes! Because it's worked separately in rows and features armholes, you can put it on and take it off. This adds a great play value to the dolls.
The belt is worked in many short rows. I recommend wrapping it around Woody's waist as you go to check the fit. You might need a few more or fewer rows than the 60 mentioned depending on your tension.
