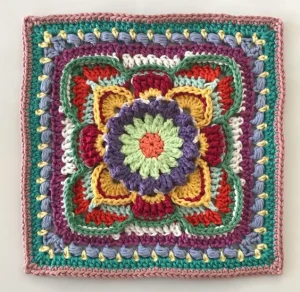
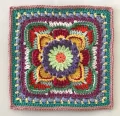
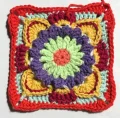
This square is such a joy to hook up because of all the rich textures and layers. It is part of a beautiful legacy series, and you can really feel the heart that went into the design as each round unfolds. Whether you are making a single statement cushion or joining them for a show-stopping heirloom blanket, these intricate stitches will keep you engaged from the very first magic ring to the final border.
Progress Tracker
0% Complete
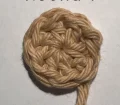
— 1. The Center :
Round 1 :
Using Color A, create a double magic circle. ch 3 (this counts as your first dc), then work 7 dc into the ring. Fasten off with an invisible join to the first true dc. (8 dc)
Round 2 :
Attach Color B in any dc. [(2tr-cluster, ch 1, 2tr-cluster) in the dc, ch 1] 8 times. Fasten off with an invisible join. (16 2tr-cluster, 16 ch-1 sp)
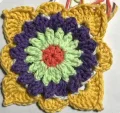
— 2. Building the Petals :
Round 3 :
Join Color C in any ch-1 sp. *Work (hdc, dc, tr) into the space, then ch 2. Fold your work toward you and sc into the previous ch-1 sp (to the right of your current petal), inserting the hook from front to back behind the ch-2 you just made. ch 2, sk the next 2tr-cluster. Repeat from * around. Fasten off with an invisible join. (16 petals)
Round 4 :
Join Color B in the ch-2 sp behind any petal. *(sc, ch 3, sc) in the space; ch 3, sk the ch-2 sp behind the next petal; (sc, ch 2, sc) in the next ch-2 sp; ch 3, sk the ch-2 sp behind the next petal. Repeat from * around. Fasten off with an invisible join. (16 sc, 4 ch-2 sp, 12 ch-3 sp)
Round 5 :
Join Color D in any ch-2 sp. *5 dc in the ch-2 sp, sk the sc, ch 1; sc in the next ch-3 sp, sk the sc; shell in the next ch-3 sp, sk the sc; sc in the next ch-3 sp, ch 1, sk the sc. Repeat from * around. Fasten off with an invisible join. (8 sc, 20 dc, 4 shells, 8 ch-1 sp)
— 3. Squaring the Design :
Round 6 :
Join Color E in the first tr of any shell. *BPsc around the next 5 tr, ch 1, sk the picot; BPsc around the next 5 tr, ch 1; sk the next (sc, ch-1 sp). (FPdc, ch 1, FPdc, ch 1) around each of the next 5 dc. sk the next (ch-1 sp, sc). Repeat from * around. Fasten off with an invisible join. (40 BPsc, 40 FPdc, 48 ch-1 sp)
Round 7 :
Join Color B in the first BPsc after a skipped picot. *dc in the next 5 BPsc; ch 1, sk the ch-1 sp. [FPsc around the next 2 FPdc as one, ch 1] 5 times. sk the next ch-1 sp, dc in the next 5 BPsc, ch 1. dc in the ch-3 sp from the Round 5 picot, ch 1. Repeat from * around. Fasten off with an invisible join. (44 dc, 20 FPsc, 32 ch-1 sp)
Round 8 :
Join Color C in the ch-1 sp before any dc worked into a picot. *3 dc in that ch-1 sp; ch 2 for the new corner, sk the dc; 3 dc in the next ch-1 sp. dc in the next 2 dc, hdc in the next dc, sc in the next 2 dc, ch 1. [sc in the next FPsc, sk the ch-1 sp] 4 times. sc in the next FPsc, ch 1, sc in the next 2 dc. hdc in the next dc, dc in the next 2 dc. Repeat from * around. Fasten off with an invisible join. (44 sc, 8 hdc, 40 dc, 4 ch-2 corner sp)
Round 9 :
Join Color D in any corner ch-2 sp. *5 dc in the corner. [sk the next dc, 2 dc in the next dc] twice. sk the next dc, 3 dc in the next hdc. ch 1, sk the next 3 sc. hdc in the next ch-1 sp from Round 6. ch 1, sc in the next 5 sc from Round 8, ch 1. hdc in the next ch-1 sp from Round 6. ch 1, sk the next 3 sc. 3 dc in the next hdc. [sk the next dc, 2 dc in the next dc] twice, sk the next dc. Repeat from * around. Fasten off with an invisible join. (20 sc, 76 dc, 8 hdc, 16 ch-1 sp)
— 4. Texture and Puffs :
Round 10 :
Join Color B in the first dc of any 5-dc corner group. *BPsc around the next 11 sts, marking the 3rd BPsc with a stitch marker. ch 1, sk the next (dc and skipped sc from Rnd 8). dc in the next 2 skipped sc. Back-stitch dc in the next 5 sc. dc in the next 2 skipped sc. ch 1, sk the next (skipped sc from Rnd 8 and dc from Rnd 9). BPsc around the next 6 sts. Repeat from * around. Fasten off with an invisible join. (68 BPsc, 16 dc, 20 dc back-stitch, 8 ch-1 sp)
Round 11 :
Join Color E in any marked stitch. *(2 hdc, ch 2, 2 hdc) in the marked dc and remove marker. hdc in the next 7 BPsc. ch 1, sk the next BPsc. 2 hdc in the ch-1 sp. [sk the next dc, 2 hdc in the next dc] 4 times. sk the next dc, 2 hdc in the next ch-1 sp. ch 1, sk the next BPsc. hdc in the next 7 BPsc. Repeat from * around. Fasten off with an invisible join. (120 hdc, 8 ch-1 sp, 4 ch-2 corner sp)
Round 12 :
Join Color C in any corner ch-2 sp. *(2 dc, ch 2, 2 dc) in the corner, ch 1, sk the next 2 hdc. [HPS in the next hdc, ch 1, sk the next 2 hdc] twice. HPS in the next hdc, ch 1, sk the (ch-1 sp and hdc). [HPS in the next hdc, ch 1, sk the next 2 hdc] 3 times. HPS in the next hdc, ch 1, sk the (hdc and ch-1 sp). [HPS in the next hdc, ch 1, sk the next 2 hdc] 3 times. HPS in the next hdc, ch 1, sk the next 2 hdc. Repeat from * around. Fasten off with an invisible join. (16 dc, 40 HPS, 44 ch-1 sp, 4 ch-2 corner sp)
— 5. Finishing the Square :
Round 13 :
Join Color D in any corner ch-2 sp. *(sc, ch 2, sc) in the corner; ch 2, sk the next 2 dc. [long sc in the next ch-1 sp, ch 2, sk the next HPS] 10 times. long sc in the next ch-1 sp, ch 2, sk the next 2 dc. Repeat from * around. Fasten off with an invisible join. (8 sc, 44 long sc, 48 ch-2 sp, 4 ch-2 corner sp)
Round 14 :
Join Color B in any corner ch-2 sp. *(2 dc, ch 2, 2 dc) in the corner. [{sk the next sc, 3 dc in the next ch-2 sp} 2 times; sk the next sc, 2 dc in the next ch-2 sp] twice. [sk the next sc, 2 dc in the next ch-2 sp; {sk the next sc, 3 dc in the next ch-2 sp} 2 times] twice. sk the next sc. Repeat from * around. Fasten off with an invisible join. (144 dc, 4 ch-2 corner sp)
Round 15 :
Join Color E in any corner ch-2 sp. *(2 dc, ch 2, 2 dc) in the corner. sk the next dc, then dc in each dc across to the next corner. Repeat from * around. Fasten off and weave in all remaining ends. (156 dc, 4 ch-2 corner sp)
I hope you enjoy every single stitch of this Kinnedy Nichelle square! It is one of those projects that looks incredibly complex but becomes so rewarding once you see the flower blooming in the center. Don't forget to take a moment to admire that rich texture before you move on to the next color. Whether you make one or a dozen, I know your finished project will be absolutely stunning. Happy hooking, and I can't wait to see your color choices! 🧶✨