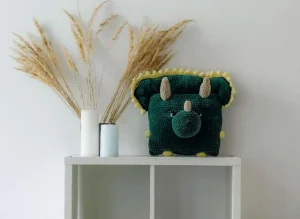
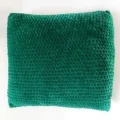
You're going to love how squishy and huggable this dino pillow turns out! It's the perfect blend of a cozy home accent and a playful toy for the little ones. Using plush yarn makes the texture incredibly soft, and the triceratops details like the frilled crest and horns add so much character. It’s a rewarding project that results in a substantial, gift-worthy piece that you'll be proud to display or share.
Progress Tracker
0% Complete
— 1. Main Pillow Body :
Round 1 :
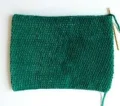
ch 90 and join to the first ch with a sl st to form a large ring (90)
Round 2-37 :
1 sc in each st around (90)
Info :
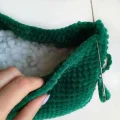
Cut the yarn leaving a long tail. Flatten the tube and sew the top edge closed. Fill the body firmly and evenly with fiberfill, making sure to pack the corners well. Once stuffed, sew the bottom edge shut and hide the yarn tail inside.
— 2. Nose :
Round 1 :
6 sc into a MR (6)
Round 3 :
repeat 6 times: (1 sc, inc) (18)
Round 4 :
repeat 6 times: (2 sc, inc) (24)
Round 5 :
repeat 6 times: (3 sc, inc) (30)
Round 6 :
repeat 6 times: (4 sc, inc) (36)
Round 7 :
repeat 6 times: (5 sc, inc) (42)
Round 8-14 :
1 sc in each st around (42)
Info :
Fasten off and leave a long tail for attaching to the face.
— 3. Legs (Make 2) :
Round 1 :
6 sc into a MR (6)
Round 3 :
repeat 6 times: (1 sc, inc) (18)
Round 4 :
1 sc in each st around (18)
Info :
Fasten off and leave a tail for sewing.
— 4. Arms (Make 2) :
Round 1 :
6 sc into a MR (6)
Round 3 :
1 sc in each st around (12)
Info :
Fasten off and leave a tail for sewing.
— 5. Brow Horns (Make 2) :
Round 1 :
6 sc into a MR (6)
Round 4 :
repeat 2 times: (3 sc, inc) (10)
Round 5 :
repeat 2 times: (4 sc, inc) (12)
Round 6 :
repeat 2 times: (5 sc, inc) (14)
Round 7-12 :
1 sc in each st around (14)
Info :
Stuff the horns and leave a long tail for assembly.
— 6. Nose Horn :
Round 1 :
6 sc into a MR (6)
Info :
Fill with stuffing and leave a long tail for sewing.
— 7. Frilled Crest (Make 2) :
Row 2 :
Starting in 2nd ch: dec, 10 sc, inc, 42 sc, inc, 10 sc, dec, ch 1, turn
Row 3 :
dec, 9 sc, inc, 44 sc, inc, 9 sc, dec, ch 1, turn
Row 4 :
dec, 9 sc, inc, 44 sc, inc, 9 sc, dec, ch 1, turn
Row 5 :
dec, 9 sc, inc, 44 sc, inc, 9 sc, dec, ch 1, turn
Row 6 :
dec, 9 sc, inc, 13 sc, 1 hdc, 16 dc, 1 hdc, 13 sc, inc, 9 sc, dec, ch 1, turn
Row 7 :
dec, 9 sc, inc, 13 sc, 1 hdc, 16 dc, 1 hdc, 13 sc, inc, 9 sc, dec, ch 1, turn
Row 8 :
dec, 9 sc, inc, 12 sc, 1 hdc, 18 sc, 1 hdc, 12 sc, inc, 9 sc, dec, ch 1, turn
Row 9 :
dec, 9 sc, inc, 11 sc, 1 hdc, 20 sc, 1 hdc, 11 sc, inc, 9 sc, dec, ch 1, turn
Row 10 :
dec, 9 sc, inc, 12 sc, 1 hdc, 18 sc, 1 hdc, 12 sc, inc, 9 sc, dec
Info :
Place the two crest pieces together. Using green yarn, sc through both layers around the curved edge to join them. Stuff the crest tightly, then sc the bottom edge shut. Leave a long tail.
— 8. Crest Scallops :
Info :
Attach yellow yarn to the top edge of the crest.
Row 1 :
ch 4, starting in 2nd ch from hook: 1 sc, 1 hdc, 1 dc. Skip 1 loop on the crest edge, 1 sc into the next loop.
Row 2 :
1 sc in each of the next 2 loops.
Info :
Repeat the scallop pattern (ch 4, sc, hdc, dc, skip 1, sc, 2 sc) until you reach the end of the crest edge.
I hope you enjoy every stitch of this prehistoric project! There's something so satisfying about watching a simple rectangular pillow transform into a characterful triceratops. Whether you're making this for a nursery or just to add a bit of whimsy to your own living room, it's sure to be a conversation starter. Don't be afraid to play with the colors too—a purple or blue dino would look just as cute! Happy crafting and enjoy your new cuddly companion! 🧶🦕✨