About This Kirby Inspired Crochet Amigurumi Pattern
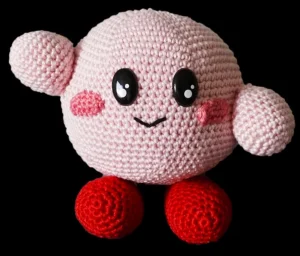
This makes a wonderful handmade gift for any gamer in your life — it sits perfectly on a desk or shelf and genuinely looks like it jumped right out of the game.
Ideal for those with basic crocheting experience, featuring slightly more advanced stitches and techniques to expand your skills.
Fits nicely into a free afternoon — 2 to 5 hours of focused, enjoyable crocheting.
Playful characters full of personality, designed to spark imagination and become cherished playtime favorites.
This makes a wonderful handmade gift for any gamer in your life — it sits perfectly on a desk or shelf and genuinely looks like it jumped right out of the game.
I love this one because it's all about that moment when the face comes together — you press in the safety eyes, embroider that little curved mouth, sew on the blush circles, and suddenly this ball of pink yarn has a whole personality. There's something so fun about making something so immediately recognizable from just a handful of basic rounds. I also love how compact and portable this project is — I finished most of the body on a long train ride.
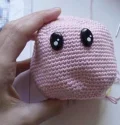
I have a soft spot for character amigurumi, and this little round pink guy might be my all-time favorite quick make. There's something almost meditative about working those long straight rounds on the body — you get into a rhythm, your hands just go, and before you know it you've got this perfect sphere sitting in your lap.
The thing I'd tell anyone making this for the first time: don't rush the face. Seriously, take five extra minutes and move those safety eyes around before you lock them in. I usually cut a small square of cardboard and hold it behind the fabric so I can shift the eyes millimeter by millimeter until the expression is exactly right. Too close together and it looks wrong. Too high and the whole mood changes. Get it right before you click those washers shut because there's no coming back.
I also love how this pattern is a genuinely portable project. The body is the biggest piece and even that fits in a medium ziplock bag. I took mine to a coffee shop and finished the arms and both legs in one sitting. People kept asking what I was making and it was so fun watching their faces when they recognized it.
Color-wise, you could take this in so many directions. A yellow version with a star embroidered on the cheek. An all-white version. A lavender one for a softer palette. The construction stays exactly the same — the only thing that changes is which yarn you pull from your stash.
This little round guy is honestly one of those makes that just makes you smile the whole time you're working on it. That chubby sphere shape, the tiny blush cheeks, those red stubby feet — it all comes together into something so satisfying to hold when you're done. You'll work through a handful of simple pieces that build up fast, and the whole thing stays small enough to tuck into a bag and crochet on the go. If you've been wanting to try your hand at a character amigurumi, this is such a good one to start with.
Work in dark pink. These are crocheted flat in a single round, not in a continuous spiral. Start with a foundation of 4 ch plus 1 turning ch (5 ch total), then begin working from the 2nd ch from the hook.
Work 1 sc into each of the first 3 ch, then 3 sc into the last ch. Rotate and continue along the other side of the foundation: 1 sc into each of the next 2 sts, then 2 sc into the final st. Join with sl st to the first sc. (10 sc total)
Leave a long yarn tail for sewing the cheeks onto the face later. Do not stuff these pieces.
Work in pink throughout. Start with a magic ring.
Place 6 sc into the magic ring. (6 sc)
Work 2 sc into every stitch around. (12 sc)
Work 2 sc into every 2nd stitch around. (18 sc)
Work 2 sc into every 3rd stitch around. (24 sc)
Work 1 sc into every stitch around. (24 sc)
Work 1 sc into every stitch around. (24 sc)
Work 1 sc into every stitch around. (24 sc)
Work 1 sc into every stitch around. (24 sc)
Work 1 sc into every stitch around. (24 sc)
Work 1 sc into every stitch around. (24 sc)
Dec every 3rd and 4th stitch together across the round. (18 sc)
Dec every 2nd and 3rd stitch together across the round. (12 sc)
Stuff the arm firmly before continuing to the next round.
Dec every pair of stitches together around. (6 sc)
Close the remaining hole with your needle and leave a long tail for sewing onto the body later.
Work in red throughout. Start with a magic ring.
Place 6 sc into the magic ring. (6 sc)
Work 2 sc into every stitch around. (12 sc)
Work 2 sc into every 2nd stitch around. (18 sc)
Work 2 sc into every 3rd stitch around. (24 sc)
Work 1 sc into every stitch around. (24 sc)
Work 1 sc into every stitch around. (24 sc)
Work 1 sc into every stitch around. (24 sc)
Work 1 sc into every stitch around. (24 sc)
Work 1 sc into every stitch around. (24 sc)
Work 1 sc into every stitch around. (24 sc)
Work 1 sc into every stitch around. (24 sc)
Work 1 sc into every stitch around. (24 sc)
Work 1 sc into every stitch around. (24 sc)
Work 1 sc into every stitch around. (24 sc)
Dec every 3rd and 4th stitch together across the round. (18 sc)
Dec every 2nd and 3rd stitch together across the round. (12 sc)
Stuff the leg before continuing.
Dec every pair of stitches together around. (6 sc)
Close the hole with your needle, then thread the yarn tail up through the top of the leg so it's ready to use when sewing the leg onto the body.
Note: The PDF states grey yarn for this piece, but the finished photos clearly show pink. Use pink yarn to match the character. Start with a magic ring.
Place 6 sc into the magic ring. (6 sc)
Work 2 sc into every stitch around. (12 sc)
Work 2 sc into every 2nd stitch around. (18 sc)
Work 2 sc into every 3rd stitch around. (24 sc)
Work 2 sc into every 4th stitch around. (30 sc)
Work 2 sc into every 5th stitch around. (36 sc)
Work 2 sc into every 6th stitch around. (42 sc)
Work 2 sc into every 7th stitch around. (48 sc)
Work 2 sc into every 8th stitch around. (54 sc)
Work 2 sc into every 9th stitch around. (60 sc)
Work 2 sc into every 10th stitch around. (66 sc)
Work 2 sc into every 11th stitch around. (72 sc)
Work 1 sc into every stitch around. (72 sc)
Work 1 sc into every stitch around. (72 sc)
Work 1 sc into every stitch around. (72 sc)
Work 1 sc into every stitch around. (72 sc)
Work 1 sc into every stitch around. (72 sc)
Work 1 sc into every stitch around. (72 sc)
Work 1 sc into every stitch around. (72 sc)
Work 1 sc into every stitch around. (72 sc)
Work 1 sc into every stitch around. (72 sc)
Work 1 sc into every stitch around. (72 sc)
Work 1 sc into every stitch around. (72 sc)
Work 1 sc into every stitch around. (72 sc)
Work 1 sc into every stitch around. (72 sc)
Work 1 sc into every stitch around. (72 sc)
Work 1 sc into every stitch around. (72 sc)
Before continuing with the decreases, attach the safety eyes and embroider the mouth with black yarn. Then stuff the head/body. Sew the cheeks onto the face now as well.
Dec every 11th and 12th stitch together across the round. (66 sc)
Dec every 10th and 11th stitch together across the round. (60 sc)
Dec every 9th and 10th stitch together across the round. (54 sc)
Dec every 8th and 9th stitch together across the round. (48 sc)
Dec every 7th and 8th stitch together across the round. (42 sc)
Dec every 6th and 7th stitch together across the round. (36 sc)
Dec every 5th and 6th stitch together across the round. (30 sc)
Dec every 4th and 5th stitch together across the round. (24 sc)
Dec every 3rd and 4th stitch together across the round. (18 sc)
Dec every 2nd and 3rd stitch together across the round. (12 sc)
Add more stuffing at this point if needed so the sphere feels firm and round.
Dec every pair of stitches together around. (6 sc)
Close the remaining opening with your needle and fasten off securely.
There's something really special about making a character that someone instantly recognizes — you hand it over and their face just lights up. This little round amigurumi is such a joy to make. The pieces come together quickly, the construction is satisfying, and that moment when the face is complete and the whole personality clicks into place is just the best. Whether you're making it for yourself or gifting it to someone who grew up loving this character, I hope every stitch brings you as much happiness as the finished piece will. Happy crocheting! 🧶✨
The pattern calls for oval black safety eyes measuring approximately 0.7 x 0.3 inches. These are larger than the round safety eyes used in most amigurumi, so make sure you source oval ones specifically — round eyes in a similar size will change the expression significantly.
You can, but the finished size will increase noticeably — probably closer to 6.5 to 7 inches tall rather than the intended 4.7 inches. You'd also want to size up your hook to around 3.5mm and use proportionally larger safety eyes. The stitch counts stay the same.
Pink is correct. This appears to be a translation or editing slip in the PDF. All the finished photos show a fully pink body, which matches the character, so go with pink for the head/body piece.
Stuff as you go during the decrease rounds rather than waiting until the opening is very small. Push filling into the bottom and sides of the sphere with a blunt pencil or stuffing tool, and keep adding small amounts frequently rather than cramming in a lot at once near the end.
If you've only worked in rows, this is a good next step but there will be a short learning curve with crocheting in continuous rounds and using a magic ring. The stitches themselves are all single crochet — nothing complex — but give yourself a little extra time to get comfortable with the spiral construction before starting the big head/body piece.
