🧶 Beautiful ✨ Detailed 💝 Adorable

Lacy Crochet Butterfly Pattern

Lacy Crochet Butterfly Pattern
4.8★Rating
1.5-2 HoursTime Needed
3.0KMade This
✂️

Intermediate Level

Ideal for those with basic crocheting experience, featuring slightly more advanced stitches and techniques to expand your skills.

⏱️

Bite-Sized Project

Complete in under 2 hours—quick, fun, and perfect for a little creative escape.

Stylish Touch

An elegant detail to elevate any look, combining traditional techniques with contemporary design sensibilities.

About This Lacy Crochet Butterfly Pattern
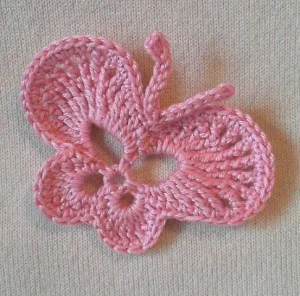
Lacy Crochet Butterfly Pattern crochet pattern - detailed view

This dainty butterfly is a wonderful way to use up those gorgeous hand-dyed scraps you've been saving. It makes a stunning addition to a gift wrap or a sweet clip for a little one's hair.

Why You'll Love This Lacy Crochet Butterfly Pattern

I'm obsessed with how the quadruple treble stitches create such a dramatic, sweeping curve for the upper wings. It is so satisfying to see that lacy texture appear after just a couple of rounds, and because it uses so little yarn, I can make a whole 'swarm' of them in every color of the rainbow without ever needing to buy a new skein.

Lacy Crochet Butterfly Pattern step 1 Lacy Crochet Butterfly Pattern step 2 Lacy Crochet Butterfly Pattern step 3 Lacy Crochet Butterfly Pattern step 4

Switch Things Up

There’s something so therapeutic about working on small motifs like this butterfly. I remember the first time I tried a pattern with quadruple treble stitches—I was so intimidated! But once you get into the rhythm of those long, elegant wraps, it’s like magic watching the wings grow right off your hook. I usually keep a few of these tucked away in my craft bin because they are the ultimate 'emergency' embellishment.

You know those moments when a plain crochet beanie or a simple tote bag feels like it’s just missing that little spark? One of these butterflies in a contrasting cotton yarn fixes that instantly. If you want to get really creative, try using a variegated yarn; the color shifts make the wings look so organic and alive. I’ve even experimented with adding tiny glass beads to the border of Round 3 for a bit of extra shimmer. It takes a little longer, but the way they catch the light is just breathtaking. Just remember to keep your tension consistent on the antennae so they stand up nicely instead of flopping over. I can't wait to see your versions!

Common Mistakes & How to Fix Them

✗ Confusing the triple treble (ttr) and quadruple treble (qtr) stitches can throw off the wing's curve; double-check your yarn overs for each long stitch.✗ If you work into the top loops instead of between the stitches in Round 3, the border will look too tight and won't have that signature lacy texture.✗ The center ring of 5 chains needs to be tight; if your slip stitch join is loose, the base of the wings might pull apart when you add the heavy stitches.✗ When skipping the 2 single crochets in Round 3, it's easy to accidentally skip 3, which will cause the 'waist' of the butterfly to pinch too much.
Lacy Crochet Butterfly Pattern

You are going to love how quickly this delicate little beauty comes together! It is the perfect project for when you want to make something impressive but don't have all day to sit at your craft desk. These butterflies are so versatile—you can stitch them onto a plain sun hat, use them as a whimsical addition to a baby blanket, or even string them together for a gorgeous spring garland. I find that working with these taller stitches feels almost like painting with yarn as the wings fan out so gracefully.

Intermediate 1.5-2 Hours

Materials Needed for Lacy Crochet Butterfly Pattern

— Main Fabric

  • 01
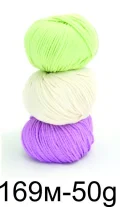
    Approximately 20-30 meters of fine weight cotton yarn (169m per 50g) in a soft pink or your favorite bright shade
  • 02
    Small amounts of contrasting colors like lime green or cream if you want to make a multi-colored version

— Tools Required

  • 01
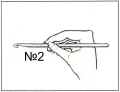
    2.0mm crochet hook (Size 2)
  • 02
    Sharp embroidery scissors
  • 03
    Tapestry needle for hiding yarn tails
  • 04
    Optional: Blocking mats and pins to help shape the wings

Progress Tracker

0% Complete

— 1. Foundation & Framework :

Info :

This butterfly is worked in rounds starting from a central ring. Ensure your tension is even so the loops sit correctly.

Start :

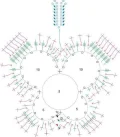
ch 5 and join with a sl st to the first ch to form a ring.

Round 1 :

ch 1, 1 sc, ch 5, 1 sc, ch 10, 1 sc, ch 10, 1 sc, ch 5, sl st into the first sc to finish the round.

— 2. Shaping the Wings :

Round 2 :

ch 1. In the first ch-5 loop, work (1 sc, 1 hdc, 1 dc, 5 tr, 1 dc, 1 hdc, 1 sc). In the next ch-10 loop, work (1 sc, 1 hdc, 1 dc, 1 tr, 1 dtr, 1 ttr, 7 qtr, 1 ttr, 1 dtr, 1 tr, 1 dc, 1 hdc, 1 sc). Repeat the sequence for the second ch-10 loop. In the final ch-5 loop, work (1 sc, 1 hdc, 1 dc, 5 tr, 1 dc, 1 hdc, 1 sc). Finish with a sl st to join.

— 3. The Finishing Edge :

Round 3 :

ch 1, work 10 sc into the spaces between the stitches of the previous round, skip the next 2 sc, work 16 sc into the spaces between stitches, skip 2 sc, work 16 sc into the spaces between stitches, skip 2 sc, work 10 sc into the spaces between stitches, sl st to join.

— 4. Antennae :

First Antenna :

ch 11, skip 3 ch, work 7 sl st back down the chain.

Second Antenna :

ch 10, skip 3 ch, work 7 sl st back down the chain.

Assembly Instructions

  • Fasten off your yarn, leaving a tail long enough for sewing the antennae in place.
  • Weave in the starting yarn tail from the center ring very securely so the foundation doesn't pull open.
  • Position the antennae at the top center of the butterfly, right between the two large upper wings.
  • Using your tapestry needle, sew the base of the antennae to the center of the body.
  • Gently pull and stretch the wings into their final shape; the tall stitches may need a little coaxing to sit flat.
  • For the best professional finish, I highly recommend steam blocking your butterfly to make the lacy details really stand out.

Important Notes

  • 💡Maintain a consistent tension throughout, especially when working the very tall stitches in Round 2, to keep the wings symmetrical.
  • 💡When working Round 3, make sure you are inserting the hook into the spaces between the stitches rather than the top loops for the best effect.
  • 💡You can substitute the yarn for a heavier weight if you want a larger butterfly, but remember to increase your hook size accordingly.
  • 💡Using a cotton or cotton-blend yarn will give the wings more structure and help them hold their shape better than a soft acrylic.
  • 💡If you find the antennae are too long for your liking, you can easily shorten the initial chain count to customize the look.

I honestly can't wait to see what colors you choose for your butterfly! Whether you're making a whole swarm of them for a nursery mobile or just one special piece to pin onto a favorite cardigan, I hope you enjoy every single stitch. Don't forget to take a moment to block your finished work—it really makes those lacy wings pop and show off all that intricate detail you worked so hard on. Happy crocheting, and may your day be as bright and beautiful as your new creation! 🦋✨

You ask,

we answer.

FAQs

How do I work a 'single crochet between crochet' as mentioned in Round 3?

Instead of inserting your hook into the top 'V' of the stitch, insert it into the space between the posts of two stitches from the previous round.

My butterfly wings are curling up quite a bit, is that normal?

Yes, because of the very tall stitches, some curling is expected. A quick steam blocking will flatten them out perfectly.

Can I use a larger hook and thicker yarn for this pattern?

Absolutely! Using worsted weight yarn and a 4mm hook will result in a much larger butterfly, perfect for a wall hanging or pillow applique.

What is a quadruple treble crochet (qtr)?

To make a qtr, wrap the yarn around your hook five times before inserting it into the stitch, then pull through two loops at a time until only one remains.