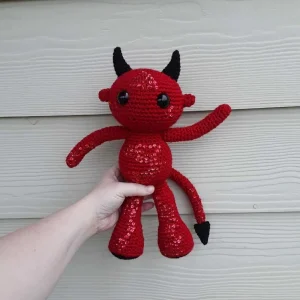
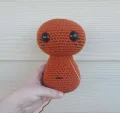
Get ready to whip up a little mischief with this adorable amigurumi! He's not your average scary monster; he's got a sweet, slightly grumpy charm that makes him impossible not to love. Whether you're making him for a Halloween display or just because you love all things quirky, you'll have a blast bringing this character to life. I've designed him with plenty of room for your own creative flair, so grab your hooks and let's get started!
Progress Tracker
0% Complete
— 1. Ears :
Info :
Use your 3.00 mm hook and main body color yarn. Work in continuous rounds. Make 2.
Round 1 :
ch 2, then work 6 x sc into the second chain from your hook (6)
Round 2-3 :
1 x sc in every stitch around (6)
Info :
Fasten off leaving a long tail. Do not stuff these pieces.
— 2. Horns - Option 1 :
Info :
Use your 2.00 mm hook and accent color yarn. Work in continuous rounds. Make 2.
Round 1 :
ch 2, then work 4 x sc into the second chain from your hook (4)
Round 2 :
{1 x sc, 1 x sc inc} repeat around (6)
Round 3 :
{2 x sc, 1 x sc inc} repeat around (8)
Round 4 :
1 x sc in every stitch around (8)
Round 5 :
{3 x sc, 1 x sc inc} repeat around (10)
Round 6 :
1 x sc in every stitch around (10)
Round 7 :
1 x sc inc, 1 x sc, 1 x sc inc, 7 x sc (12)
Round 8 :
1 x sc in every stitch around (12)
Info :
Fasten off leaving a long tail. Stuff gently.
— 3. Horns - Option 2 :
Info :
Use your 2.00 mm hook and accent color yarn. Work in continuous rounds. Make 2.
Round 1 :
ch 2, then work 4 x sc into the second chain from your hook (4)
Round 2 :
{1 x sc, 1 x sc inc} repeat around (6)
Round 3 :
{2 x sc, 1 x sc inc} repeat around (8)
Round 4 :
1 x sc in every stitch around (8)
Round 5 :
{3 x sc, 1 x sc inc} repeat around (10)
Round 6 :
1 x sc in every stitch around (10)
Round 7 :
1 x sc inc, 1 x sc, 1 x sc inc, 7 x sc (12)
Round 8 :
1 x sc in every stitch around (12)
Round 9 :
1 x sc inc, 2 x sc, 1 x sc inc, 8 x sc (14)
Round 10 :
1 x sc in every stitch around (14)
Round 11 :
1 x sc inc, 3 x sc, 1 x sc inc, 9 x sc (16)
Round 12 :
1 x sc inc, 14 x sc, 1 x sc inc (18)
Round 13 :
16 x sc, then 2 x sc inc (20)
Round 14 :
1 x sc in every stitch around (20)
Info :
Fasten off leaving a long tail. Stuff gently.
— 4. Legs :
Info :
Use your 3.00 mm hook. Start with the accent color and stuff as you progress. Make 2.
Round 1 :
ch 2, then work 10 x sc into the second chain from your hook (10)
Round 2 :
{1 x sc, 1 x sc inc} repeat around (15)
Round 3 :
{2 x sc, 1 x sc inc} repeat around (20)
Round 4 :
{3 x sc, 1 x sc inc} repeat around (25)
Colour Change :
Switch to your main body color yarn now.
Round 5 :
{4 x sc, 1 x sc inc} repeat around (30)
Round 6 :
In the blo only, work {4 x sc, 1 x sc dec} across the round (25)
Round 7-8 :
1 x sc in every stitch around (25)
Round 9 :
{3 x sc, 1 x sc dec} repeat around (20)
Round 10-12 :
1 x sc in every stitch around (20)
Round 13 :
{2 x sc, 1 x sc dec} repeat around (15)
Round 14-24 :
1 x sc in every stitch around (15)
Round 25 :
{1 x sc, 1 x sc dec} repeat around (10)
Info :
Stop stuffing the leg here. The last two rounds remain empty.
Round 26-27 :
1 x sc in every stitch around (10)
Info :
Fasten off leaving a long tail for assembly.
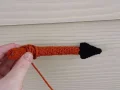
— 5. Tail :
Info :
Use your 3.00 mm hook and main color. This part is optional. Stuff as you go.
Round 1 :
ch 2, then work 6 x sc into the second chain from your hook (6)
Round 2-28 :
1 x sc in every stitch around (6)
Info :
Fasten off leaving a long tail for sewing.
— 6. Tail Spike :
Info :
Use your 2.00 mm hook and accent color yarn. Make 1.
Round 1 :
ch 2, then work 4 x sc into the second chain from your hook (4)
Round 2 :
{1 x sc, 1 x sc inc} repeat around (6)
Round 3 :
{2 x sc, 1 x sc inc} repeat around (8)
Round 4 :
1 x sc in every stitch around (8)
Round 5 :
{3 x sc, 1 x sc inc} repeat around (10)
Round 6 :
1 x sc in every stitch around (10)
Round 7 :
1 x sc inc, 1 x sc, 1 x sc inc, 7 x sc (12)
Info :
Fasten off with a long tail. Flatten the spike and sew it to the end of the tail without stuffing.
— 7. Body :
Info :
Use your 3.00 mm hook and main color yarn. Work in continuous rounds.
Round 1 :
ch 2, then work 10 x sc into the second chain from your hook (10)
Round 2 :
{1 x sc, 1 x sc inc} repeat around (15)
Round 3 :
{2 x sc, 1 x sc inc} repeat around (20)
Round 4 :
{3 x sc, 1 x sc inc} repeat around (25)
Round 5 :
{4 x sc, 1 x sc inc} repeat around (30)
Round 6 :
{5 x sc, 1 x sc inc} repeat around (35)
Round 7 :
{6 x sc, 1 x sc inc} repeat around (40)
Round 8 :
{6 x sc, 1 x sc dec} repeat around (35)
Round 9-11 :
1 x sc in every stitch around (35)
Round 12 :
{5 x sc, 1 x sc dec} repeat around (30)
Round 13-14 :
1 x sc in every stitch around (30)
Round 15 :
{4 x sc, 1 x sc dec} repeat around (25)
Round 16-17 :
1 x sc in every stitch around (25)
Round 18 :
{3 x sc, 1 x sc dec} repeat around (20)
Round 19-20 :
1 x sc in every stitch around (20)
Info :
Fasten off leaving a long tail. Add a belly button now if desired, then stuff the body firmly.
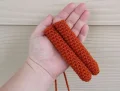
— 8. Arms :
Info :
Use your 3.00 mm hook and main color. Stuff as you go. Make 2.
Round 1 :
ch 2, then work 8 x sc into the second chain from your hook (8)
Round 2-22 :
1 x sc in every stitch around (8)
Info :
Fasten off leaving a long tail. If you are adding wings, do not break the yarn after sewing the wing to the arm.
— 9. Wings :
Info :
Use your 2.00 mm hook and accent color. Work in rows. Make 2. Start every row with a ch 1 (not counted as a stitch).
Row 1 :
ch 3, 1 x sc in 2nd ch from hook, 1 x sc in next (2)
Row 2 :
ch 1, turn, in blo only: 1 x sc in 1st st, 3 x sc in last st (4)
Row 3 :
ch 1, turn, in blo only: 1 x sc in every stitch across (4)
Row 4 :
ch 1, turn, in blo only: 1 x sc in next 3 sts, 3 x sc in last st (6)
Row 5 :
ch 1, turn, in blo only: 1 x sc in every stitch across (6)
Row 6 :
ch 1, turn, in blo only: 1 x sc in next 5 sts, 3 x sc in last st (8)
Row 7 :
ch 1, turn, in blo only: 1 x sc in every stitch across (8)
Row 8 :
ch 1, turn, in blo only: 1 x sc in next 7 sts, 3 x sc in last st (10)
Row 9 :
ch 1, turn, in blo only: 1 x sc in every stitch across (10)
Row 10 :
ch 1, turn, in blo only: 1 x sc in next 9 sts, 3 x sc in last st (12)
Row 11 :
ch 1, turn, in blo only: 1 x sc in every stitch across (12)
Row 12 :
ch 1, turn, in blo only: 1 x sc in next 11 sts, 3 x sc in last st (14)
Row 13 :
ch 1, turn, in blo only: 1 x sc in every stitch across (14)
Row 14 :
ch 1, turn, in blo only: 1 x sc in next 13 sts, 3 x sc in last st (16)
Row 15 :
ch 1, turn, in blo only: 1 x sc in every stitch across (16)
Row 16 :
ch 1, turn, in blo only: 1 x sc in next 15 sts, 3 x sc in last st (18)
Row 17 :
ch 1, turn, in blo only: 1 x sc in every stitch across (18)
Row 18 :
ch 1, turn, in blo only: 1 x sc in next 17 sts, 3 x sc in last st (20)
Row 19 :
ch 1, turn, in blo only: 1 x sc in every stitch across (20)
Row 20 :
ch 1, turn, in blo only: 1 x sc in next 19 sts, 3 x sc in last st (22)
Row 21 :
ch 1, turn, in blo only: 1 x sc in every stitch across (22)
Row 22 :
ch 1, turn, in blo only: 1 x sc in next 21 sts, 3 x sc in last st (24)
Info :
Fasten off leaving a long tail for sewing the wing to the arm.
— 10. Head :
Info :
Use your 3.00 mm hook and main color yarn. Work in continuous rounds.
Round 1 :
ch 2, then work 6 x sc into the second chain from your hook (6)
Round 2 :
work 1 x sc inc in every stitch around (12)
Round 3 :
{1 x sc, 1 x sc inc} repeat around (18)
Round 4 :
{2 x sc, 1 x sc inc} repeat around (24)
Round 5 :
{3 x sc, 1 x sc inc} repeat around (30)
Round 6 :
{4 x sc, 1 x sc inc} repeat around (36)
Round 7 :
{5 x sc, 1 x sc inc} repeat around (42)
Round 8 :
{6 x sc, 1 x sc inc} repeat around (48)
Round 9 :
{7 x sc, 1 x sc inc} repeat around (54)
Round 10-17 :
1 x sc in every stitch around (54)
Round 18 :
{7 x sc, 1 x sc dec} repeat around (48)
Round 19 :
{6 x sc, 1 x sc dec} repeat around (42)
Round 20 :
{5 x sc, 1 x sc dec} repeat around (36)
Round 21 :
{4 x sc, 1 x sc dec} repeat around (30)
Round 22 :
{3 x sc, 1 x sc dec} repeat around (24)
Eyes :
Insert safety eyes between Rounds 13 and 14, spaced 8 to 9 stitches apart. Embroider freckles now if you like.
Round 23 :
{2 x sc, 1 x sc dec} repeat around (18)
Round 24 :
{1 x sc, 1 x sc dec} repeat around (12)
Round 25 :
work 1 x sc dec in every stitch around (6)
Info :
Fasten off and use a running stitch through the final stitches to close the hole securely.
I really hope you enjoyed bringing this little mischief-maker to life! There is something so satisfying about finishing those final wing stitches and seeing your character finally take shape. He’s the perfect size for a desk buddy or a unique addition to your plushie collection. Don't forget that you can always go back and add more details like embroidery or even a tiny trident if you're feeling fancy. I can't wait to see your finished devils—be sure to share them with the community! Keep those hooks flying and stay creative. 🧶 ✨