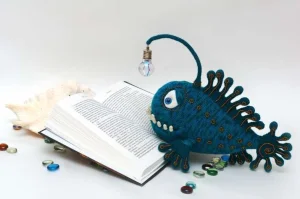
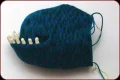
Get ready to create something truly extraordinary with Sam, the deep-sea explorer! This isn't just another fish pattern; it's a sculptural journey into the mysterious depths of the ocean. You'll love how the clever wire armature gives him life, allowing you to pose his fins and that iconic glowing lure. Working with the variegated yarns creates a stunning, natural camouflage effect that makes every Sam unique. It's a project that rewards patience with a finished piece that looks like it swam straight out of a beautiful underwater documentary.
Progress Tracker
0% Complete
— 1. Side Fin - Finger Rays :
Info :
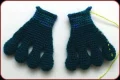
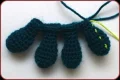
You need to make two side fins using solid green yarn and the 1.5mm hook. Each fin is made of four rays (two A rays and two B rays).
Ray A: Round 1 :
Start with a MR and work 6 sc into it (6)
Ray A: Round 2 :
Work 2 sc into every stitch around (12)
Ray A: Round 3 :
(3 sc, 1 incr) repeat 3 times (15)
Ray A: Round 4-5 :
sc in each st around (15)
Ray A: Round 6 :
(3 sc, 1 dec) repeat 3 times (12)
Ray A: Round 7 :
(1 sc, 1 dec) repeat 4 times (8)
Ray A: Round 8-10 :
sc in each st around (8)
Info :
Cut yarn after the first Ray A. Do not cut yarn after the second Ray A; continue from that marker to join. Repeat the same process for Ray B, but follow the variation for Round 11.
Ray B: Round 11 :
1 incr, 2 sc, (1 incr) repeat 2 times, 2 sc, 1 incr (12). Fasten off and hide the tail.
— 2. Joining the Side Fin :
Round 1 :
Join the rays: 4 sc on Ray A, 6 sc on Ray B, 6 sc on Ray B, 8 sc on Ray A. Turn and work back: 6 sc on Ray B, 6 sc on Ray B, 4 sc on Ray A (40)
Round 2 :
1 dec, 16 sc, (1 dec) repeat 2 times, 16 sc, 1 dec (36) + 1 shift st
Round 3 :
(16 sc, 1 dec) repeat 2 times (34)
Round 4 :
(15 sc, 1 dec) repeat 2 times (32) + 1 shift st
Round 5 :
(14 sc, 1 dec) repeat 2 times (30)
Round 6 :
(13 sc, 1 dec) repeat 2 times (28) + 1 shift st
Round 7 :
(12 sc, 1 dec) repeat 2 times (26)
Round 8 :
(11 sc, 1 dec) repeat 2 times (24) + 1 shift st
Round 9 :
(10 sc, 1 dec) repeat 2 times (22). Switch to multicolor yarn.
Round 10 :
(9 sc, 1 dec) repeat 2 times (20) + 1 shift st
Round 11-13 :
sc in each st around (20) + 1 shift st
Round 14 :
(9 sc, 1 incr) repeat 2 times (22)
Round 15 :
(10 sc, 1 incr) repeat 2 times (24). Fasten off.
— 3. Lower Fin :
Info :
Make one lower fin using green yarn. It consists of two A rays and one B ray.
Rays A & B: Round 1-7 :
Work identical to Side Fin rays R1-R7 (8)
Rays A & B: Round 8-9 :
sc in each st around (8)
Ray B: Round 10 :
1 incr, 2 sc, (1 incr) repeat 2 times, 2 sc, 1 incr (12). Fasten off.
Round 1 :
Join: 4 sc on Ray A, 6 sc on Ray B, 8 sc on Ray A, turn, 6 sc on Ray B, 4 sc on Ray A (28)
Round 2 :
(1 incr, 13 sc) repeat 2 times (30) + 1 shift st
Round 3 :
(1 incr, 14 sc) repeat 2 times (32)
Round 4 :
(1 incr, 15 sc) repeat 2 times (34). Fasten off.
— 4. Dorsal Fin :
Info :
Make one dorsal fin with 8 rays labeled A through E. Use solid yarn and label each ray as you go.
All Rays: Round 1-7 :
Follow Side Fin Ray A instructions for R1-R7 (8)
Ray A & E: Round 8-12 :
sc in each st around (8)
Ray B: Round 8-16 :
sc in each st around (8)
Ray B: Round 17 :
1 incr, 2 sc, (1 incr) repeat 2 times, 2 sc, 1 incr (12)
Ray C: Round 8-15 :
sc in each st around (8)
Ray C: Round 16 :
1 incr, 2 sc, (1 incr) repeat 2 times, 2 sc, 1 incr (12)
Ray D: Round 8-13 :
sc in each st around (8)
Ray D: Round 14 :
1 incr, 2 sc, (1 incr) repeat 2 times, 2 sc, 1 incr (12)
Round 1 :
Join A, B, C, C, D: 4 sc on A, 6 sc on B, 6 sc on C, 6 sc on C, 5 sc on D, 2 incr, 5 sc on D, turn, 6 sc on C, 6 sc on C, 6 sc on B, 4 sc on A (58)
Round 2 :
1 incr, 28 sc, 5 sc on D, 2 incr, 5 sc on D, turn, 29 sc (73) + 1 shift st
Round 3 :
1 incr, 36 sc, 5 sc on D, 2 incr, 5 sc on D, turn, 36 sc (88)
Round 4 :
1 incr, 43 sc, 3 sc, 1 incr, 4 sc on E, turn, 44 sc (98)
Round 5 :
(1 incr, 48 sc) repeat 2 times (100) + 1 shift st
Round 6 :
(1 incr, 49 sc) repeat 2 times (102) + 1 shift st
Round 7 :
(1 incr, 50 sc) repeat 2 times (104). Fasten off.
— 5. Tail :
Info :
Make one tail using solid yarn. You will need two A rays, four B rays, and one C ray.
All Rays: Round 1-7 :
Follow Side Fin Ray A instructions for R1-R7 (8)
Ray A & B: Round 8-11 :
sc in each st around (8)
Ray C: Round 8-12 :
sc in each st around (8)
Ray C: Round 13 :
1 incr, 2 sc, (1 incr) repeat 2 times, 2 sc, 1 incr (12)
Round 1 :
Join A, C, B: 4 sc on A, 6 sc on C, 3 sc, 1 incr, 4 sc on B, turn, 6 sc on C, 3 sc, 1 incr, 4 sc on A (30)
Round 2 :
(14 sc, 1 incr) repeat 2 times (32)
Round 3 :
(15 sc, 1 incr) repeat 2 times (34). Fasten off.
Round 4 :
Join the rest: 4 sc on A, 17 sc on joined piece, 3 sc, 1 incr, 4 sc on B, turn, 17 sc on joined piece, 3 sc, 1 incr on A (52)
Round 5-11 :
sc in each st around (52)
Round 12 :
(1 dec, 22 sc, 1 dec) repeat 2 times (48)
Round 13 :
(1 dec, 20 sc, 1 dec) repeat 2 times (44)
Round 14 :
(1 dec, 18 sc, 1 dec) repeat 2 times (40)
Round 15 :
(1 dec, 16 sc, 1 dec) repeat 2 times (36)
Round 16 :
(1 dec, 14 sc, 1 dec) repeat 2 times (32). Fasten off.
— 6. Lower Jaw :
Round 1 :
Using multicolor yarn, start with a MR and 6 sc (6)
Round 2 :
Work 2 sc in every st (12)
Round 3 :
(1 sc, 1 incr) repeat 6 times (18)
Round 4 :
1 sc, 1 incr, (2 sc, 1 incr) repeat 5 times, 1 sc (24)
Round 5 :
(3 sc, 1 incr) repeat 6 times (30)
Round 6 :
2 sc, 1 incr, (4 sc, 1 incr) repeat 5 times, 2 sc (36)
Round 7 :
(5 sc, 1 incr) repeat 6 times (42)
Round 8 :
3 sc, 1 incr, (6 sc, 1 incr) repeat 5 times, 3 sc (48)
Round 9 :
(7 sc, 1 incr) repeat 6 times (54)
Round 10 :
4 sc, 1 incr, (8 sc, 1 incr) repeat 5 times, 4 sc (60)
Round 11 :
(9 sc, 1 incr) repeat 6 times (66)
Round 12 :
5 sc, 1 incr, (10 sc, 1 incr) repeat 5 times, 5 sc (72)
Round 13 :
(11 sc, 1 incr) repeat 6 times (78)
Round 14 :
6 sc, 1 incr, (12 sc, 1 incr) repeat 5 times, 6 sc (84)
Round 15 :
(13 sc, 1 incr) repeat 6 times (90)
Round 16 :
sc in each st around (90)
Round 17 :
7 sc, 1 incr, (14 sc, 1 incr) repeat 5 times, 7 sc (96)
Round 18 :
sc in each st around (96)
Round 19 :
(15 sc, 1 incr) repeat 6 times (102)
Round 20 :
sc in each st around (102)
Round 21 :
8 sc, 1 incr, (16 sc, 1 incr) repeat 5 times, 8 sc (108)
Round 22 :
sc in each st around (108)
Round 23 :
(35 sc, 1 incr) repeat 3 times (111)
Round 24 :
sc in each st around (111)
Round 25 :
18 sc, 1 incr, (36 sc, 1 incr) repeat 2 times, 18 sc (114)
Round 26 :
sc in each st around (114)
Round 27 :
(37 sc, 1 incr) repeat 3 times (117)
Round 28 :
sc in each st around (117)
Round 29 :
19 sc, 1 incr, (38 sc, 1 incr) repeat 2 times, 19 sc (120)
Round 30 :
sc in each st around (120)
Round 31 :
(39 sc, 1 incr) repeat 3 times (123)
Round 32 :
sc in each st around (123)
Round 33 :
20 sc, 1 incr, (40 sc, 1 incr) repeat 2 times, 20 sc (126)
Round 34-35 :
sc in each st around (126)
Round 36 :
(41 sc, 1 incr) repeat 3 times (129)
Round 37 :
sc in each st around (129)
Round 38 :
21 sc, 1 incr, (42 sc, 1 incr) repeat 2 times, 21 sc (132)
Round 39 :
(2 incr, 64 sc) repeat 2 times (136)
Round 40 :
1 sc, 2 incr, 66 sc, 2 incr, 65 sc (140)
Round 41 :
2 sc, 2 incr, 68 sc, 2 incr, 66 sc (144)
Round 42 :
3 sc, 2 incr, 70 sc, 2 incr, 67 sc (148). sl st and fasten off.
— 7. Muzzle :
Round 1 :
Using multicolor yarn, work 7 sc into a MR (7)
Round 2 :
Work 2 sc in each st (14)
Round 3 :
(1 sc, 1 incr) repeat 7 times (21)
Round 4 :
1 sc, 1 incr, (2 sc, 1 incr) repeat 6 times, 1 sc (28)
Round 5 :
(3 sc, 1 incr) repeat 7 times (35)
Round 6 :
2 sc, 1 incr, (4 sc, 1 incr) repeat 6 times, 2 sc (42)
Round 7 :
3 sc, 1 incr, (6 sc, 1 incr) repeat 5 times, 3 sc (48)
Round 8 :
(7 sc, 1 incr) repeat 6 times (54)
Round 9 :
4 sc, 1 incr, (8 sc, 1 incr) repeat 5 times, 4 sc (60)
Round 10 :
(9 sc, 1 incr) repeat 6 times (66)
Round 11 :
5 sc, 1 incr, (10 sc, 1 incr) repeat 5 times, 5 sc (72)
Round 12 :
(11 sc, 1 incr) repeat 6 times (78)
Round 13 :
6 sc, 1 incr, (12 sc, 1 incr) repeat 5 times, 6 sc (84)
Round 14 :
sc in each st around (84)
Round 15 :
(13 sc, 1 incr) repeat 6 times (90)
Round 16 :
sc in each st around (90)
Round 17 :
7 sc, 1 incr, (14 sc, 1 incr) repeat 5 times, 7 sc (96)
Round 18 :
sc in each st around (96)
Round 19 :
(15 sc, 1 incr) repeat 6 times (102)
Round 20 :
sc in each st around (102)
Round 21 :
8 sc, 1 incr, (16 sc, 1 incr) repeat 5 times, 8 sc (108)
Round 22 :
sc in each st around (108)
Round 23 :
(17 sc, 1 incr) repeat 6 times (114)
Round 24 :
sc in each st around (114)
Round 25 :
9 sc, 1 incr, (18 sc, 1 incr) repeat 5 times, 9 sc (120)
Round 26 :
sc in each st around (120)
Round 27 :
(39 sc, 1 incr) repeat 3 times (123)
Round 28 :
sc in each st around (123)
Round 29 :
20 sc, 1 incr, (40 sc, 1 incr) repeat 2 times, 20 sc (126)
Round 30 :
sc in each st around (126)
Round 31 :
(41 sc, 1 incr) repeat 3 times (129)
Round 32-37 :
sc in each st around (129). Do not cut yarn.
— 8. Joining Jaw and Muzzle :
Round 1 :
Work 28 sc on muzzle, join inner jaw and muzzle by working 72 sc through both layers, then 29 sc on muzzle to marker (129)
Round 2 :
28 sc from marker on muzzle, work 76 sc around the outer edge of the jaw, then 29 sc on muzzle to marker (133)
Round 3 :
1 incr, 132 sc (134)
Round 4 :
sc in each st around (134)
Round 5 :
1 incr, 133 sc (135)
Round 6-10 :
sc in each st around (135)
Round 11 :
1 dec, 133 sc (134)
Round 12 :
(1 dec, 65 sc) repeat 2 times (132)
Round 13 :
32 sc, 1 dec, 64 sc, 1 dec, 32 sc (130)
Round 14 :
16 sc, 1 dec, 94 sc, 1 dec, 16 sc (128)
Round 15 :
(1 dec, 62 sc) repeat 2 times (126)
Round 16 :
31 sc, 1 dec, 61 sc, 1 dec, 30 sc (124)
Round 17 :
15 sc, 1 dec, 90 sc, 1 dec, 15 sc (122)
Round 18 :
1 dec, 120 sc (121)
Round 19 :
29 sc, 1 dec, 59 sc, 1 dec, 29 sc (119)
Round 20 :
15 sc, 1 dec, 85 sc, 1 dec, 15 sc (117)
Round 21 :
1 dec, 115 sc (116)
Round 22 :
28 sc, 1 dec, 56 sc, 1 dec, 28 sc (114)
Round 23 :
15 sc, 1 dec, 80 sc, 1 dec, 15 sc (112)
Round 24 :
1 dec, 110 sc (111)
Round 25 :
27 sc, 1 dec, 53 sc, 1 dec, 27 sc (109)
Round 26 :
14 sc, 1 dec, 77 sc, 1 dec, 14 sc (107)
Round 27 :
1 dec, 105 sc (106)
Round 28 :
26 sc, 1 dec, 50 sc, 1 dec, 26 sc (104)
Round 29 :
13 sc, 1 dec, 74 sc, 1 dec, 13 sc (102)
— 9. Finishing the Body :
Round 30 :
16 sc, 1 dec, (32 sc, 1 dec) repeat 2 times, 16 sc (99)
Round 31 :
(31 sc, 1 dec) repeat 3 times (96)
Round 32 :
15 sc, 1 dec, (30 sc, 1 dec) repeat 2 times, 15 sc (93)
Round 33 :
(29 sc, 1 dec) repeat 3 times (90)
Round 34 :
14 sc, 1 dec, (28 sc, 1 dec) repeat 2 times, 14 sc (87)
Round 35 :
(27 sc, 1 dec) repeat 3 times (84)
Round 36 :
13 sc, 1 dec, (26 sc, 1 dec) repeat 2 times, 13 sc (81)
Round 37 :
(25 sc, 1 dec) repeat 3 times (78)
Round 38 :
12 sc, 1 dec, (24 sc, 1 dec) repeat 2 times, 12 sc (75)
Round 39 :
(23 sc, 1 dec) repeat 3 times (72)
Round 40 :
11 sc, 1 dec, (22 sc, 1 dec) repeat 2 times, 11 sc (69)
Round 41 :
(21 sc, 1 dec) repeat 3 times (66)
Round 42 :
(20 sc, 1 dec) repeat 3 times (63)
Round 43 :
(19 sc, 1 dec) repeat 3 times (60)
Round 44 :
(18 sc, 1 dec) repeat 3 times (57)
Round 45 :
(17 sc, 1 dec) repeat 3 times (54)
Round 46 :
(16 sc, 1 dec) repeat 3 times (51)
Round 47 :
(15 sc, 1 dec) repeat 3 times (48)
Round 48 :
(22 sc, 1 dec) repeat 2 times (46)
Round 49 :
(21 sc, 1 dec) repeat 2 times (44)
Round 50 :
(20 sc, 1 dec) repeat 2 times (42)
Round 51 :
(1 dec, 17 sc, 1 dec) repeat 2 times (38)
Round 52 :
(1 dec, 15 sc, 1 dec) repeat 2 times (34)
Round 53 :
(1 dec, 13 sc, 1 dec) repeat 2 times (30)
Round 54 :
(13 sc, 1 dec) repeat 2 times (28)
Round 55 :
sc in each st around (28)
Round 56 :
(1 incr, 12 sc, 1 incr) repeat 2 times (32). Fasten off.
— 10. Teeth :
Info :
Use white or gray yarn and a 1.0mm/1.25mm hook. Make 2 each of A, B, and C, and 8-10 of D.
Teeth A, B, C: Round 1 :
6 sc into a MR (6)
Teeth A, B, C: Round 2-3 :
sc in each st around (6)
Teeth A, B, C: Round 4 :
(1 sc, 1 incr) repeat 3 times (9)
Teeth A: Round 5-10 :
sc in each st around (9)
Teeth B: Round 5-8 :
sc in each st around (9)
Teeth C: Round 5-6 :
sc in each st around (9)
Teeth D: Round 1 :
6 sc into a MR (6)
Teeth D: Round 2-4 :
sc in each st around (6). Fasten off.
— 11. Fishing Line (Lure) :
Round 1 :
Using fin yarn, 6 sc in MR (6)
Round 2-56 :
sc in each st around (6)
Round 57 :
(1 sc, 1 incr) repeat 3 times (9)
Round 58 :
sc in each st around (9)
Round 59 :
(2 sc, 1 incr) repeat 3 times (12)
Round 60 :
sc in each st around (12)
Round 61 :
(3 sc, 1 incr) repeat 3 times (15)
Round 62 :
sc in each st around (15)
Round 63 :
(4 sc, 1 incr) repeat 3 times (18)
Round 64 :
sc in each st around (18). Fasten off.
— 12. Eye Whites :
Round 1 :
Using white cotton, 6 sc in MR (6)
Round 2 :
Work 2 sc in each st around (12)
Round 3 :
(1 sc, 1 incr) repeat 6 times (18)
Round 4 :
1 sc, 1 incr, (2 sc, 1 incr) repeat 5 times, 1 sc (24)
Round 5 :
(7 sc, 1 incr) repeat 3 times (27)
Round 6 :
4 sc, 1 incr, (8 sc, 1 incr) repeat 2 times, 4 sc (30)
Round 7 :
(14 sc, 1 incr) repeat 2 times (32)
Round 8-15 :
sc in each st around (32)
Round 16 :
(14 sc, 1 dec) repeat 2 times (30)
Round 17 :
4 sc, 1 dec, (8 sc, 1 dec) repeat 2 times, 4 sc (27)
Round 18 :
(7 sc, 1 dec) repeat 3 times (24)
Round 19 :
1 sc, 1 dec, (2 sc, 1 dec) repeat 5 times, 1 sc (18)
Round 20 :
(1 sc, 1 dec) repeat 6 times (12)
Round 21 :
(1 dec) repeat 6 times (6). Fasten off.
— 13. Eyelids :
Row 1 :
Using multicolor, ch 4. Start in 2nd ch: 2 sc, 1 sc, 4 sc in last ch. Work on other side: 1 sc, 2 sc in last ch (10)
Round 2 :
(1 incr, 3 sc, 1 incr) repeat 2 times (14)
Round 3 :
(1 incr, 5 sc, 1 incr) repeat 2 times (18) + 1 shift st
Round 4 :
(1 incr, 7 sc, 1 incr) repeat 2 times (22)
Round 5 :
10 sc, 2 incr, 10 sc (24)
Round 6 :
1 dec, 9 sc, 2 incr, 9 sc, 1 dec (24). Fasten off.
— 14. Crochet Light Bulb :
Round 1-2 :
With yellow, 6 sc in MR (6), then 12 sc (12)
Round 3-8 :
Increase gradually to 36 sc following the logic of the body increases.
Round 9-10 :
Work even (37)
Round 11-16 :
Decrease gradually to 17 sc.
Round 17-19 :
sc in each st (17). Switch to silver gray.
Round 20 :
sc in each st (17)
Round 21-24 :
sc in each st blo (17)
Round 25 :
9 dec (8). Switch to black.
Round 26 :
8 sc. Fasten off and close.
I hope you enjoy every stitch of Sam’s journey from a pile of yarn to a deep-sea legend! This project is a wonderful way to stretch your skills with wiring and complex assembly, and the result is truly a piece of handmade art. Don't forget to take your time with the beading—it’s those tiny details that really make him sparkle under the light. Once he's finished, he'll be the perfect guardian for your bookshelf or a quirky companion for your desk. Happy crafting, and may your hook never snag! 🧶✨🐟