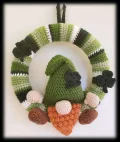
If you've been looking for a St. Patrick's Day project that actually makes your front door look like something special, this is it. You'll crochet a striped green wreath cover, a pointy gnome hat, a textured orange beard, a little rounded nose, two tiny hands, a pair of stuffed shoes, and a handful of shamrocks — then bring them all together on a foam wreath base. Every piece is manageable on its own, and watching them come together into one cohesive decoration is genuinely satisfying. This pattern is written clearly, and the construction is forgiving enough that you won't be pulling your hair out. Make one for your door, one as a gift — honestly, you'll probably want to make more than one.
Progress Tracker
0% Complete
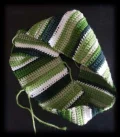
— 1. Wreath Cover (Rotating Greens — 4mm hook) :
Info :
Color key: Lime Green = A, Light Green = B, Forest Green = C, Dark Green = D, White = E. Work flat in rows of 20 SC throughout. Every row after Row 1 is identical in stitch — only the color changes. The full color sequence below is repeated 5 times total (125 rows). When switching colors, complete the last stitch of the current row with the new color for clean transitions, and work yarn tails into stitches as you go to reduce end weaving later.
Row 1 :
Using Color A, CH 21. SC into the 2nd CH from the hook, then SC across the remaining chains. CH 1, turn. (20)
Row 2 :
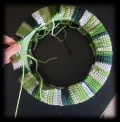
SC across all stitches, CH 1, turn. (20) — This is a good point to test-wrap the strip around your foam wreath. It should fit snugly. Adjust your starting chain up or down by a few stitches if needed before continuing.
Info :
Color sequence for one full repeat (25 rows): 2 rows in A (Rows 1–2 already done), 3 rows in B, 4 rows in C, 1 row in D, 1 row in E, 4 rows in A, 2 rows in B, 1 row in C, 4 rows in D, 3 rows in E. Repeat this entire sequence 4 more times for a total of 5 complete repeats = 125 rows.
Rows 3-5 :
Color B — SC across all stitches, CH 1, turn. (20)
Rows 6-9 :
Color C — SC across all stitches, CH 1, turn. (20)
Row 10 :
Color D — SC across all stitches, CH 1, turn. (20)
Row 11 :
Color E — SC across all stitches, CH 1, turn. (20)
Rows 12-15 :
Color A — SC across all stitches, CH 1, turn. (20)
Rows 16-17 :
Color B — SC across all stitches, CH 1, turn. (20)
Row 18 :
Color C — SC across all stitches, CH 1, turn. (20)
Rows 19-22 :
Color D — SC across all stitches, CH 1, turn. (20)
Rows 23-25 :
Color E — SC across all stitches, CH 1, turn. (20) — This completes one full color repeat. Work Rows 26–125 by repeating this same 25-row color sequence four more times.
Info :
Continue repeating the 25-row sequence until you have completed 125 rows total. Every row is SC across 20 stitches.
Joining :
Fold the strip so the right sides face each other and the short ends meet. Insert your hook through the first stitch of Row 125 and the first stitch of Row 1 simultaneously, then SL ST across all stitches to join the two ends into a ring. (20 SL ST)
Finishing :
Slide the joined ring over the foam wreath form with the right side facing out. Cut a strand of Color A roughly 40 inches long and use it to whipstitch or mattress stitch the long open edges of the cover together around the wreath, keeping the color stripes aligned as you sew. Tuck any stray yarn tails inside as you go. Weave in all remaining ends.
— 2. Gnome Hat (Forest Green — 4mm hook) :
Round 1 :
Using Forest Green, work HDCFS 38, then join the last stitch to the first with a SL ST to form a ring — make sure the foundation chain isn't twisted before joining. You'll now work continuously in rounds. (38)
Round 2-7 :
HDC in every stitch around. (38)
Round 8 :
*HDC in next 4 ST, HDC2TOG* repeat 5 times, HDC, HDC. (32)
Round 9 :
HDC all the way around. (32)
Round 10 :
*HDC in next 6 ST, HDC2TOG* repeat 3 times. (28)
Round 11 :
HDC around. (28)
Round 12 :
HDC around. (28)
Round 13 :
*HDC in next 5 ST, HDC2TOG* repeat 3 times. (24)
Round 14 :
HDC around. (24)
Round 15 :
HDC around. (24)
Round 16 :
*HDC in next 4 ST, HDC2TOG* repeat 3 times. (20)
Round 17 :
HDC around. (20)
Round 18 :
*HDC in next 3 ST, HDC2TOG* repeat 3 times. (16)
Round 19 :
HDC all the way around. (16)
Round 20 :
HDC all the way around. (16)
Round 21 :
*HDC in next 2 ST, HDC2TOG* repeat 3 times. (12)
Round 22 :
HDC all the way around. (12)
Round 23 :
*HDC, HDC2TOG* repeat 3 times. (8)
Round 24 :
HDC2TOG 4 times. (4) Leave a long tail, cut yarn, and pull the end through the last stitch. Thread the tail onto your needle and run it through the front loops only of the 4 remaining stitches all the way around. Pull firmly to close the top of the hat, then weave through a couple more times to secure. Give the hat a very light fill of fiberfill — just a little to hold the shape — and set aside.
— 3. Beard (Orange — 4mm hook) :
Info :
Bubble Stitch (BS): YO, insert hook into stitch, YO, pull yarn through the stitch, YO, pull through first 2 loops on hook — repeat this sequence 3 more times in the same stitch until you have 6 loops on the hook. YO and draw through all 6 loops at once.
Row 1 :
CH 4, turn. SC into the 2nd CH from hook, work 1 BS into the next CH, SC into the last CH. CH 1, turn. (3 stitches)
Row 2 :
2SC in first stitch, SC, 2SC in last stitch. CH 1, turn. (5)
Row 3 :
SC, BS, SC, BS, SC. CH 1, turn. (5)
Row 4 :
2SC in first stitch, SC in next 3 stitches, 2SC in last stitch. CH 1, turn. (7)
Row 5 :
SC, BS, SC, BS, SC, BS, SC. CH 1, turn. (7)
Row 6 :
2SC in first stitch, SC across next 5 stitches, 2SC in last stitch. CH 1, turn. (9)
Row 7 :
SC, BS, SC, BS, SC, BS, SC, BS, SC. CH 1, turn. (9)
Row 8 :
2SC in first stitch, SC across next 7 stitches, 2SC in last stitch. CH 1, turn. (11)
Row 9 :
*SC, BS* 4 times, SC. CH 1, turn. (11)
Row 10 :
2SC in first stitch, SC across next 9 stitches, 2SC in last stitch. CH 1, turn. (13)
Row 11 :
*SC, BS* 5 times, SC. CH 1, turn. (13)
Row 12 :
2SC in first stitch, SC across next 11 stitches, 2SC in last stitch. CH 1, turn. (15)
Row 13 :
*SC, BS* 6 times, SC. CH 1, turn. (15)
Row 14 :
2SC in first stitch, SC across next 13 stitches, 2SC in last stitch. CH 1, turn. (17)
Row 15 :
*SC, BS* 7 times, SC. CH 1, turn. (17)
Row 16 :
2SC in first stitch, SC across next 15 stitches, 2SC in last stitch. CH 1, turn. (19)
Row 17 :
SC in each stitch across. (19) Tie off and weave in all ends.
Info :
Note: The pattern labels the final row as Row 15 a second time — this appears to be a numbering error in the source. The row that reads 'sc in each st across (19)' is the last row after Row 16, and has been labeled here as Row 17 for clarity. Verify your stitch count of 19 before tying off.
— 4. Nose (Skin/Peach Color — 4mm hook) :
Round 1 :
SC 6 times into a MC. Pull the ring tight. (6)
Round 2 :
2SC in every stitch around. (12)
Round 3 :
*2SC, 1SC* repeat 5 times. (18)
Round 4 :
*2SC, 1SC, 1SC* repeat 5 times. (24)
Round 5 :
SC all the way around. (24)
Round 6 :
SC all the way around. (24)
Round 7 :
*SC, SC, SC2TOG* repeat 5 times. (18)
Round 8 :
SC all the way around. (18)
Round 9 :
*SC, SC2TOG* repeat 5 times. (12) Stuff with fiberfill now.
Round 10 :
*SC, SC, SC2TOG* repeat 2 times. (9)
Round 11 :
SC around. (9) Pinch the opening flat so both edges line up, then SL ST across through both layers to close. Tie off and leave a tail for assembly.
— 5. Hand/Arm (Skin/Peach Color into Forest Green — 4mm hook) :
Round 1 :
SC 6 times into a MC. Pull ring tight. (6)
Round 2 :
2SC in every stitch around. (12)
Round 3 :
*2SC, 1SC* repeat 5 times. (18)
Round 4 :
SC all the way around. (18)
Round 5 :
SC all the way around. (18)
Round 6 :
*SC, SC2TOG* repeat 5 times. (12)
Round 7 :
BS in first stitch, SC in every remaining stitch around. (12)
Round 8 :
*SC, SC, SC2TOG* repeat 2 times. (9) Lightly stuff the rounded hand portion only — don't stuff the arm section.
Round 9 :
SC all the way around. (9)
Color Change :
Switch to Forest Green yarn.
Round 10 :
SC all the way around. (9)
Round 11 :
SC all the way around. (9)
Round 12 :
SC all the way around. (9)
Round 13 :
SC all the way around. (9)
Round 14 :
SC all the way around. (9)
Round 15 :
SC all the way around. (9)
Round 16 :
SC all the way around. (9) Tie off, leaving a long tail for sewing onto the wreath. Make a second hand/arm the same way.
— 6. Shoes (Brown — 4mm hook) :
Round 1 :
CH 6. Starting in the 2nd CH from the hook: SC in next 4 chains, work 4SC into the last chain (the toe end). Now rotate and crochet along the opposite side of the starting chain: SC in next 3 chains, then work 3SC into the very last chain. (14)
Round 2 :
2SC, SC in next 3 stitches, 2SC, 2SC, 2SC, 2SC, SC in next 3 stitches, 2SC, 2SC, 2SC. (22)
Round 3 :
SC in next 5 stitches, *2SC, SC* repeat 3 times, SC in next 5 stitches, *2SC, SC* repeat 1 time. (28)
Round 4 :
Working through back loops only: SC all the way around. (28)
Round 5 :
SC in next 5 stitches, *SC2TOG, SC, SC* repeat 3 times, SC in next 7 stitches. (24)
Round 6 :
SC in next 3 stitches, *SC2TOG, SC, SC* repeat 3 times, SC in next 5 stitches. (20) Tie off, leaving a long tail for sewing. Stuff the shoe loosely. Make a second shoe the same way.
— 7. Shamrock (Dark Green — 5mm hook) :
Info :
Use the 5mm hook for shamrocks. You can start with either a CH 4 joined with a SL ST into a ring, or a MC — both work the same way.
Petals :
Into the ring: *CH 3, TR, DC, TR, CH 3, SL ST into the ring* — repeat this sequence 2 more times to create 3 petals total.
Stem :
CH 5. Working back along the chain: SC into the 2nd CH from the hook, SL ST into each of the next 3 chains, then SL ST into the center ring to anchor. Tie off and leave a tail long enough for sewing to the wreath. Make as many shamrocks as desired.
— 8. Hanger :
Info :
Using any remaining yarn and the 4mm hook, work HDCFS 20. Fold the strip in half to form a loop and sew both ends securely to the back or top of the wreath. This serves as the hanging loop.
There's something really lovely about a handmade wreath — it tells anyone who walks through your door that someone put time and care into making a space feel special. This lucky gnome is charming enough to become a yearly tradition, and once you've made one, I'd bet you'll want to make a second for someone you love. 🍀 The construction is manageable, the pieces are fun to work up individually, and putting it all together on the foam base is genuinely satisfying. Hang it up, stand back, and feel good about what your hands made. Happy crocheting! 🧶✨