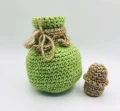
There's something genuinely magical about crocheting a tiny potion bottle — and this one delivers all the fantasy-craft energy you could want. Worked in a rich jade green with a rustic boulder-toned cork and trailing tendrils, it looks straight out of an apothecary shelf. You'll crochet the round bottle body, shape a fitted cork stopper, and finish with a whimsical hanging decoration that ties into a bow. The whole thing comes together faster than you'd expect, and the result is so satisfying to hold. Whether you're making it for your shelf, as a gift, or just because you needed a little magic in your life — this one's for you.
Progress Tracker
0% Complete
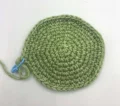
— 1. Bottle (Canada Jade) :
Round 1 :
Start with a magic ring and work 6 sc into it. (6)
Round 2 :
Inc in every st around. (12)
Round 3 :
(Inc in next st, sc in next st) repeat 6 times. (18)
Round 4 :
(Inc in next st, sc in next 2 st) repeat 6 times. (24)
Round 5 :
(Sc in next 2 st, inc in next st, sc in next st) repeat 6 times. (30)
Round 6 :
(Inc in next st, sc in next 4 st) repeat 6 times. (36)
Round 7 :
(Sc in next 3 st, inc in next st, sc in next 2 st) repeat 6 times. (42)
Round 8 :
(Inc in next st, sc in next 6 st) repeat 6 times. (48)
Round 9 :
Sc in all 48 st. (48)
Round 10 :
Sc in all 48 st. (48)
Round 11 :
Sc in all 48 st. (48)
Round 12 :
Sc in all 48 st. (48)
Round 13 :
Sc in all 48 st. (48)
Round 14 :
Sc in all 48 st. (48)
Round 15 :
Sc in all 48 st. (48)
Round 16 :
Sc in all 48 st. (48)
Round 17 :
Sc in all 48 st. (48)
Round 18 :
Sc in all 48 st. (48)
Round 19 :
Sc in all 48 st. (48)
Round 20 :
(Dec over next 2 st, sc in next 6 st) repeat 6 times. (42)
Round 21 :
(Sc in next 3 st, dec over next 2 st, sc in next 2 st) repeat 6 times. (36)
Round 22 :
(Dec over next 2 st, sc in next 4 st) repeat 6 times. (30)
Round 23 :
(Sc in next st, dec over next 2 st, sc in next 2 st) repeat 6 times. (24)
Round 24 :
(Sc in next 6 st, dec over next 2 st) repeat 3 times. (21)
Round 25 :
Sc in all 21 st. (21)
Round 26 :
Sc in all 21 st. (21)
Round 27 :
Sc in all 21 st. (21)
Round 28 :
Sc in all 21 st. (21)
Round 29 :
Sc in all 21 st. (21)
Round 30 :
Sc in all 21 st. (21)
Round 31 :
Work sc through the FLO of every st around — this creates the fold line for the rolled collar. (21)
Round 32 :
Sc in all 21 st. (21)
Round 33 :
Sc in all 21 st. (21)
Round 34 :
Sc in all 21 st. (21)
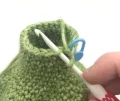
Info :
Fasten off and weave in your end. Roll the top edge of the bottle down — the FLO round creates a natural crease that makes the collar fold over neatly.
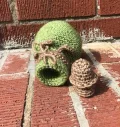
— 2. Cork (Boulder Opal) :
Round 1 :
Start with a magic ring and work 6 sc into it. (6)
Round 2 :
Inc in every st around. (12)
Round 3 :
Sc in all 12 st. (12)
Round 4 :
Sc in all 12 st. (12)
Round 5 :
(Sc in next 4 st, inc in next st) repeat 2 times, then sc in the last 2 st. (14)
Round 6 :
Sc in all 14 st. (14)
Round 7 :
Sc through the BLO of all 14 st. (14)
Round 8 :
Sc through the BLO of all 14 st. (14)
Round 9 :
Sc in all 14 st. (14) — Begin stuffing here. Test fit the cork inside the bottle neck as you go and adjust the filling for a snug but comfortable fit.
Round 10 :
Sc through the BLO of all 14 st. (14)
Round 11 :
Sc through the BLO of all 14 st. (14)
Round 12 :
Dec across all 14 st. (7)
Info :
Fasten off leaving a long tail. Thread your tapestry needle through each front loop of the remaining 7 st and pull to close the top. Then bring the tail up through the center from bottom to top and pull gently to flatten the bottom of the cork. Fasten off at the top to hold the shape and hide the end inside.
— 3. Cork Band Decoration :
Info :
Using Boulder Opal, make a slip knot and insert your hook into the loops closest to the top of the cork — specifically the loops left from the BLO rounds. Ch 1 to anchor your yarn.
Info :
Work sc evenly around the cork in each st, then sl st into the first ch-1 st to close the round. Fasten off and weave in the end.
— 4. Bottle Neck Decoration (Boulder Opal) :
Info :
Leave a long starting tail before you begin — you'll use it later to tie a bow around the bottle neck. The tail should be at least 20cm.
Row 1 :
Ch 26. Starting in the second ch from the hook, work hdc in all 25 ch. Ch 1 and turn. (25)
Row 2 :
Create the hanging tendril pattern: sl st into the first st, then in that same st ch 10 — sl st back along all 9 ch to form a curl — then sl st into the next 4 st. Repeat this tendril sequence 5 times total until you reach the end of the row.
Info :
Pull your yarn through the last sl st and use a tapestry needle to thread the tail through to the other side so both ends match up. Either sew the ends together around the bottle neck or tie them into a bow.
This little magic potion bottle is one of those projects that feels completely disproportionate — it's a fairly quick make, but the finished piece looks like it took forever. The round jade body, the ridged cork, those wild curling tendrils around the neck... it all just comes together into something genuinely special. 🧶 Pop it on a shelf, tuck it into a gift bag, or make a whole apothecary's worth in different colors. However you finish it, I hope you love making it as much as I do. ✨ Happy crocheting!