About This Magical Brew Potion Bottle Amigurumi Pattern
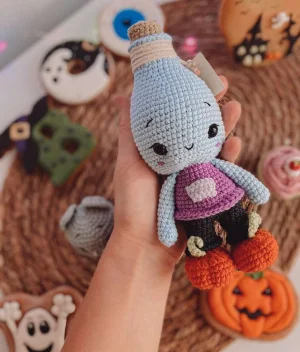
This charming little bottle makes a wonderful handmade gift for gamers, bookworms, or anyone who loves a touch of magic on their desk or bookshelf.
Ideal for those with basic crocheting experience, featuring slightly more advanced stitches and techniques to expand your skills.
Fits nicely into a free afternoon — 2 to 5 hours of focused, enjoyable crocheting.
Playful characters full of personality, designed to spark imagination and become cherished playtime favorites.
This charming little bottle makes a wonderful handmade gift for gamers, bookworms, or anyone who loves a touch of magic on their desk or bookshelf.
I absolutely adore how this design blends structure with softness. The clever use of back-loop stitches to create the bottle neck and boot cuffs is so satisfying to crochet, and adding that tiny pocket to the front felt like dressing up a little doll. It is a fantastic way to practice shaping while playing with fun color combinations.
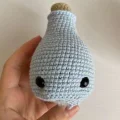
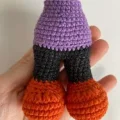
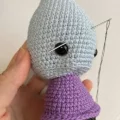
There is something so incredibly satisfying about crocheting objects that usually aren't soft, and this little potion bottle is the perfect example! I remember when I first made one of these, I was so worried the neck would be floppy, but with a bit of extra stuffing, it stood up beautifully.
If you want to customize your little potion, the color combinations are absolutely endless! You could make a health potion with bright red yarn, a mana potion with deep purple, or even a glowing poison bottle using neon green. I also love the idea of adding a tiny bit of sparkly metallic thread into the main bottle body to make it look like the liquid inside is actually shimmering.
For the little pocket on the front, you can embroider a tiny star or a heart to give it an extra touch of personality. It is these tiny details that make handmade toys so incredibly special to work on and share with our loved ones.
Whose ready to add a splash of magic to their yarn collection? This adorable little potion buddy is the perfect whimsical project to bright up your shelves or gift to a fantasy-loving friend. You will love watching this quirky character come to life, from the tiny cork top down to those sweet little boots. Grab your favorite shades and let us make some magic together!
Using your beige yarn to start the cork, work 6 sc into a mr (6)
Work 1 inc in each of the next 6 stitches around (12)
Repeat the sequence of 1 sc followed by 1 inc a total of 6 times (18)
Working in blo, make 1 sc in each of the 18 stitches around (18)
Work 1 sc in every stitch around for these three rounds (18)
Switch to your light blue yarn to begin the main bottle section.
Working in blo with the blue yarn, repeat the sequence of 2 sc then 1 inc 6 times (24)
Work 1 sc in each of the 24 stitches around for these four rounds (24)
Repeat the sequence of 3 sc and 1 inc 6 times around (30)
Work 1 sc in each of the 30 stitches around for these two rounds (30)
Repeat the sequence of 4 sc and 1 inc 6 times around (36)
Repeat the sequence of 5 sc and 1 inc 6 times around (42)
Work 1 sc in each of the 42 stitches around (42)
Repeat the sequence of 6 sc and 1 inc 6 times around (48)
Work 1 sc in each of the 48 stitches around for these two rounds (48)
Repeat the sequence of 7 sc and 1 inc 6 times around (54)
Work 1 sc in each of the 54 stitches around for these twelve rounds (54)
Repeat the sequence of 7 sc and 1 dec 6 times around (48)
Working in blo, repeat the sequence of 6 sc and 1 dec 6 times around (42)
Repeat the sequence of 5 sc and 1 dec 6 times around (36)
Repeat the sequence of 4 sc and 1 dec 6 times around (30)
Repeat the sequence of 3 sc and 1 dec 6 times around (24)
Go back to the front loops of Round 8 and work 1 sc in each loop around to create the bottle neck rim. Insert the 10-12mm safety eyes between Rounds 30 and 31, leaving a space of 13 sc between them.
Using your orange yarn, ch 7. Starting in the second chain from your hook, work 5 sc, then work 4 sc into the next single chain, continue down the opposite side of the chain with 4 sc, and finish with 1 inc (13)
Work 1 inc, 4 sc, 4 inc, 4 sc, and 2 inc (22)
Work 1 sc, 1 inc, 4 sc, repeat (1 sc, inc) 4 times, work 4 sc, and repeat (1 sc, inc) 2 times (29)
Work 2 sc, 1 inc, 4 sc, repeat (2 sc, inc) 4 times, work 4 sc, and repeat (2 sc, inc) 2 times (36)
Work 1 sc in each of the 36 stitches around for these three rounds (36)
Work 12 sc, then make 6 dec using hdc, and finish with 12 sc (30)
Repeat the sequence of 3 sc and 1 dec 6 times around (24)
Work 3 sc, 1 dec, repeat (1 sc, dec) 5 times, and finish with 4 sc (18)
Work 2 sc, 1 dec, repeat (4 sc, dec) 2 times, and finish with 2 sc (15)
Switch to your dark grey/black yarn for the pants.
Work 1 sc in each of the 15 stitches around (15)
Working in blo, work 1 sc in each of the 15 stitches around (15)
Work 1 sc in each of the 15 stitches around for these four rounds (15)
To make the boot cuffs, return to the front loops of Round 13 and work 15 dc around. Fasten off. On the second leg, work an additional 5 sc after Round 17 to align the join, but do not cut the yarn. We will now join the legs together.
Continue directly from the second leg by working 15 sc across the first leg, then work 15 sc across the second leg to join them together (30)
Repeat the sequence of 4 sc and 1 inc 6 times around (36)
Work 1 sc in each of the 36 stitches around (36)
Switch to your soft purple yarn to start the sweater.
Work 1 sc in each of the 36 stitches around (36)
Working in blo, work 1 sc in each of the 36 stitches around (36)
Work 1 sc in each of the 36 stitches around for these three rounds (36)
Repeat the sequence of 4 sc and 1 dec 6 times around (30)
Work 1 sc in each of the 30 stitches around (30)
Repeat the sequence of 3 sc and 1 dec 6 times around (24)
Work 1 sc in each of the 24 stitches around for these three rounds (24)
To finish the sweater bottom rim, return to the front loops of Round 22 and work 36 dc around. Fasten off and weave in ends.
Using your light blue yarn, work 6 sc into a mr (6)
Work 1 inc in each of the next 6 stitches around (12)
Work 1 sc in each of the 12 stitches around (12)
Work 10 sc, then work 1 dec (11)
Work 9 sc, then work 1 dec (10)
Work 1 sc in each of the 10 stitches around for these nine rounds (10)
Press the top edges flat and work a row of sc through both layers to close the opening. Fasten off, leaving a long tail for sewing.
Using your light green yarn, ch 10. Turn your work and starting in the second chain from your hook, work 9 sl st along the chain. Fasten off and leave a tail for assembly.
Using your light pink/beige yarn, ch 5, then turn your work (5)
Work 1 inc, 2 sc, and 1 inc, then turn your work (6)
Work 1 sc in each of the 6 stitches across (6)
Fasten off, leaving a long tail to sew the pocket onto the belly.
You have done an amazing job bringing this little potion bottle to life! I hope making this whimsical buddy brought a bit of magic to your day. Display your finished creation proudly on your favorite shelf, or wrap it up as a truly unique gift for someone special. Don't forget to share your photos with the community—we all love to see your unique color choices! Keep shining and happy crocheting! 🧶✨🔮
Absolutely! Just keep in mind that using a heavier worsted weight yarn will make your finished potion bottle significantly larger, and you'll need to increase your hook size to around 3.0mm or 3.5mm to match.
To give the boots a flat, sturdy base, you can cut out a small oval of thick plastic (like from a clean yogurt lid) and place it inside the bottom of each boot before stuffing them.
A wooden chopstick or the back end of a larger crochet hook is perfect for pushing small clumps of stuffing down into the neck to keep it rigid.
Not at all! If you are making this toy for a very young child, embroidering the eyes with black yarn is a much safer alternative to plastic safety eyes.
