About This Majestic Royal Peacock Amigurumi Pattern
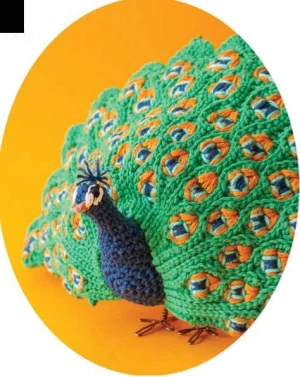
This pattern makes a beautiful handmade gift — thoughtful enough for someone special, but detailed enough to be a true showstopper on any display shelf or mantle.
Ideal for those with basic crocheting experience, featuring slightly more advanced stitches and techniques to expand your skills.
Takes 5-7 hours, making it an enjoyable project to finish over a couple of days.
Playful characters full of personality, designed to spark imagination and become cherished playtime favorites.
This pattern makes a beautiful handmade gift — thoughtful enough for someone special, but detailed enough to be a true showstopper on any display shelf or mantle.
I honestly fell in love with the way the train is constructed—sewing the two layers together makes it so sturdy and professional. Plus, the embroidery on the feathers is surprisingly meditative; it is like painting with yarn, and the results are just gorgeous!

I remember the first time I saw a peacock fan its feathers; it was just breathtaking! Trying to translate that into crochet was such a fun puzzle to solve. When you're working on the train, don't be intimidated by the repetitive rows. I found that putting on a good podcast and just getting into the rhythm of the BLO stitches made the time fly by.
One thing I discovered while making my prototype is that the tension on the embroidery really matters. If you pull those ochre and turquoise stitches too tight, the fabric of the feather will pucker. Keep them firm but gentle. If you want to get really creative, try using a variegated blue and green yarn for the body to give it that iridescent look peacocks are famous for!
For the legs, if you find the wire a bit slippery, you can wrap it in a little floral tape before you start the yarn wrap. It gives the yarn something to grip onto. I can't wait to see your versions—this little guy has so much character, especially once you untwist those yarn fibers for his crest. Happy hooking!
There is something truly magical about the way a peacock carries itself, and capturing that elegance in crochet is such a rewarding challenge. You will love watching this little guy come to life, from his slender blue neck to that breathtaking fan of feathers. It is the perfect project for when you want to slow down and focus on the tiny, beautiful details that make handmade toys so special. Whether you keep him for yourself or give him as a gift, he is sure to be the star of any collection.
Start with blue yarn and work 6 x 1sc into a magic ring (6)
Work 6 x inc around (12)
[1 x 1sc, 1 x inc] repeat 6 times (18)
1 x 1sc, [1 x inc, 2 x 1sc] repeat 5 times, then 1 x inc, 1 x 1sc (24)
[3 x 1sc, 1 x inc] repeat 6 times (30)
2 x 1sc, [1 x inc, 4 x 1sc] repeat 5 times, then 1 x inc, 2 x 1sc (36)
ch 8, sk 8 sts, 28 x 1sc (36)
8 x 1sc in the back loops of the chain, 24 x 1sc (36)
36 x 1sc (36)
2 x 1sc, [1 x dec, 4 x 1sc] repeat 5 times, then 1 x dec, 2 x 1sc (30)
30 x 1sc (30)
[3 x 1sc, 1 x dec] repeat 6 times (24)
24 x 1sc (24)
Begin stuffing the body firmly and continue as you work the remaining rounds.
1 x 1sc, [1 x dec, 2 x 1sc] repeat 5 times, then 1 x dec, 1 x 1sc (18)
18 x 1sc (18)
[1 x 1sc, 1 x dec] repeat 6 times (12)
12 x 1sc (12)
6 x dec (6)
Fasten off and weave the tail through the front loops to close the opening.
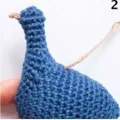
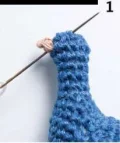
You will now work the neck out of the opening created in Round 7 of the body.
Join blue yarn at the gap to the right of the first skipped stitch. 8 x 1sc across the front, 1 x 1sc in the space between rounds 6 and 7, 8 x 1sc across the other side of the chains, and 1 x 1sc in the joining space (18)
[7 x 1sc, 1 x dec] repeat 2 times (16)
[2 x 1sc, 1 x dec] repeat 4 times (12)
12 x 1sc (12)
Stuff the neck as you go to ensure it stays upright.
[1 x 1sc, 1 x dec] repeat 4 times (8)
8 x 1sc (8)
[1 x 1sc, 1 x inc] repeat 4 times (12)
12 x 1sc (12)
6 x dec (6)
Fasten off and close the round neatly.
Using beige yarn, start with a foundation chain.
ch 2, then work 1 x 1sc in the second ch from your hook (1)
Fasten off, leaving a tail for attachment.
Make two of these using orange yarn.
Work 6 x 1sc into a magic ring (6)
6 x inc around (12)
12 x 1sc (12)
[ch 7, 6 x 1sc starting in the 2nd ch from hook, sl st through both the next st and the corresponding st on the opposite side to close the circle] repeat 6 times
Using brown yarn, work in rows. Start with ch 3.
2 x 1sc starting in 2nd ch, ch 1, turn (2)
2 x inc, ch 1, turn (4)
1 x inc, 2 x 1sc, 1 x inc, ch 1, turn (6)
6 x 1sc, ch 1, turn (6)
2 x 1sc, [sk 1, 1 x 1sc] repeat 2 times, ch 1, turn (4)
sk 1, 3 x 1sc, ch 1, turn (3)
1 x 1sc, sk 1, 1 x 1sc, ch 1, turn (2)
2 x 1sc, ch 1, turn (2)
sk 1, 1 x 1sc, ch 1, turn (1)
1 x 1sc, ch 1, turn (1)
1 x 1sc (1)
Do not fasten off. Crochet around the edges: 14 x 1sc up the side, 2 x 1sc in the starting chain base, 14 x 1sc down the other side (30)
Using brown yarn, work in rows. Start with ch 3.
2 x 1sc starting in 2nd ch, ch 1, turn (2)
2 x inc, ch 1, turn (4)
1 x inc, 2 x 1sc, 1 x inc, ch 1, turn (6)
6 x 1sc, ch 1, turn (6)
[sk 1, 1 x 1sc] repeat 2 times, 2 x 1sc, ch 1, turn (4)
2 x 1sc, sk 1, 1 x 1sc, ch 1, turn (3)
sk 1, 2 x 1sc, ch 1, turn (2)
2 x 1sc, ch 1, turn (2)
sk 1, 1 x 1sc, ch 1, turn (1)
1 x 1sc, ch 1, turn (1)
1 x 1sc (1)
Do not fasten off. Crochet around the edges: 14 x 1sc up the side, 2 x 1sc in the starting chain base, 14 x 1sc down the other side (30)
Using green yarn, start with ch 38. Leave a long tail.
1 x 1tr in 4th ch from hook, 4 x 1tr, 5 x 1sc, 5 x 1dc, 5 x sl st, 5 x 1hdc, 10 x sl st, ch 1, turn (35)
In BLO: 10 x sl st, 5 x 1hdc, 5 x sl st, 5 x 1dc, 5 x 1sc, 5 x 1tr, ch 1, turn (35)
In BLO: [5 x sl st, 5 x 1hdc] repeat 2 times, 15 x sl st, ch 1, turn (35)
In BLO: 15 x sl st, [5 x 1hdc, 5 x sl st] repeat 2 times, ch 3, turn (35)
In BLO: 5 x 1tr, 5 x 1sc, 5 x 1dc, 5 x sl st, 5 x 1hdc, 10 x sl st, ch 1, turn (35)
In BLO: 10 x sl st, 5 x 1hdc, 5 x sl st, 5 x 1dc, 5 x 1sc, 5 x 1tr, ch 1, turn (35)
In BLO: 5 x sl st, 5 x 1dc, [5 x sl st, 5 x 1hdc] repeat 2 times, 5 x sl st, ch 1, turn (35)
In BLO: [5 x sl st, 5 x 1hdc] repeat 2 times, 5 x 1dc, 5 x sl st, ch 3, turn (35)
In BLO: 5 x 1tr, 5 x 1sc, 5 x 1dc, 5 x sl st, 5 x 1hdc, 10 x sl st, ch 1, turn (35)
Repeat Row 2 to Row 9 once (35)
Repeat Row 2 to Row 9 once (35)
Repeat Row 2 to Row 9 once (35)
Repeat Row 2 to Row 9 once (35)
Repeat Row 2 to Row 9 once (35)
10 x sl st, 5 x 1hdc, 5 x sl st, 5 x 1dc, 5 x 1sc, 5 x 1tr (35)
Do not fasten off. Work along the decorative edge: [4 x 1tr, ch 3, sl st in 3rd ch, 4 x 1tr, sl st in the space between the slip stitch rows] repeat 13 times across the top.
Using green yarn, start with ch 33.
1 x 1tr in 4th ch from hook, 4 x 1tr, 5 x 1sc, 5 x 1dc, 5 x sl st, 5 x 1hdc, 5 x sl st, ch 1, turn (30)
In BLO: 5 x sl st, 5 x 1hdc, 5 x sl st, 5 x 1dc, 5 x 1sc, 5 x 1tr, ch 1, turn (30)
In BLO: [5 x sl st, 5 x 1hdc] repeat 2 times, 10 x sl st, ch 1, turn (30)
In BLO: 10 x sl st, [5 x 1hdc, 5 x sl st] repeat 2 times, ch 3, turn (30)
In BLO: 5 x 1tr, 5 x 1sc, 5 x 1dc, 5 x sl st, 5 x 1hdc, 5 x sl st, ch 1, turn (30)
In BLO: 5 x sl st, 5 x 1hdc, 5 x sl st, 5 x 1dc, 5 x 1sc, 5 x 1tr, ch 1, turn (30)
In BLO: 5 x sl st, 5 x 1dc, [5 x sl st, 5 x 1hdc] repeat 2 times, ch 1, turn (30)
In BLO: [5 x 1hdc, 5 x sl st] repeat 2 times, 5 x 1dc, 5 x sl st, ch 3, turn (30)
In BLO: 5 x 1tr, 5 x 1sc, 5 x 1dc, 5 x sl st, 5 x 1hdc, 5 x sl st, ch 1, turn (30)
Repeat Rows 2 through 9 five more times (30)
5 x sl st, 5 x 1hdc, 5 x sl st, 5 x 1dc, 5 x 1sc, 5 x 1tr (30)
I really hope you enjoy the process of bringing this majestic bird to life! From the first magic ring to the final styling of the crest, every stitch is an opportunity to create something beautiful. Once he is finished and standing tall on his wire legs, you will have a truly unique piece of art that showcases your skills. Don't forget to share your finished photos with our community; seeing your color choices is always the highlight of my day! Happy crocheting and enjoy your new royal companion. 🧶 ✨
You can, but the peacock will not be able to stand on its own, and the feather train will be floppy. If it is for a small child, omit the wire for safety and consider sewing the train directly to a backing for support.
I find that using a sturdy sewing needle or a small comb works best. Gently pick at the ends of the yarn until the individual plies separate, then trim them to your desired length.
Using a row counter or a simple tally on a piece of paper is a lifesaver here! Since the train is the largest part of the project, marking off each 8-row repeat will help you stay on course.
Absolutely! Just keep in mind that your peacock will turn out significantly larger, and you'll need to increase your hook size (try a 3.5mm or 4.0mm) and use a thicker gauge wire for the legs.
