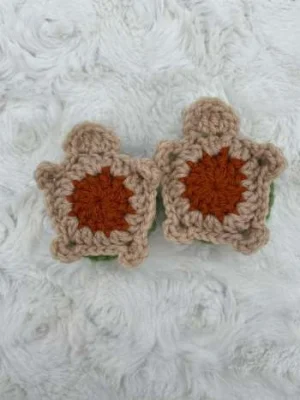
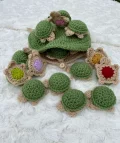
Bring a splash of handmade joy to game night with this incredibly sweet turtle memory game! You will love crafting a cozy mama turtle whose shell opens up to store a whole family of colorful baby turtles. It is a brilliant, tactile matching game that kids and adults alike will fall in love with, making it as fun to play with as it is to crochet.
Progress Tracker
0% Complete
— 1. Baby Bottom (Make 2 of each match color - 20 total) :
Info :
Use your 4.0mm crochet hook for this section. Do not worry about weaving in or hiding your yarn tails, as they will be tucked safely inside the turtle shell.
Round 1 :
Using your chosen match color, start with a mc and ch 2. Work 12 dc into the mc. ss to the top of your first dc. ch 1 and cut your yarn. (12)
Round 2 :
Join your tan yarn to any st of the previous round. ch 2, then work a dc inc into that same st and into each st around. ss to the first dc. (24)
Round 3 :
This round forms the head and legs of the baby turtle and is worked entirely into the FLO. ch 2. Work a dc and a tr into the same st as your ss. Work a tr and a dc into the next st, then ch 2 and ss into that same st. ss into the next 2 st. Work (ss, ch 1, 2 hdc, ch 1, ss) into the next st to make a leg. ss into the next 5 st. Work (ss, ch 1, 2 hdc, ch 1, ss) into the next st for the second leg. ss into the next 4 st. Work (ss, ch 1, 2 hdc, ch 1, ss) into the next st for the third leg. ss into the next 5 st. Work (ss, ch 1, 2 hdc, ch 1, ss) into the next st for the fourth leg. ss into the final 2 st. Fasten off and pull the tail through to the other side.
— 2. Baby Shell (Make 20) :
Info :
Use your 4.0mm crochet hook and green yarn. The piece will naturally start to cup into a bowl shape as you work.
Round 1 :
Start with a mc, ch 1, and work 6 sc into the ring. ss to the first st, then ch 1. (6)
Round 2 :
Work a hdc inc in each st around. ss to the first st, then ch 1. (12)
Round 3 :
Work (1 hdc, hdc inc) 6 times around. ss to the first st, then ch 1. (18)
Round 4 :
Work (2 hdc, hdc inc) 6 times around. ss to the first st, then ch 1. (24)
Info - Joining Option 1 :
For the no-sew finish, ch 1 and line up the shell with the baby bottom, ensuring the right sides face outwards. Work through both loops of the shell and the FLO of the bottom (these are the exposed loops from Round 3). sc all the way around, pausing near the end to stuff with polyfil, then ss to join and weave in your tail.
Info - Joining Option 2 :
If you prefer to sew the pieces together, fasten off your green yarn, leaving a 12-inch tail. Thread your needle and sew through both loops of the shell and the FLO of the bottom. Work your way around, stuffing with polyfil before closing completely.
— 3. Bottom of Mama's Shell :
Info :
Use your 4.0mm crochet hook and tan yarn. Remember that the starting ch 2 does not count as a dc. Always begin your round by working into the same st as your ss, and ss to the beginning ch after each round.
Round 1 :
Start with a mc, ch 2, and work 12 dc into the ring. ss to the first dc to join. (12)
Round 2 :
ch 2, work a dc inc in each of the 12 stitches around, then ss to join. (24)
Round 3 :
ch 2, work (1 dc, dc inc) 12 times around, then ss to join. (36)
Round 4 :
ch 2, work (2 dc, dc inc) 12 times around, then ss to join. (48)
Round 5 :
ch 2, work (3 dc, dc inc) 12 times around, then ss to join. (60)
Round 6 :
ch 2, work (4 dc, dc inc) 12 times around, then ss to join. (72)
Round 7 :
ch 2, work (5 dc, dc inc) 12 times around, then ss to join. (84)
Round 8 :
ch 2, work (6 dc, dc inc) 12 times around, then ss to join. (96)
Info :
ss to the top of the first dc but do not cut your yarn. You will immediately proceed to crocheting the tail.
— 4. Mama's Tail :
Row 1 :
ch 1, work 4 sc, then ch 1 and turn. (4)
Row 2 :
Work 4 sc across, then ch 1 and turn. (4)
Row 3 :
Work 2 sc dec, then ch 1 and turn. (2)
Row 4 :
Work 2 sc, then ch 1 and turn. (2)
Row 5 :
Work 1 sc dec. (1)
Info :
ch 1, cut your yarn leaving an 8-inch tail. This tail will be used to sew on the closure button later.
— 5. Mama's Legs (Make 4) :
Info :
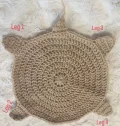
All four legs are worked into the BLO of Row 1. Turn the piece so the wrong side is facing up before you begin joining the legs for a cleaner finish. Leg 1: Count 9 st to the left of the tail. Leg 2: Count 16 st to the left of Leg 1. Leg 3: Count 14 st to the right of the tail. Leg 4: Count 21 st to the right of Leg 3. There should be 15 unworked stitches between the front and back legs, and 8 unworked stitches between the back legs and the tail.
Row 1 :
Join your tan yarn in the BLO of the designated placement st, ch 1, work sc in the same st, then work 5 sc. ch 1 and turn. (6)
Row 2 :
ch 1, work 6 sc across, then ch 1 and turn. (6)
Row 3 :
ch 1, work 6 sc across, then ch 1 and turn. (6)
Row 4 :
ch 1, work 6 sc across, then ch 1 and turn. (6)
Row 5 :
ch 1, work 1 sc dec, 2 sc, then 1 sc dec. ch 1 and turn. (4)
Row 6 :
Work 2 sc dec, then ch 1 to secure your yarn. Cut and weave in all ends.
— 6. Mama's Head (Make 2) :
Info :
Switch to your 3.5mm crochet hook and tan yarn for the head pieces.
Row 1 :
ch 9. Starting in the second ch from your hook, work 8 sc across. ch 1 and turn. (8)
Row 2 :
Work 8 sc across, then ch 1 and turn. (8)
Row 3 :
Work 8 sc across, then ch 1 and turn. (8)
Row 4 :
Work 1 sc inc, 6 sc, then 1 sc inc. ch 1 and turn. (10)
Row 5 :
Work 1 sc inc, 8 sc, then 1 sc inc. ch 1 and turn. (12)
Row 6 :
Work 12 sc across, then ch 1 and turn. (12)
Row 7 :
Work 12 sc across, then ch 1 and turn. (12)
Row 8 :
Work 12 sc across, then ch 1 and turn. (12)
Row 9 :
Work 12 sc across, then ch 1 and turn. (12)
Row 10 :
Work 1 sc dec, 8 sc, then 1 sc dec. ch 1 and turn. (10)
Row 11 :
Work 10 sc across, then ch 1 and turn. (10)
Row 12 :
Work 1 sc dec, 6 sc, then 1 sc dec. ch 1 and turn. (8)
Row 13 :
Work 1 sc dec, 4 sc, then 1 sc dec. ch 1 and turn. (6)
Info - Finishing Head Pieces :
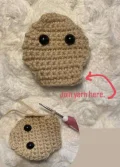
On the first piece, ch 1, cut your yarn and weave in the ends. On the second piece, insert the 12mm safety eyes between Rows 9 and 10, spacing them 4 stitches apart. Place the piece with the eyes directly on top of the plain piece.
Row 14 - Joining Head :
Join your tan yarn at the right side of the neck, working through both pieces: work 3 sc, 1 sc inc, (2 sc, sc inc) 3 times, 4 sc across the top of the head, (sc inc, 2 sc) 3 times, 1 sc inc, then 3 sc down the other side of the neck. Leave a long tail for sewing the head to the bottom shell, stuff the head firmly with polyfil, and fasten off.
— 7. Top of Mama's Shell :
Info :
Switch back to your 4.0mm crochet hook and use green yarn. The starting ch 2 does not count as a stitch; always work into the same st as your ss and ss to the first stitch at the end of each round.
Round 1 :
Start with a mc, ch 2, and work 12 dc into the ring. ss to the first dc to join. (12)
Round 2 :
ch 2, work a dc inc in each of the 12 stitches around, then ss to join. (24)
Round 3 :
ch 2, work (1 dc, dc inc) 12 times around, then ss to join. (36)
Round 4 :
ch 2, work (2 dc, dc inc) 12 times around, then ss to join. (48)
Round 5 :
ch 2, work (3 dc, dc inc) 12 times around, then ss to join. (60)
Round 6 :
ch 2, work (2 dc, dc inc, 2 dc) 12 times around, then ss to join. (72)
Round 7 :
ch 2, work (5 dc, dc inc) 12 times around, then ss to join. (84)
Round 8 :
ch 2, work (6 dc, dc inc) 12 times around, then ss to join. (96)
Round 9 :
ch 2, work 96 dc around, then ss to join. (96)
Round 10 (Optional) :
If you plan to make extra baby turtle matches and need more storage room, work an extra round of 96 dc around, then ss to join. (96)
Info - Joining Shells :
ch 1 but do not cut your yarn. Place the green top shell directly over the tan bottom shell. Align the pieces starting at the first stitch of the back right leg. Working through both loops of the top shell and the FLO of the bottom shell, work 76 sc. This will leave 20 unworked stitches at the front to create the pocket opening where the babies will go. Cut your yarn and weave in the ends.
There is nothing quite like the feeling of finishing a big, beautiful project like this. Watching this little turtle family come to life stitch by stitch is such a rewarding experience. I hope this memory game brings endless smiles, cozy game nights, and lots of playful memories to your home. Happy crocheting, my lovely friends! 🧶🐢✨