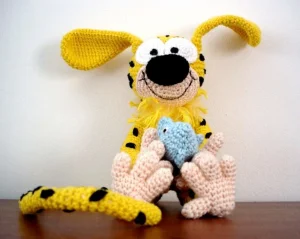
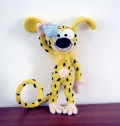
Bring this classic, energetic jungle character to life with your crochet hook! If you love quirky, retro cartoons and projects filled with clever construction details, you are going to have so much fun with this project. From the incredibly long, bendy tail to those wonderfully expressive oversized ears, every stitch captures his mischievous spirit. Grab your favorite yellow cotton yarn and let's get making!
Progress Tracker
0% Complete
— 1. Head :
Round 1 :
ch 6. Starting in second chain from hook, sc 4, work 3 sc in the last chain. Turning to work along the opposite side of the chain, sc 3, work 2 sc in the final stitch. (12 sts)
Round 2 :
*inc, sc 1* repeat 6 times. (18 sts)
Round 3 :
*inc, sc 2* repeat 6 times. (24 sts)
Round 4 :
*inc, sc 3* repeat 6 times. (30 sts)
Round 5 :
*inc, sc 4* repeat 6 times. (36 sts)
Round 6 :
*inc, sc 5* repeat 6 times. (42 sts)
Round 7 :
*inc, sc 6* repeat 6 times. (48 sts)
Round 8 :
*inc, sc 7* repeat 6 times. (54 sts)
Round 10 :
*inc, sc 8* repeat 6 times. (60 sts)
Round 11-14 :
sc 60. (60 sts)
Round 15 :
*dec, sc 8* repeat 6 times. (54 sts)
Round 16 :
sc 54. (54 sts)
Round 17 :
*dec, sc 7* repeat 6 times. (48 sts)
Round 18 :
*dec, sc 6* repeat 6 times. (42 sts)
Round 19 :
*dec, sc 5* repeat 6 times. (36 sts)
Round 20 :
*dec, sc 4* repeat 6 times. (30 sts)
Round 21 :
*dec, sc 3* repeat 6 times. (24 sts)
Round 22 :
*dec, sc 2* repeat 6 times. (18 sts)
Info :
Stuff the head firmly with fiberfill at this stage.
Round 23 :
*dec, sc 1* repeat 6 times. (12 sts)
Info :
Fasten off, leaving a tail. Top up the stuffing if needed to keep the head shape round and firm.
— 2. Leg Fingers :
Info :
Use peach or beige yarn for the fingers. You will make two normal fingers, one middle finger, and then join them using a fourth starting finger.
Finger 1 & 2 (Make 2) :
Work 4 sc into a mr. (4 sts)
Round 2 :
*inc, sc 1* repeat 2 times. (6 sts)
Info :
Fasten off and weave in ends for these first two fingers.
Middle Finger (Make 1) :
Work 4 sc in mr. (4 sts)
Round 2 :
*inc, sc 1* repeat 2 times. (6 sts)
Info :
Fasten off and weave in ends for this middle finger.
Last Finger (Do not tie off) :
Work 4 sc in mr. (4 sts)
Round 2 :
*inc, sc 1* repeat 2 times. (6 sts)
Round 3-5 :
sc 6. (6 sts) Do not cut yarn.
Round 6 :
Connect the fingers: work 3 sc over the middle finger, then bring the next normal finger and work 6 sc around it. Continue by working 3 sc back across the middle finger, and finish with 6 sc around the first finger. (18 sts)
Round 7-8 :
sc 18. (18 sts)
Info :
Lightly stuff the joined fingers at this point.
— 3. Right Foot & Leg :
Info :
Continue using peach/beige yarn.
Round 9 :
Connect the thumb: work sc 3, then work sc 3 through both the thumb and the main foot piece to connect them, then sc 12 around the rest of the foot. (18 sts)
Round 10 :
Work sc 3, then work sc 3 directly over the unworked stitches of the thumb, then sc 12. (18 sts)
Row 11 :
sc 10, ch 1, turn. (10 sts)
Row 12 :
sc 14, ch 1, turn. (14 sts)
Row 13 :
sc 7, ch 1. Fold this section in half and work sl st through both layers for 7 stitches to close the back of the foot. Change color to yellow yarn. (7 sts)
Round 14 :
Work 12 sc evenly around the remaining top opening of the foot. (12 sts)
Round 15 :
Work sc 12 in BLO. (12 sts)
Round 16-19 :
sc 12. (12 sts)
Round 20 :
sc 12. (12 sts) Note: To add a knee detail, work 3 cl (each made of 2 dc) in the front area of this round.
Round 21-29 :
sc 12. (12 sts)
Info :
Fasten off and cut the yarn. This completes the right leg.
— 4. Left Foot & Leg :
Info :
Repeat the finger setup and joining rounds from Section 2 to create the left foot base.
Round 9 :
Connect the thumb: work sc 7, then work sc 3 through both the thumb and the main foot piece to connect them, then sc 8. (18 sts)
Round 10 :
Work sc 7, then work sc 3 directly over the unworked stitches of the thumb, then sc 8. (18 sts)
Row 11 :
sc 1, ch 1, turn. (1 st)
Row 12 :
sc 14, ch 1, turn. (14 sts)
Row 13 :
sc 7, ch 1. Fold these rows in half with right sides facing each other and work sl st through both layers for 7 stitches. Change color to yellow yarn. (7 sts)
Round 14 :
Work 12 sc evenly around the remaining top opening of the foot. (12 sts)
Round 15 :
Work sc 12 in BLO. (12 sts)
Round 16-19 :
sc 12. (12 sts)
Round 20 :
sc 12. (12 sts) Note: To add a knee detail, work 3 cl (each made of 2 dc) in the front area of this round.
Round 21-29 :
sc 12. (12 sts)
Info :
Do not cut the yarn. Keep the loop on your hook to join the legs and begin the body.
— 5. Body :
Round 1 :
ch 3, work sc 12 around the right leg, work sc 3 over the back loops of the joining chain, work sc 12 around the left leg, work sc 3 over the front loops of the joining chain. (30 sts)
Round 2 :
*inc, sc 4* repeat 6 times. (36 sts)
Round 3-12 :
sc 36. (36 sts)
Round 13 :
*dec, sc 4* repeat 6 times. (30 sts)
Round 14-15 :
sc 30. (30 sts)
Round 16 :
*dec, sc 3* repeat 6 times. (24 sts)
Round 17-21 :
sc 24. (24 sts)
Round 22 :
*dec, sc 2* repeat 6 times. (18 sts)
Round 23 :
sc 18. (18 sts)
Info :
Stuff the body firmly with fiberfill.
Round 24 :
*dec, sc 1* repeat 6 times. (12 sts)
Round 25 :
sc 12 in BLO. (12 sts)
Round 26 :
sc 12. (12 sts)
Info :
Fasten off, leaving a long yarn tail for sewing the body to the head. Finish stuffing the neck area firmly.
— 6. Arms (Make 2) :
Info :
Start with peach or beige yarn.
Finger 1 & 2 (Make 2) :
Work 4 sc in mr. (4 sts)
Round 2 :
*inc, sc 1* repeat 2 times. (6 sts)
Info :
Fasten off and weave in ends.
Middle Finger (Make 1) :
Work 4 sc in mr. (4 sts)
Round 2 :
*inc, sc 1* repeat 2 times. (6 sts)
Info :
Fasten off and weave in ends.
Starting Finger (Do not tie off) :
Work 4 sc in mr. (4 sts)
Round 2 :
*inc, sc 1* repeat 2 times. (6 sts)
Round 6 :
Connect the fingers: work 3 sc over the middle finger, then bring the next normal finger and work 6 sc around it. Continue by working 3 sc back across the middle finger, and finish with 6 sc around the starting finger. (18 sts)
Round 7-8 :
sc 18. (18 sts)
Info :
Stuff the fingers lightly.
Round 9 :
Connect the thumb: sc 5, work sc 3 through both the thumb and the main hand piece, then sc 10. (18 sts)
Round 10 :
sc 5, work sc 3 directly over the unworked stitches of the thumb, then sc 10. (18 sts) Change color to yellow yarn.
Round 11 :
*dec, sc 1* repeat 6 times. (12 sts)
Round 12 :
Work *dec, sc 4* repeat 2 times in BLO. (10 sts)
Round 13-32 :
sc 10. (10 sts)
Info :
Note: To add elbow details, work 3 cl (each made of 2 dc) around Rounds 17-18. Stuff the arm as you go. Fasten off, leaving a long tail for sewing.
— 7. Eyes (Make 2) :
Round 1 :
Work 5 sc in mr. (5 sts)
Round 2 :
Work inc in each stitch around. (10 sts)
Round 3 :
*inc, sc 1* repeat 5 times. (15 sts)
Round 4 :
*inc, sc 2* repeat 5 times. (20 sts)
Info :
Fasten off, leaving a long tail for sewing.
— 8. Nose :
Round 1 :
ch 8. Starting in second chain from hook, sc 6, work 3 sc in the last chain. Turning to work along the opposite side of the chain, sc 5, work 2 sc in the final stitch. (16 sts)
Round 2 :
*inc, sc 1* repeat 8 times. (24 sts)
Round 4 :
*dec, sc 1* repeat 8 times. (16 sts)
Info :
Fasten off, leaving a long tail for sewing. Stuff the nose firmly before attaching.
— 9. Mouth Facial Piece :
Info :
Use peach or beige yarn.
Round 1 :
ch 6. Starting in second chain from hook, sc 4, work 3 sc in the last chain. Turning to work along the opposite side of the chain, sc 3, work 2 sc in the final stitch. (12 sts)
Round 2 :
*inc, sc 1* repeat 6 times. (18 sts)
Round 3 :
*inc, sc 2* repeat 6 times. (24 sts)
Round 4 :
*inc, sc 3* repeat 6 times. (30 sts)
Round 5 :
*inc, sc 4* repeat 6 times. (36 sts)
Round 6 :
*inc, sc 5* repeat 6 times. (42 sts)
Info :
Fasten off, leaving a long tail for sewing.
— 10. Ears (Make 2) :
Round 1 :
Work 6 sc in mr. (6 sts)
Round 2 :
Work inc in each stitch around. (12 sts)
Round 3 :
*inc, sc 1* repeat 6 times. (18 sts)
Round 4 :
*inc, sc 2* repeat 6 times. (24 sts)
Round 5-9 :
sc 24. (24 sts)
Round 10 :
*dec, sc 10* repeat 2 times. (22 sts)
Round 11 :
sc 22. (22 sts)
Round 12 :
*dec, sc 9* repeat 2 times. (20 sts)
Round 13 :
sc 20. (20 sts)
Round 14 :
*dec, sc 8* repeat 2 times. (18 sts)
Round 15 :
sc 18. (18 sts)
Round 16 :
*dec, sc 7* repeat 2 times. (16 sts)
Round 17 :
sc 16. (16 sts)
Round 18 :
*dec, sc 6* repeat 2 times. (14 sts)
Round 19 :
sc 14. (14 sts)
Round 20 :
*dec, sc 5* repeat 2 times. (12 sts)
Round 21-28 :
sc 12. (12 sts)
Info :
Note: The original pattern rounds for the ears contain some overlapping numbering. We have cleaned this up into sequential rounds. Flatten the ears when finished and do not stuff. Fasten off, leaving a long tail.
— 11. Belly Patch :
Info :
Use peach or beige yarn.
Round 1 :
Work 6 sc in mr. (6 sts)
Round 2 :
Work inc in each stitch around. (12 sts)
Round 3 :
*inc, sc 1* repeat 6 times. (18 sts)
Info :
Fasten off, leaving a long tail for sewing.
— 12. Tail :
Round 1 :
Work 6 sc in mr. (6 sts)
Round 2-100 :
sc 6. (6 sts)
Info :
Note: Continue working in spirals of 6 sc until the tail reaches your desired length. The designer recommends about 26 cm (12 inches).
Round 101-105 :
*inc, sc 2* repeat 2 times. (8 sts)
Round 106-109 :
sc 8. (8 sts)
Info :
Fasten off, leaving a long tail for sewing. This wider end will help create a firmer connection to the body.
— 13. Companion Fish (Optional Accessory) :
Info :
Use yarn in your choice of color (e.g., light blue).
Tail Fins (Make 2) :
Work 4 sc in mr. (4 sts)
Round 2 :
*inc, sc 1* repeat 2 times. (6 sts)
Round 3 :
*inc, sc 2* repeat 2 times. (8 sts)
Round 4 :
Work dec 4 times. (4 sts)
Info :
Fasten off the first fin. Do not fasten off the second fin.
Round 5 :
Connect both fin pieces together by working 8 sc around. (8 sts)
Round 6 :
*inc, sc 3* repeat 2 times. (10 sts)
Round 7 :
*inc, sc 4* repeat 2 times. (12 sts)
Round 8 :
*inc, sc 5* repeat 2 times. (14 sts)
Round 9 :
*inc, sc 6* repeat 2 times. (16 sts)
Round 10 :
*inc, sc 3* repeat 4 times. (20 sts)
Round 11-13 :
sc 20. (20 sts)
Info :
Begin stuffing the fish body with fiberfill as you progress through the next decrease rounds.
Round 14 :
*dec, sc 3* repeat 4 times. (16 sts)
Round 15 :
*dec, sc 2* repeat 4 times. (12 sts)
Round 16 :
*dec, sc 1* repeat 4 times. (8 sts)
Round 17 :
Work dec 4 times. (4 sts)
Info :
Fasten off, leaving a tail. Use a tapestry needle to weave through the final stitches and pull tight to close.
Round 18 :
Join yarn with a sl st to the top of the body at the 8th round (working through the upper stitches of Rounds 5 to 8). ch 1, work hdc in the same stitch, 2 dc in each of the next two stitches, hdc in the fourth stitch, and sc in the same stitch. Fasten off and weave in ends.
I can't wait to see your finished jungle buddy! Watching all these separate pieces—the tiny fingers, those expressive ears, and that wonderfully long tail—come together into a living character is pure magic. Take your time with the assembly, enjoy the process of embroidering those playful spots, and most importantly, have fun bringing him to life. Don't forget to share your photos with our crafting community; seeing your unique creations always makes my day! Happy crocheting, my friends! 🧶✨💛