🧶 Beautiful ✨ Detailed 💝 Adorable

Mini Mike Wazowski Amigurumi Pattern

Mini Mike Wazowski Amigurumi Pattern
4.4★Rating
3-5 HoursTime Needed
3.6KMade This
✂️

Intermediate Level

Ideal for those with basic crocheting experience, featuring slightly more advanced stitches and techniques to expand your skills.

⏱️

Quick Craft

Fits nicely into a free afternoon — 2 to 5 hours of focused, enjoyable crocheting.

🐰

Whimsical Buddy

Playful characters full of personality, designed to spark imagination and become cherished playtime favorites.

About This Mini Mike Wazowski Amigurumi Pattern

Mini Mike Wazowski Amigurumi Pattern crochet pattern - detailed view

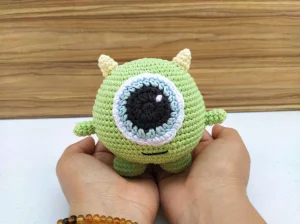
This monster is the perfect afternoon project for anyone who loves quick, character-driven makes. He looks amazing on a bookshelf or as a desk buddy to keep you company while you work.

Why You'll Love This Mini Mike Wazowski Amigurumi Pattern

I love how this project uses embroidery for the final touches. There's something so satisfying about seeing Mike's little smirk come to life with just a few stitches of black yarn. Plus, the construction of the eye is really clever—it's much more vibrant than just using a plastic eye and feels more authentic to the original animation.

Mini Mike Wazowski Amigurumi Pattern step 1 Mini Mike Wazowski Amigurumi Pattern step 2 Mini Mike Wazowski Amigurumi Pattern step 3 Mini Mike Wazowski Amigurumi Pattern step 4

Switch Things Up

I've always had a soft spot for Mike Wazowski. There’s just something about his all-eye design that makes him such a fun subject for amigurumi. When I was working through this version, I realized that the key to getting him just right isn't just about the stitches, but the tension. Since we're using a 2.0mm hook with 2mm yarn, the fabric is nice and tight, which is exactly what you want so that the stuffing doesn't peek through.

One thing I love to do is experiment with the eye colors. While the classic blue is iconic, I’ve seen some makers try a seafoam green or even a purple iris, and it looks fantastic. If you find the eye piece curling a bit as you crochet it, don't worry—once you pin it flat against the rounded body and sew it down, it will smooth out perfectly.

I also recommend leaving a fairly long tail when you finish the horns and hands. It makes the assembly so much easier when you have plenty of yarn to work with. If you're feeling adventurous, you could even add a little wire inside the arms to make him poseable, though he's just as cute without it. I can't wait to see your finished monsters!

Common Mistakes & How to Fix Them

✗ When you get to the eye color changes, make sure you're pulling the new color through on the last loop of the previous stitch to keep the transition clean.✗ The body has a lot of rounds with the same stitch count; it's easy to lose track, so definitely use a marker to avoid ending up with a lopsided monster.✗ If you stuff the feet too firmly, they might make him tip over—try to keep the stuffing a bit lighter at the top where they join the body.✗ Positioning the eye is everything! If you place it even one round too high or low, his whole expression changes, so pin it in place and check it from a distance before sewing.

Mini Mike Wazowski Amigurumi Pattern

If you're a fan of those lovable monsters from the big screen, you're going to have a blast with this one. Mike is such a classic character, and this little guy is the perfect size to sit on your desk or join a collection. He's mostly one big round shape, which makes the base work feel like it's flying by. I really enjoyed how the layered eye gives him so much personality without needing plastic safety eyes.

Intermediate 3-5 Hours

Materials Needed for Mini Mike Wazowski Amigurumi Pattern

— Main Fabric

  • 01
    About 50g of 2mm mercerized cotton yarn in a bright lime green
  • 02
    Small amounts of 2mm cotton yarn in pale yellow for the horns
  • 03
    Scraps of black, light blue, and white 2mm cotton yarn for the layered eye and facial details

— Tools Required

  • 01
    2.0 mm crochet hook
  • 02
    Stitch markers for tracking rounds
  • 03
    Straight pins for positioning pieces
  • 04
    Wool needle for assembly and embroidery
  • 05
    Polyester fiberfill stuffing
  • 06
    Sharp scissors

Progress Tracker

0% Complete

— 1. Body :

Round 1 :

Start by placing 8 sc into a magic ring (8)

Round 2 :

Work 2 sc into every st around (16)

Round 3 :

Repeat (1 sc, 1 inc) a total of 8 times (24)

Round 4 :

Repeat (2 sc, 1 inc) a total of 8 times (32)

Round 5 :

Repeat (3 sc, 1 inc) a total of 8 times (40)

Round 6 :

Work 1 sc in each st around (40)

Round 7 :

Repeat (4 sc, 1 inc) a total of 8 times (48)

Round 8 :

Repeat (5 sc, 1 inc) a total of 8 times (56)

Round 9 :

Repeat (6 sc, 1 inc) a total of 8 times (64)

Round 10-13 :

Work 1 sc in each st around for these four rounds (64)

Round 14 :

Repeat (15 sc, 1 inc) a total of 4 times (68)

Round 15-16 :

Work 1 sc in each st around for these two rounds (68)

Round 17 :

Repeat (16 sc, 1 inc) a total of 4 times (72)

Round 18-19 :

Work 1 sc in each st around for these two rounds (72)

Round 20 :

Repeat (17 sc, 1 inc) a total of 4 times (76)

Round 21-24 :

Work 1 sc in each st around for these four rounds (76)

Round 25 :

Repeat (2 sc, 1 dec) a total of 19 times (57)

Round 26 :

Repeat (1 sc, 1 dec) a total of 19 times (38)

Round 27 :

Repeat (2 sc, 1 dec) 9 times, then finish with 1 dec (28)

Round 28 :

Repeat (2 sc, 1 dec) a total of 7 times (21)

Info :

Pause here to firmly stuff the body with fiberfill.

Round 29 :

Repeat (1 sc, 1 dec) a total of 7 times (14)

Round 30 :

Work 7 dec around (7)

Info :

Fasten off and use your wool needle to weave through the remaining stitches to close the hole.

— 2. Feet :

Info :

Make two of these using the green yarn.

Round 1 :

Start with 8 sc in a magic ring (8)

Round 2 :

Work 2 sc into every st around (16)

Round 3 :

Repeat (1 sc, 1 inc) a total of 8 times (24)

Round 4-5 :

Work 1 sc in each st around (24)

Round 6 :

Work 12 dec around (12)

Info :

Fasten off leaving a tail for sewing and stuff the foot.

— 3. Hands :

Info :

Make two of these using the green yarn.

Round 1 :

Start with 6 sc in a magic ring (6)

Round 2-4 :

Work 1 sc in each st around (6)

Info :

Fasten off leaving a sewing tail. Do not stuff these pieces.

— 4. Horns :

Info :

Make two of these using the yellow yarn.

Round 1 :

Start with 6 sc in a magic ring (6)

Round 2 :

Work 1 sc in each st around (6)

Round 3 :

Repeat (1 sc, 1 inc) a total of 3 times (9)

Round 4 :

Work 1 sc in each st around (9)

Info :

Fasten off leaving a sewing tail and stuff lightly.

— 5. Eye :

Round 1 :

Using black yarn, place 8 sc into a magic ring (8)

Round 2 :

Work 2 hdc into every st around (16)

Round 3 :

Repeat (3 sc, 1 inc) a total of 4 times (20)

Colour Change :

Switch your yarn to the blue color.

Round 4 :

Repeat (1 hdc, 1 inc) a total of 10 times (30)

Colour Change :

Switch your yarn to the white color.

Round 5 :

Repeat (2 sc, 1 inc) a total of 10 times (40)

Info :

Fasten off and leave a long tail for attaching to the body.

Assembly Instructions

  • Center the large eye on the front of the body, beginning the placement around Round 8 and sewing it securely.
  • Attach the two feet to the bottom of the body, ensuring they are spaced evenly so he can stand upright.
  • Sew the small hands to the sides of the body, roughly level with the middle of the eye.
  • Place the yellow horns on top of the head, slightly angled outward for a characteristic look.
  • Using a needle and white yarn, add a tiny glint stitch to the black pupil area to give him a lively gaze.
  • Embroider a simple straight line or slight curve in black yarn below the eye to create his mouth.

Important Notes

  • 💡Use a stitch marker at the beginning of every round to keep your place in the continuous spirals.
  • 💡When stuffing the body, focus on getting a smooth, rounded shape without overstretching the stitches.
  • 💡 Mercerized cotton is recommended for this project as it gives Mike a nice sheen and great stitch definition.
  • 💡Keep your embroidery stitches for the mouth relatively loose so they don't pull into the stuffing and disappear.
  • 💡If you find your eye piece is rippling, try using a slightly smaller hook or adjusting your tension.

I really hope you enjoy making your own little Mike! He’s such a cheerful character to have around, and seeing that big eye come together is always a highlight of the process. Whether he’s destined for a shelf, a backpack, or a gift box, he’s sure to bring a smile to anyone who sees him. Don't forget to take a photo of your finished monster—I’d love to see how he turned out! Happy crocheting, and may your stitches always be even and your yarn never tangle. 🧶 ✨
You ask,

we answer.

FAQs

Can I use safety eyes instead of crocheting the eye?

You definitely could, but since Mike's eye is his most prominent feature, the crocheted version captures his look much better. If you go the safety eye route, you'd need a very large one to keep the proportions right!

What if I don't have 2mm yarn?

No problem at all! You can use standard DK or worsted weight yarn, just remember to up your hook size accordingly (like a 3.0mm or 3.5mm). Your Mike will just turn out a bit bigger than the 11cm version.

Is the body worked in a spiral or joined rounds?

This pattern is designed to be worked in a continuous spiral. This avoids a visible seam running down Mike's back, which keeps him looking smooth and professional.

My horns look a bit floppy, how can I fix that?

The horns are small, so stuffing them can be tricky. Use the back of your crochet hook to push a tiny bit of fiberfill inside, and make sure your stitches are tight to give them natural structure.