About This Mini Realistic Bumblebee Amigurumi Pattern
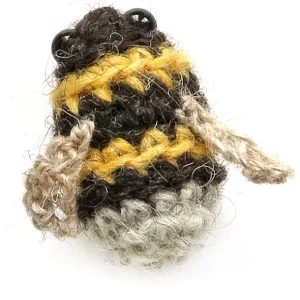
This set is a wonderful choice for anyone looking to practice clean color changes while creating a charming gift for a gardener or nature enthusiast.
Ideal for those with basic crocheting experience, featuring slightly more advanced stitches and techniques to expand your skills.
Fits nicely into a free afternoon — 2 to 5 hours of focused, enjoyable crocheting.
Delightful animal designs with sweet details that capture the essence of your favorite woodland and farmyard friends.
This set is a wonderful choice for anyone looking to practice clean color changes while creating a charming gift for a gardener or nature enthusiast.
I absolutely adore how much personality you can pack into such a small project! Using a slightly fuzzy wool yarn makes these bees feel so much more authentic than standard cotton. I also love that this pattern is a fantastic way to use up those tiny scraps of yellow, orange, and grey yarn that we all have hiding in our stash. It is genuinely satisfying to see a handful of yarn bits turn into a realistic little creature in just an hour or two.
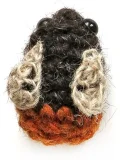
I’ve always felt that the best crochet projects are the ones that make you stop and appreciate the tiny wonders of the world. These little bumblebees are exactly that for me. When I first sat down to design a bee, I didn’t want just a yellow and black cartoon; I wanted something that felt like it belonged in a wildflower meadow. That’s why I’m such a huge advocate for using a slightly fuzzy, 100% wool yarn for this pattern. It mimics that soft, velvety look of a real bumblebee’s body in a way that smooth cotton just can’t touch.
One thing I discovered while making my own swarm is that the eye placement is everything. Just a millimeter difference can change the entire expression of your bee! I like to spend a few extra minutes pinning the eyes and checking them from every angle before I snap those washers into place. It’s also a fantastic way to use up those tiny scraps of yarn we all have tucked away in our stash. You only need a few yards of each color, making these the ultimate stash-busters. I hope you find as much peace in stitching these little guys as I do.
There is something so incredibly peaceful about watching bees drift from flower to flower in a summer garden. I wanted to capture that tiny bit of magic in a project you can hold in your hand. These little bumblebees are designed with a touch of realism, featuring the distinct stripe patterns of four different species. Whether you are making a whole swarm for a nature display or just one as a lucky charm, you will love how quickly these fuzzy friends come together.
Start with Black yarn. For this bee, close each round with a sl st to the first sc. Then ch 1 and sc into that same st to begin the next round. Do not cut yarn between colors; carry it along the inside.
MR, 4 sc (4)
(1 sc, 1 inc) x 2 (6)
(2 sc, 1 inc) x 2 (8). Mark the 2nd & 6th st for eye placement. Change to Yellow in the final st. sl st to 1st st.
ch 1, 1 sc in same st, BLO [2 sc, (1 sc, 1 inc) x 3] (12). Change to Black in final st. sl st to 1st st.
ch 1, 1 sc in same st, BLO 11 sc (12). sl st to 1st st.
Attach the safety eyes in the marked spots now. It is easier if you turn the piece inside out to secure the backings, then flip it back. Add a tiny bit of stuffing between the eyes.
ch 1, 1 sc in same st, 11 sc (12). Change to Yellow in final st. sl st to 1st st.
ch 1, 1 sc in same st, BLO 11 sc (12). Change to Black in final st and cut the Yellow yarn. sl st to 1st st.
ch 1, 1 sc in same st, BLO 11 sc (12). Change to Light Grey in final st and cut the Black yarn. sl st to 1st st.
ch 1, 1 sc in same st, BLO 11 sc (12). sl st to 1st st.
ch 1, 1 sc in same st, s2tog, (1 sc, s2tog) x 3 (8). sl st to 1st st.
Stuff the body firmly before the final round.
ch 1, 1 sc in same st, 1 sc, s2tog, 2 sc, s2tog (6). sl st to 1st st.
This bee is worked in a continuous spiral for the first three rounds. Use Black yarn.
Follow the White-tailed instructions but do not use sl st or ch 1.
Follow the White-tailed instructions but do not change color to yellow; stay in Black.
BLO (1 sc, 1 inc) x 4 (12)
12 sc in each round (12)
12 sc (12). Change to Orange in the final loop. Cut the Black yarn. sl st to 1st st.
ch 1, 1 sc in same st, 11 sc (12). sl st to 1st st.
Follow the White-tailed instructions for the final shaping and closing.
Follow the White-tailed instructions but use Orange yarn instead of Yellow for the color change in Round 3.
ch 1, 1 sc in same st, BLO [2 sc, (1 sc, 1 inc) x 3] (12). sl st to 1st st.
ch 1, 1 sc in same st, 11 sc (12). Change to Black in final st and cut the Orange yarn. sl st to 1st st.
ch 1, 1 sc in same st, BLO 11 sc (12). sl st to 1st st.
ch 1, 1 sc in same st, 11 sc (12). sl st to 1st st.
ch 1, 1 sc in same st, 11 sc (12). Change to Light Grey in final st and cut the Black yarn. sl st to 1st st.
ch 1, 1 sc in same st, BLO 11 sc (12). sl st to 1st st.
Follow the White-tailed instructions for the final shaping and closing.
To create this variety, follow the White-tailed Bumblebee pattern exactly, but substitute Orange yarn for the Light Grey yarn at the bottom.
Make two wings for each bee using lace weight yarn and the same 3.5 mm hook. If you only have worsted wool, you can split the strand in half.
ch 6. In the 3rd ch from hook work 2 dc. In the next ch work 1 hdc. In the next ch work 1 sc. In the final ch work 1 sl st. Fasten off, leaving a long tail.
I really hope you enjoy bringing these little fuzzy friends to life! There is something so satisfying about seeing a whole collection of different bee species sitting together on a shelf or tucked into a potted plant. Don’t be afraid to play around with different shades of yellow and orange to make your colony unique. Once you get the hang of the stripe pattern, they work up so quickly you will have a whole swarm before you know it. Happy crocheting, and may your yarn always be tangle-free! 🧶✨
You certainly can, but the bees will have a much smoother, less 'realistic' look. Wool yarn like Lopi provides that signature fuzzy bumblebee texture that makes them look lifelike.
Joined rounds are used for the White-tailed and Tree bees to keep the color stripes perfectly horizontal. The Red-tailed bee uses a spiral at the start for a slightly different head shape.
No problem! You can take a strand of your worsted weight yarn and carefully untwist/split it to get a thinner thread, or use a strand of embroidery floss in a similar color.
When closing Round 11, avoid pulling the yarn tail too aggressively. A gentle tug is all you need to close the hole while keeping the bottom of the bee rounded and oval.
