About This Modern Baby Sneaker Crochet Pattern
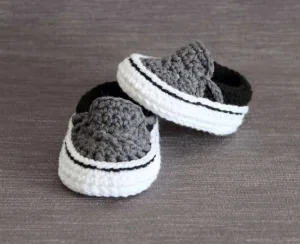
These stylish little sneakers are the perfect way to use up your scrap yarn while creating a high-end looking gift that parents will actually want to keep as a keepsake forever.
Ideal for those with basic crocheting experience, featuring slightly more advanced stitches and techniques to expand your skills.
Fits nicely into a free afternoon — 2 to 5 hours of focused, enjoyable crocheting.
Everyday comfort with practical charm, designed for both functionality and style through changing seasons.
These stylish little sneakers are the perfect way to use up your scrap yarn while creating a high-end looking gift that parents will actually want to keep as a keepsake forever.
I honestly adore this pattern because it moves away from the typical 'frilly' baby bootie and gives you something modern and cool. The way the accent row defines the sole is so satisfying to stitch, and seeing the little flap come together makes the whole project feel like a tiny work of art.
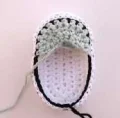
I still remember the first time I tried making baby shoes; I was so intimidated by the tiny scale! But honestly, these modern sneakers are such a breath of fresh air compared to traditional booties. There’s something so satisfying about seeing that little 'Vans' inspired silhouette come to life right in your hands.
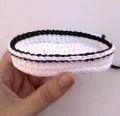
One thing I really love about this specific design is the double-layered sole. Not only does it make the shoes much more durable for those little kickers, but it also gives them a really polished, professional look that you don't always get with single-layer crochet soles. When you're working on the accent color row, take your time. It’s the secret sauce that makes these look like real sneakers.
If you're feeling adventurous, try experimenting with the colors! I once made a pair in a bright mustard yellow with black accents, and they were the hit of the baby shower. Just remember to keep your tension consistent, especially when joining the two sole pieces together. If you find the slip stitching a bit fiddly, using a slightly pointier hook can really help you get through both layers easily. I can't wait to see the color combos you come up with!
Get ready to whip up the cutest little kicks you've ever seen! These modern sneakers are the perfect way to keep tiny toes stylish and cozy. I've designed this pattern to give you that classic skater-shoe look with a sturdy construction that actually stays on. Whether you're making a thoughtful gift for a baby shower or just want to practice some fun layered techniques, you'll love how these professional-looking booties come together in your hands.
Make two soles for each shoe. For the first sole of each pair, fasten off normally. For the second sole, leave a 60-inch tail for joining.
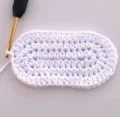
ch 10. Place 2 hdc in the 2nd ch from hook. hdc in each of the next 7 ch. Work 6 hdc into the final ch. Rotate to work along the bottom of the chain: hdc in next 7 ch, 2 hdc in the last ch. Do not join. (24)
2 hdc in each of the next 2 sts. hdc in next 7 sts. 2 hdc in each of the next 6 sts. hdc in next 7 sts. 2 hdc in each of the last 2 sts. Do not join. (34)
hdc in next 2 sts. 2 hdc in each of the next 3 sts. hdc in next 7 sts. (2 hdc in next st, hdc in next st) 6 times. hdc in next 7 sts. 2 hdc in each of the next 3 sts. Do not join. (46)
dc in the next st, then slst in the following st to reach the center back of the heel.
Make two soles for each shoe. For the first sole of each pair, fasten off normally. For the second sole, leave a 60-inch tail for joining.
ch 11. Place 2 hdc in the 2nd ch from hook. hdc in each of the next 8 ch. Work 6 hdc into the final ch. Rotate to work along the bottom of the chain: hdc in next 8 ch, 2 hdc in the last ch. Do not join. (26)
2 hdc in each of the next 2 sts. hdc in next 8 sts. 2 hdc in each of the next 6 sts. hdc in next 8 sts. 2 hdc in each of the last 2 sts. Do not join. (36)
hdc in next 2 sts. 2 hdc in each of the next 3 sts. hdc in next 8 sts. (2 hdc in next st, hdc in next st) 6 times. hdc in next 8 sts. 2 hdc in each of the next 3 sts. Do not join. (48)
dc in the next st, then slst in the following st to reach the center back of the heel.
Make two soles for each shoe. For the first sole of each pair, fasten off normally. For the second sole, leave a 60-inch tail for joining.
ch 13. Place 2 hdc in the 2nd ch from hook. hdc in each of the next 10 ch. Work 6 hdc into the final ch. Rotate to work along the bottom of the chain: hdc in next 10 ch, 2 hdc in the last ch. Do not join. (30)
2 hdc in each of the next 2 sts. hdc in next 10 sts. 2 hdc in each of the next 6 sts. hdc in next 10 sts. 2 hdc in each of the last 2 sts. Do not join. (40)
hdc in next 2 sts. 2 hdc in each of the next 3 sts. hdc in next 10 sts. (2 hdc in next st, hdc in next st) 6 times. hdc in next 10 sts. 2 hdc in each of the next 3 sts. Do not join. (52)
dc in the next st, then slst in the following st to reach the center back of the heel.
Place sole #1 (right side up) on top of sole #2 (wrong side up). Use the long tail from sole #2 to slst through both layers all the way around. (46-48-52)
Ensure you start at the center back of the heel to keep the shape aligned.
The sc2tog at the start of a row is worked as: ch 1, insert hook into the same stitch, yarn over and pull up a loop, insert hook into the next stitch, yarn over and pull up a loop, yarn over and pull through all loops.
Join white yarn at the center heel with a standing sc. sc in each of the next 45-47-51 sts. slst to the first sc to join. (46-48-52)
ch 1, sc2tog, sc in each of the next 42-44-48 sts, sc2tog. slst to the first st to join. Fasten off and weave in ends. (44-46-50)
From the inside of the shoe, join black yarn at the center heel. Work a row of surface slst over the previous white row. Work 45-47-51 slst total. Keep these loose to avoid shrinking the shoe.
Locate the center heel stitch and count 12 stitches forward along the side. Start here with your chosen upper color.
Work in FLO of the black slip stitches. Join yarn with a standing sc in the 12th stitch. (sc2tog) 10-11-13 times. sc in the last stitch. Turn. (12-13-15)
ch 1, sc in the same st, sc in each of the next 11-12-14 sts. Turn. (12-13-15)
ch 1, (sc2tog) 6 times across. Turn. (6)
ch 1, (sc2tog) 3 times across. Fasten off. (3)
ch 1, (sc2tog) 3 times, sc in next st, (sc2tog) 3 times. Turn. (7)
ch 1, sc2tog, sc in next 3 sts, sc2tog. Turn. (5)
ch 1, sc2tog, sc in next st, sc2tog. Fasten off. (3)
ch 1, sc in same st, sc in next 2 sts, (sc2tog) 2 times, sc in next st, (sc2tog) 2 times, sc in last 3 sts. Turn. (11)
ch 1, sc in same st, (sc2tog) 2 times, sc in next st, (sc2tog) 2 times, sc in last st. Turn. (7)
ch 1, (sc2tog) 3 times, sc in last st. Fasten off. (4)
Rejoin yarn with a standing sc in the center of the toe. Work 4-4-5 sc across. Turn. (5-5-6)
ch 1, sc in same st, sc in each of the next 4-4-5 sts. Turn. (5-5-6)
For sizes 0-3 and 3-6 only: ch 1, sc in same st, sc in each of the next 4 sts. Fasten off. (5)
Work in FLO of the black slst. Rejoin black yarn with a standing sc in the first side stitch. sc in each of the next 22 sts. Turn. (23)
ch 1, sc in same st, sc in next 7 sts, hdc in next 2 sts, dc in next 3 sts, hdc in next 2 sts, sc in next 8 sts. Turn. (23)
ch 1, slst in each of the next 23 sts. Fasten off and weave in ends.
Rejoin yarn with a standing sc at the front part. (sc2tog) twice along the side, 2 sc in the first flap st, sc in next 3-3-4 sts, 2 sc in last flap st, (sc2tog) twice along the other side, sc in final st. Fasten off.
Seeing these tiny sneakers finished is honestly the best feeling. They look so professional once you add that little side stripe and the accent row! I hope you enjoyed making these as much as I did. They make such a special keepsake or a standout gift for new parents. Don't forget to play around with different colors—a classic red or a bright blue would look just as amazing as the grey. Happy stitching, and I can't wait to see your finished shoes! 🧶 ✨
Yes, cotton is a fantastic choice for summer shoes! Just make sure it's a soft 8-ply (DK weight) so the shoes remain comfortable for the baby while still holding that structured sneaker shape.
The double-layer construction adds some bulk, which is normal. Double-check your gauge (18 sc = 10cm); if your stitches are too loose, the shoe will come out larger than intended.
This means you should hold the shoe so the inside is facing you. Insert your hook from the wrong side through to the right side to pull the yarn through, creating a clean surface slip stitch on the exterior.
When sewing down the ch-5 piece, use small, hidden stitches with a yarn needle. Keep the chain parallel to the sole line and ensure it's not pulled too tight, or it will pucker the fabric.
