About This Pink Squid Amigurumi Pattern

This makes such a thoughtful handmade gift — surprising enough to get a genuine reaction, personal enough to feel special. It's the kind of thing that lives on someone's desk for years.
Ideal for those with basic crocheting experience, featuring slightly more advanced stitches and techniques to expand your skills.
Fits nicely into a free afternoon — 2 to 5 hours of focused, enjoyable crocheting.
Playful characters full of personality, designed to spark imagination and become cherished playtime favorites.
This makes such a thoughtful handmade gift — surprising enough to get a genuine reaction, personal enough to feel special. It's the kind of thing that lives on someone's desk for years.
I'll be honest — I didn't expect to fall this hard for a squid. But something about working up those tentacles one by one, watching the whole creature come to life from a single magic ring, just got me. The moment I attached the eyes and embroidered that little smile, I was completely done for. I've made a few of these now and every single one gets the same reaction: people pick it up, squeeze it, and immediately ask if they can have it. The plush yarn is so satisfying to work with — it hides minor tension inconsistencies beautifully, which takes the pressure off. I genuinely look forward to the tentacle rounds every time.

I picked up this pattern on a whim during a week when I genuinely needed something fun to crochet — not complicated, not a commitment, just something that would make me happy to look at when it was done. A squid. Pink. With curly little tentacles. I was sold immediately.
What I didn't expect was how clever the construction is. The whole thing is essentially one continuous piece — head, body, and tentacles all flow from the same magic ring. That Round 11 where you skip stitches to create the fins? First time through, I stopped and stared at the instructions for a solid minute. Once I realized the skipped sections literally become the ear-like fins, I actually laughed out loud. Such a smart little trick built into what looks like a simple pattern.
The plush yarn is genuinely a joy to work with on this one. It's so forgiving — tension inconsistencies basically disappear into the fluffiness. If you've been nervous about amigurumi because you're worried about visible imperfections, this is a great project to start with. The fabric hides a lot and the chunkiness means you move through rounds quickly.
My biggest tip: before you start the tentacle section, physically count out and mark your 20 remaining front loops with little scraps of contrasting yarn. You have 10 tentacles to distribute across 20 stitches — one anchor stitch per tentacle, one stitch between each. Mapping it out first means you can just crochet without stopping to count every few minutes.
I made mine in the original pink but I've been thinking about a deep teal version, or even a gradient where the tentacles shift from coral to cream. The construction is simple enough that color play would be really rewarding here.
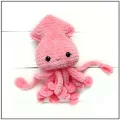
This little squid is going to steal your heart — and honestly, your shelf space too. Crocheted in one continuous piece with tentacles that curl and dangle in the most satisfying way, it comes together faster than you'd expect and looks incredible when it's done. The super bulky plush yarn gives it that irresistibly squishy texture you just want to squeeze. If you've been looking for a quick crochet project that actually has personality, this is it — something a little unexpected, a little quirky, and completely charming.
Start with a MR and work 4 Sc into it. (4)
(Sc 1, Inc) x 2. (6)
Inc in each of the 6 sts. (12)
(Sc 1, Inc) x 6. (18)
(Sc 2, Inc) x 6. (24)
(Sc 7, Inc) x 3. (27)
(Sc 8, Inc) x 3. (30)
(Sc 4, Inc) x 6. (36)
(Sc 11, Inc) x 3. (39)
(Sc 12, Inc) x 3. (42)
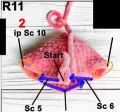
Sc 5, skip the next 10 sts, Sc 11, skip the next 10 sts, Sc 6. (22) — This round shapes the fins by skipping over sections of the previous round. See the diagram in the pattern for a visual guide to this step.
Sc 5, Inc 1, Sc 10, Inc 1, Sc 5. (24)
(Sc 3, Inc) x 6. (30)
(Sc 4, Inc) x 6. (36)
(Sc 5, Inc) x 6. (42)
Sc around. (42)
Sc around. (42)
Sc around. (42)
Sc around. (42)
Sc around. (42)
Sc around. (42)
(Sc 5, Dec) x 6. (36)
(Sc 2, Dec 8) x 2. (20) — After completing this round, flatten the body and locate the center. Position the two safety eyes between rounds 19 and 20, placing each one 3 stitches out from the center (6 stitches apart total), then press the backings firmly to secure.
Note: The tentacles are worked next using the FRONT LOOPS ONLY of Round 23. Do not fasten off. The back loops of Round 23 will be used later to close the bottom of the body.
Working into the front loops of Round 23 only, you'll crochet a total of 10 tentacles: 8 of Type A and 2 of Type B. Work them in this order: Type A x 3, Type B x 1, Type A x 4, Type B x 1, Type A x 1. Each tentacle starts with an Sc into the next front-loop stitch of the body, then chains out for the tentacle length. After finishing each tentacle, Sc into the following body stitch to anchor it before beginning the next.
Sc into the next front loop of the body, then Ch 27. Starting from the 3rd chain from the hook, work (Inc HDC, HDC 3) x 5, then HDC 4, then Sc 1. Sc into the next body stitch to anchor the tentacle end. Sc into the stitch after that, then repeat from Ch 27 for the next Type A tentacle.
Sc into the next front loop of the body, then Ch 30. Starting from the 2nd chain from the hook: Sl St 5 (1). Turn to the opposite side of the chain: Sc 1, HDC 3, Sc 1, then work (Sc 1, Ch 1, Sc 1) all into the top stitch at the tip (2). Back along the opposite side: Sc 5 (3). Sl St 24 all the way back down to the body end of the tentacle. Sc into the next body stitch to finish. Then Sc into the following stitch and continue with the next Type A tentacle.
With all tentacles complete, set the body aside temporarily and use Sc to close any openings left on the head section. Fill the head firmly with stuffing and weave all loose yarn ends inside.
Working into the BACK LOOPS ONLY of Round 23, work Dec 10 across the round. (10) — Stuff the body firmly before continuing.
Working through both loops as normal: Dec 5, then Sl St. (5)
Fasten off, then stitch the remaining hole closed. Run the yarn tail through to the inside and trim.
Cut a length of fine black cotton yarn. Tie it snugly around one of the safety eyes with a secure knot. Using the yarn needle, embroider short eyelash strokes above the eye, then thread both ends down through the body and out beneath the tentacles. Tie the ends off in a knot and tuck them inside the body.
For the second eye, repeat the same eyelash embroidery — but this time leave the thread ends longer and do not hide them yet. Use the longer thread to embroider a V-shaped smile between the two eyes. Once the smile is formed, bring the thread across to the other side, tie a firm knot, and tuck all remaining ends inside the body.
There's something about a pink squid that just makes people smile — and now you've got one of your very own to show off. 🧶 Whether it ended up on your bookshelf, in someone's hands as a gift, or propped up next to your yarn stash (we see you), this little guy deserves all the love. Those curly tentacles, that tiny embroidered smile, those beady black eyes — honestly, what's not to love? If you made it your own with a different color or added some extra personality, I'd be so happy to hear about it. You put real time and care into this, and that makes every single stitch worth it. ✨
You can, but the finished size will change noticeably. The original uses super bulky plush yarn with a 4.5 mm hook, which gives that squishy, dense texture. Dropping to worsted weight will produce a smaller, firmer squid — probably around 15–17 cm instead of 25 cm. You'd also be able to see the stitch definition more clearly, which can make Round 11 easier to follow but changes the overall look significantly.
Round 11 is where the squid's side fins are shaped. You work 5 Sc normally, then deliberately skip the next 10 stitches (those unworked stitches become the fin), work 11 Sc across the front, skip another 10 stitches (second fin), then work 6 Sc to close the round. You end up with only 22 stitches — that's correct. The skipped stitch sections form little flaps at the sides. Looking at the diagram in the pattern before attempting this round makes a huge difference.
They're worked directly onto the body — no sewing required. You crochet into the front loops of Round 23 to make each tentacle, one after another in the specified order. This is actually one of the most satisfying parts of the whole pattern because the tentacles just grow right out of the body as you go.
The pattern calls for 12 mm black safety eyes, which look proportionally right on a 25 cm finished squid. You can embroider eyes instead if the piece is for a very young child — use a few satin stitches in black yarn placed between rounds 19 and 20, spaced 6 stitches apart (3 stitches each side of center).
At the end of each Type A tentacle, the final Sc anchors it back into the body, so the tip is secured by the chain structure itself. For Type B, the slip stitches along the length lock the curled shape in place. If a tip feels loose, just pass the yarn tail back through a few stitches at the end and trim close — the plush fibers grip yarn tails really well and they won't slip out.
That depends on the license the original designer has set for their pattern. Generally speaking, many independent crochet designers do allow finished items to be sold from their patterns, but you should check the specific terms that came with your copy of this pattern. When in doubt, credit the designer.
