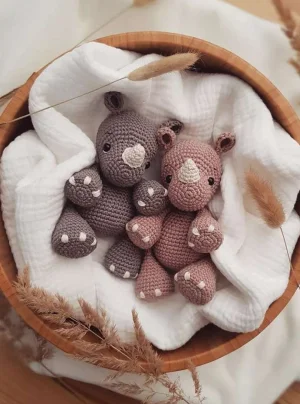
There is something so incredibly charming about a chunky amigurumi, and Pino the Rhino is the perfect example. You are going to love how his sturdy little body comes together, especially with the clever join-as-you-go limbs that save you a ton of sewing time later on. He has such a gentle, tubby personality that makes him an instant favorite for anyone who sees him. Grab your favorite earthy tones and let's get started on your new best friend!
Progress Tracker
0% Complete
— 1. Legs (Make 2) :
Round 1 :
Start with 6 sc into a MR (6)
Round 2 :
Work 1 inc in every st around (12)
Round 3 :
Repeat (1 sc, 1 inc) 6 times (18)
Round 4 :
Repeat (2 sc, 1 inc) 6 times (24)
Round 5 :
Repeat (3 sc, 1 inc) 6 times (30)
Round 6 :
Work 30 sc through the BLO only (30)
Round 7-9 :
Work 30 sc (30)
Round 10 :
Repeat (3 sc, 1 dec) 6 times (24)
Round 11 :
Work 24 sc (24)
Round 12 :
Repeat (2 sc, 1 dec) 6 times (18)
Round 13-14 :
Work 18 sc (18)
Info :
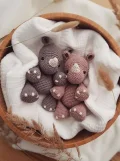
Begin stuffing the leg with fiberfill up to Round 11. Keep the stuffing light so the leg retains a good shape without being too stiff.
Round 15 :
Repeat (1 sc, 1 dec) 6 times (12)
Round 16 :
Work 12 sc (12)
Round 19 :
Work 2 sc. Note: This is a partial round used to align the piece for closing (2)
Info :
Flatten the opening so the joints from rounds 5 and 6 are parallel. Adjust the stitch count if needed. Fold the top edges together and work 2 sc through both layers to close. Fasten off and weave in the tail.
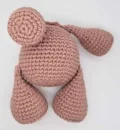
— 2. Arms (Make 2) :
Round 1 :
Start with 6 sc into a MR (6)
Round 2 :
Work 1 inc in every st around (12)
Round 3 :
Repeat (1 sc, 1 inc) 6 times (18)
Round 4 :
Repeat (2 sc, 1 inc) 6 times (24)
Round 5 :
Work 24 sc through the BLO only (24)
Round 6-9 :
Work 24 sc (24)
Round 10 :
Repeat (2 sc, 1 dec) 6 times (18)
Round 11 :
Work 18 sc (18)
Round 12 :
Repeat (1 sc, 1 dec) 6 times (12)
Round 13-14 :
Work 12 sc (12)
Info :
Fill the arm with stuffing up to Round 12. Don't overstuff the top so it can lay flat against the body.
Round 15 :
Repeat (2 sc, 1 dec) 3 times (9)
Round 16-17 :
Work 9 sc (9)
Round 18 :
Repeat (1 sc, 1 dec) 3 times (6)
Round 19 :
Work 2 sc. Note: This is a partial round to align the fold (2)
Info :
Flatten the opening, ensuring the round 5/6 joints are parallel. Fold the top and work 2 sc across both layers to seal. Fasten off and hide the yarn tail.
— 3. Body :
Round 1 :
Start with 6 sc into a MR (6)
Round 2 :
Work 1 inc in every st around (12)
Round 3 :
Repeat (1 sc, 1 inc) 6 times (18)
Round 4 :
Repeat (2 sc, 1 inc) 6 times (24)
Round 5 :
Repeat (3 sc, 1 inc) 6 times (30)
Round 6 :
Repeat (4 sc, 1 inc) 6 times (36)
Round 7 :
Repeat (5 sc, 1 inc) 6 times (42)
Round 8 :
Repeat (6 sc, 1 inc) 6 times (48)
Round 9-10 :
Work 48 sc (48)
Info :
Place a marker at the front. Ensure the legs are attached with the right side facing forward and the joints at the back.
Round 11 :
Work 13 sc, attach 1st leg with 2 sc through both body and leg, 24 sc, attach 2nd leg with 2 sc through both body and leg, 7 sc (48)
Round 12-14 :
Work 48 sc (48)
Round 15 :
Repeat (6 sc, 1 dec) 6 times (42)
Round 16-17 :
Work 42 sc (42)
Round 18 :
Repeat (5 sc, 1 dec) 6 times (36)
Round 19 :
Repeat (4 sc, 1 dec) 6 times (30)
Round 20-21 :
Work 30 sc (30)
Round 22 :
Repeat (3 sc, 1 dec) 6 times (24)
Info :
Firmly stuff the body with fiberfill now.
Round 23 :
Repeat (2 sc, 1 dec) 6 times (18)
Round 24 :
Work 7 sc, attach 1st arm with 2 sc through both body and arm, 7 sc, attach 2nd arm with 2 sc through both body and arm (18)
Round 25 :
Repeat (1 sc, 1 dec) 6 times (12)
Info :
Flatten the neck opening and work 5 sc across both sides to close it. Fasten off and weave in your tail.
— 4. Head :
Round 1 :
Start with 6 sc into a MR (6)
Round 2 :
Work 1 inc in every st around (12)
Round 3 :
Repeat (1 sc, 1 inc) 6 times (18)
Round 4 :
Repeat (2 sc, 1 inc) 6 times (24)
Round 5 :
Repeat (3 sc, 1 inc) 6 times (30)
Round 6-9 :
Work 30 sc (30)
Round 10 :
Work 4 sc, repeat (1 inc, 1 sc) 6 times, then work 14 sc (36)
Info :
You can use yarn scraps to mark the eye positions in Round 11 now.
Round 11 :
Work 5 sc, place marker, repeat (1 inc, 2 sc) 5 times, 1 inc, place marker, 15 sc (42)
Round 12 :
Work 6 sc, repeat (1 inc, 3 sc) 6 times, then work 12 sc (48)
Round 13-14 :
Work 48 sc (48)
Info :
Insert the 8mm safety eyes into the positions you marked previously.
Round 15 :
Work 48 sc (48)
Round 16 :
Work 42 sc, then attach the head to the body by working 5 sc through both the head and the closed neck of the body, then 1 sc (48)
Round 17-19 :
Work 48 sc (48)
Round 20 :
Repeat (6 sc, 1 dec) 6 times (42)
Round 21 :
Work 42 sc (42)
Round 22 :
Repeat (5 sc, 1 dec) 6 times (36)
Round 23 :
Repeat (4 sc, 1 dec) 6 times (30)
Round 24 :
Repeat (3 sc, 1 dec) 6 times (24)
Round 25 :
Repeat (2 sc, 1 dec) 6 times (18)
Info :
Stuff the head thoroughly with fiberfill.
Round 26 :
Repeat (1 sc, 1 dec) 6 times (12)
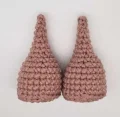
— 5. Ears (Make 2) :
Round 1 :
Start with 6 sc into a MR (6)
Round 2 :
Work 1 inc in every st around (12)
Round 3 :
Work 1 ch, 5 hdc, work 2 dc into the next st twice, then 5 hdc (14)
Info :
Finish with a sl st in the next st. Leave a long tail for sewing. Fold the ear and sew the bottom two stitches together to create the curved shape.
— 6. Horn :
Round 1 :
Start with 6 sc into a MR (6)
Round 3 :
Repeat (1 sc, 1 inc) 3 times (9)
Round 4 :
Work 3 inc, then 6 sc (12)
Info :
Finish with a sl st and leave a long tail. Lightly stuff the horn before attaching.
I really hope you enjoy bringing Pino to life as much as I did! There’s something so rewarding about finishing those tiny details, like the embroidered nails and that cute little horn, that really makes his personality shine. Once you're finished, don't forget to give him a little squeeze—he’s designed to be the perfect size for hugging. I can't wait to see the colors you choose for your own rhino family! Happy crocheting, and may your stitches always be even and your yarn never tangle! ✨🧶