About This Plush Backpack Unicorn Crochet Pattern
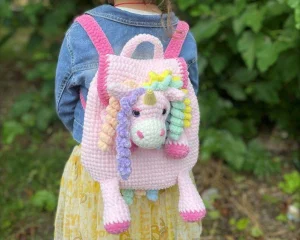
Perfect for preschool, playdates, or weekend outings, this whimsical accessory brings a touch of magic to any child's wardrobe and makes a treasured keepsake.
Ideal for those with basic crocheting experience, featuring slightly more advanced stitches and techniques to expand your skills.
Takes 5-7 hours, making it an enjoyable project to finish over a couple of days.
Delightful animal designs with sweet details that capture the essence of your favorite woodland and farmyard friends.
Perfect for preschool, playdates, or weekend outings, this whimsical accessory brings a touch of magic to any child's wardrobe and makes a treasured keepsake.
I absolutely adore how squishy and huggable this velvet yarn makes the finished backpack! Crocheting the curly, colorful mane strands is incredibly satisfying, and seeing the cute little unicorn face come together at the end is pure magic.
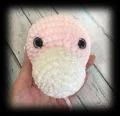


When I first sat down to design this unicorn backpack, I wanted to create something that felt like a warm hug but was sturdy enough to survive actual playground adventures. Velvet yarn is my absolute go-to for kids' items because it is ridiculously soft, but it does require a bit of patience! One of my favorite parts of this project is playing with color. While the pattern calls for a classic pink and cream palette, you can totally customize this to match your child's favorite colors. Imagine a mint green unicorn with lilac curls, or a classic white unicorn with a vibrant rainbow mane!
If you find working with chenille yarn a bit tricky to see, try working in a well-lit room and feeling for the next stitch with your fingers rather than just relying on your eyes. And don't be afraid to use plenty of locking stitch markers—they are an absolute lifesaver for keeping track of those rounds. I promise, once you attach that final curly strand of the mane and see those sleepy eyelashes, you will be so proud of what you've created!
Surprise your favorite little adventurer with a whimsical, super-soft unicorn backpack they'll want to carry everywhere! This delightful project blends the cozy texture of velvet yarn with a magical design that is as functional as it is adorable. You will love watching this cute companion take shape stitch by stitch, creating a durable, huggable bag that makes the ultimate handmade gift.
ch2, work 5 sc into the second chain from your hook. Do not pull the loop tight. Turn. (5)
t-ch, 1 sc, repeat inc 4 times, turn (9)
t-ch, repeat (1 sc, inc) 4 times, 1 sc, turn (13)
t-ch, repeat (2 sc, inc) 4 times, 1 sc, turn (17)
t-ch, repeat (3 sc, inc) 4 times, 1 sc, turn (21)
t-ch, repeat (4 sc, inc) 4 times, 1 sc, turn (25)
t-ch, repeat (5 sc, inc) 4 times, 1 sc, turn (29)
t-ch, repeat (7 sc, inc) 3 times, 5 sc, turn (32)
t-ch, repeat (8 sc, inc) 3 times, 5 sc (35)
t-ch, repeat (9 sc, inc) 3 times, 5 sc (38)
Do not turn your work. Instead, begin working along the flat top edge of the flap.
t-ch, 21 sc, turn (21)
The original pattern lists rows 12-18 as 6 rows, but mathematically this spans 7 rows. Work 7 rows of 21 sc to maintain proper flap length.
t-ch, 21 sc, turn (21)
t-ch, 21 sc, turn (21)
t-ch, 21 sc, turn (21)
t-ch, 21 sc, turn (21)
t-ch, 21 sc, turn (21)
t-ch, 21 sc, turn (21)
t-ch, 21 sc, turn (21)
t-ch, 21 sc (21). Do not turn.
Switch to dark pink yarn and cut the light pink yarn.
t-ch, 25 sc, ch3, skip next 3 stitches to create a buttonhole, 25 sc, turn (53)
t-ch, 53 reverse sc (53), sl st to finish. Fasten off.
ch20. Starting in the second chain from your hook, work 18 sc, then 3 sc into the last chain. Working back along the opposite side of the chain, crochet 17 sc, inc, and inc into the t-ch (42)
inc, 15 sc, repeat (inc, 1 sc) 2 times, inc, 17 sc, repeat (inc, 1 sc) 2 times (48)
inc, 1 sc, inc, 15 sc, repeat (inc, 1 sc) 4 times, inc, 15 sc, repeat (inc, 1 sc) 3 times (58)
inc, 1 sc, inc, 16 sc, repeat (inc, 3 sc) 3 times, inc, 18 sc, repeat (inc, 3 sc) 2 times (66)
inc, 3 sc, inc, 18 sc, repeat (inc, 4 sc) 3 times, inc, 17 sc, repeat (inc, 4 sc) 2 times (74)
74 sc (74)
BLO 74 sc (74)
74 sc (74)
74 sc (74)
74 sc (74)
74 sc (74)
74 sc (74)
74 sc (74)
74 sc (74)
74 sc (74)
74 sc (74)
32 sc, dec, 35 sc, dec, 3 sc (72)
72 sc (72)
72 sc (72)
72 sc (72)
72 sc (72)
72 sc (72)
72 sc (72)
72 sc (72)
72 sc (72)
72 sc (72)
72 sc (72)
72 sc (72)
72 sc (72)
72 sc (72)
72 sc (72)
72 sc (72)
72 sc (72)
72 sc (72)
72 sc (72)
72 sc (72)
Prepare to attach the flap to the main backpack body in the next round.
1 sc, work 23 sc holding the flap and backpack together, 48 sc (72), sl st. Fasten off and weave in ends.
ch71. Starting in the second chain from the hook, work 70 sc, turn (70)
t-ch, 70 sc, turn (70)
t-ch, 70 sc, turn (70)
t-ch, 70 sc (70). Fasten off, leaving a long tail for sewing.
ch21. Starting in the second chain from your hook, work 20 sc, turn (20)
The pattern lists rows 2-3 as 20 rows, which is a misprint. Work only 2 rows (Row 2 and Row 3) of 20 sc to complete the handle.
t-ch, 20 sc, turn (20)
t-ch, 20 sc (20). Fasten off, leaving a long tail for sewing.
ch150. Fasten off and tie secure knots at both ends of the chain.
Using cream yarn, ch2, work 6 sc into the second chain from your hook (6)
repeat inc 6 times (12)
repeat (1 sc, inc) 6 times (18)
1 sc, inc, repeat (2 sc, inc) 5 times, 1 sc (24)
24 sc (24)
24 sc (24)
24 sc (24)
Switch to pink yarn and cut the cream yarn.
24 sc (24)
9 sc, repeat inc 6 times, 9 sc (30)
9 sc, repeat (1 sc, inc) 6 times, 9 sc (36)
repeat (5 sc, inc) 6 times (42)
42 sc (42)
42 sc (42)
42 sc (42)
Insert the 15 mm safety eyes between Rounds 10 and 11, spacing them about 10 to 11 stitches apart.
repeat (5 sc, dec) 6 times (36)
2 sc, dec, repeat (4 sc, dec) 5 times, 2 sc (30)
repeat (3 sc, dec) 6 times (24). Stuff the head firmly with fiberfill and leave a long tail for sewing.
Using pink yarn and a 3.0 mm hook, ch2, work 4 sc into the second chain from your hook (4)
repeat (1 sc, inc) 2 times (6)
repeat (2 sc, inc) 2 times (8)
repeat (1 sc, inc) 4 times (12)
12 sc (12)
repeat (3 sc, dec) 2 times (10). Fasten off, leaving a tail for sewing.
Using yellow cotton yarn and a 2.25 mm hook, work 6 sc into a MR (6)
repeat (2 sc, inc) 2 times (8)
8 sc (8)
repeat (3 sc, inc) 2 times (10)
10 sc (10)
repeat (4 sc, inc) 2 times (12)
12 sc (12)
repeat (3 sc, inc) 3 times (15)
15 sc (15)
repeat (4 sc, inc) 3 times (18)
18 sc (18), sl st to finish. Fasten off, leaving a tail for sewing. Stuff the horn with fiberfill.
ch40, starting in the second chain from the hook, work 39 inc (78). Fasten off, leaving a long tail for sewing.
Using dark pink yarn, ch2, work 6 sc into the second chain from your hook (6)
repeat inc 6 times (12)
repeat (3 sc, inc) 3 times (15)
BLO 15 sc (15)
Switch to pink yarn and cut the dark pink yarn.
15 sc (15)
15 sc (15)
dec, 13 sc (14)
dec, 12 sc (13)
dec, 11 sc (12)
dec, 10 sc (11)
dec, 9 sc (10)
10 sc (10)
10 sc (10)
Stuff the lower portion of the leg. Fold the top flat and work 5 sc through both layers to close. Fasten off, leaving a tail for sewing.
Using dark pink yarn, ch2, work 6 sc into the second chain from your hook (6)
repeat inc 6 times (12)
repeat (1 sc, inc) 6 times (18)
BLO 18 sc (18)
Switch to pink yarn and cut the dark pink yarn.
18 sc (18)
18 sc (18)
repeat (7 sc, dec) 2 times (16)
repeat (6 sc, dec) 2 times (14)
dec, 12 sc (13)
dec, 11 sc (12)
dec, 10 sc (11)
dec, 9 sc (10)
10 sc (10)
Stuff the lower portion of the leg. Fold the top flat and work 5 sc through both layers to close. Fasten off, leaving a tail for sewing.
I hope you have as much fun making this magical unicorn backpack as the little one in your life will have carrying it! There is nothing quite like the joy of gifting a handmade treasure that sparks the imagination. Don't forget to share your finished creations with our wonderful crafting community—we all love to see your unique color choices! Happy stitching, and may your days be filled with cozy stitches and a little bit of magic! 🧶✨🦄
You can, but it will significantly change the size and texture of the backpack. If you use worsted weight acrylic, the bag will turn out much smaller. To get a similar size, you would need to hold multiple strands together or adjust your hook size accordingly.
While the main backpack body uses basic stitches, assembling the pieces and working with plush yarn can be tricky for absolute beginners. I recommend having a few simple amigurumi projects under your belt first to get used to shaping and sewing pieces together.
Because of the delicate velvet yarn and safety eyes, I highly recommend spot cleaning the bag with a damp cloth and mild soap. If a full wash is necessary, hand wash gently in cold water and let it air dry completely to preserve the plush texture.
Chenille and velvet yarns are notorious for shedding at cut ends! A great trick is to gently singe the very tip of the yarn tail with a lighter to melt the fibers together, or secure the end with a tiny dab of fabric glue before you start crocheting.
