🧢 Beautiful ✨ Detailed πŸ’ Adorable

Plush Capybara Amigurumi Pattern

Plush Capybara Amigurumi Pattern
3.9β˜…Rating
3-4 HoursTime Needed
2.6KMade This
βœ‚οΈ

Intermediate Level

Ideal for those with basic crocheting experience, featuring slightly more advanced stitches and techniques to expand your skills.

⏱️

Quick Craft

Fits nicely into a free afternoon β€” 2 to 5 hours of focused, enjoyable crocheting.

🧸

Cute Companion

An adorable friend to cherish, handcrafted with love to bring comfort and joy for years to come.

About This Plush Capybara Amigurumi Pattern

Plush Capybara Amigurumi Pattern crochet pattern - detailed view

This cuddly companion makes a wonderful, thoughtful gift for animal lovers, or a whimsical accent piece for your living room. It is sure to bring a smile to anyone who sees it resting on a desk.

Why You'll Love This Plush Capybara Amigurumi Pattern

I absolutely fell in love with designing this because of the seamless leg attachment! If you dislike sewing pieces together at the end as much as I do, you are going to find this method incredibly satisfying. Plus, working with bulky plush yarn means you get a wonderfully squishy, substantial toy in just a single afternoon of cozy crafting.

Plush Capybara Amigurumi Pattern step 1 Plush Capybara Amigurumi Pattern step 2 Plush Capybara Amigurumi Pattern step 3 Plush Capybara Amigurumi Pattern step 4

Switch Things Up

There is something incredibly therapeutic about working with super bulky plush yarn, isn't there? The way it glides on the hook and grows so quickly always makes me feel like a crochet wizard. When I first designed this capybara, I wanted to create something that captured that ultimate, serene 'no thoughts, just vibes' look that capybaras are famous for. Adding the tiny tangerine on top was the absolute perfect finishing touchβ€”it just brings so much whimsical joy!

If you want to customize your little buddy, try playing around with different shades of brown or even a soft cream color for a leucistic capybara look. You could also swap the tangerine for a tiny pink flower or a little green sprout! I love seeing how everyone puts their own unique spin on these patterns. Just remember to take your time when joining the legs. It can feel a little fiddly on those specific rounds, but once you get the hang of working through both layers, you will love how seamless it is. Happy crafting, friends!

Common Mistakes & How to Fix Them

βœ— When attaching the first leg in Round 20, make sure you align the leg's stitches correctly so the foot points downward rather than twisting sideways.βœ— If you skip marking the ear placement stitches in Round 18, it will be very difficult to position them symmetrically later on, as the plush yarn hides stitch definition.βœ— When sewing up the small gaps under the legs after finishing the body, use the leftover yarn tails from the legs themselves to keep the stitches invisible and secure.βœ— Avoid stuffing the body too lightly before closing Round 38, or your capybara will lose its signature blocky, sturdy shape and look a bit deflated.

Plush Capybara Amigurumi Pattern

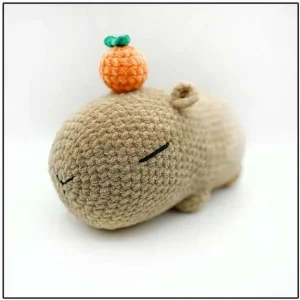
There is nothing quite like the cozy charm of a capybara, and this sweet little plushie is here to steal your heart! Crocheted with super chunky velvet yarn, this project is incredibly huggable and comes together so fast. I love how the legs are seamlessly joined as you go, saving you tons of sewing time. Topped with a tiny, vibrant tangerine, this little buddy makes the perfect desk companion or a handmade gift for anyone who loves quirky, adorable animals.

Intermediate 3-4 Hours

Materials Needed for Plush Capybara Amigurumi Pattern

β€” Main Fabric

  • 01
    Approximately 1 skein (100g) of super bulky plush yarn (such as Himalaya Dolphin Baby or equivalent) in a soft beige or light brown
  • 02
    A small amount of orange plush yarn for the tiny head tangerine
  • 03
    A small amount of green plush yarn for the tangerine leaves
  • 04
    A few yards of fine black cotton yarn (like Yarnart Begonia) for embroidering the facial features

β€” Tools Required

  • 01
    4.5 mm (US H-7) crochet hook, or size needed to obtain a tight fabric with your yarn
  • 02
    High-quality polyester fiberfill stuffing
  • 03
    Several locking stitch markers to track rounds and ear placement
  • 04
    A large, blunt-tipped yarn needle for sewing the plush pieces
  • 05
    A smaller, sharp yarn needle for embroidering the fine black details
  • 06
    Sharp scissors for clean yarn cuts

Progress Tracker

0% Complete

β€” 1. Legs (Make 4) :

Round 1 :

Start with a MR and work 6 sc into it. (6)

Round 2 :

Work an inc in every stitch around. (12)

Round 3 :

Work 1 sc in each stitch around. (12)

Info :

Fasten off and secure your yarn, leaving a short tail for closing any gaps later.

β€” 2. Ears (Make 2) :

Round 1 :

Work 6 sc into a MR, but do not pull the ring closed. Turn your work and ch 1. (6)

Round 2 :

Work a repeat of (1 inc, 1 sc) three times across. (9)

Info :

Fasten off and leave a long tail. Bring the two bottom corners of the ear together and sew them securely to create a curved shape.

β€” 3. Head and Body :

Round 1 :

Create a MR and work 8 sc into the ring. (8)

Round 2 :

Work an inc in each of the 8 stitches around. (16)

Round 3 :

Repeat (1 sc, 1 inc) eight times around. (24)

Round 4 :

Repeat (2 sc, 1 inc) eight times around. (32)

Round 5 :

Repeat (3 sc, 1 inc) eight times around. (40)

Round 6 :

Repeat (4 sc, 1 inc) eight times around. (48)

Round 7 :

Work 1 sc in each stitch around. (48)

Round 8 :

Work 19 sc, 1 inc, 8 sc, 1 inc, 19 sc. (50)

Round 9 :

Work 1 sc in each stitch around. (50)

Round 10 :

Work 21 sc, 1 inc, 6 sc, 1 inc, 21 sc. (52)

Round 11 :

Work 1 sc in each stitch around. (52)

Round 12 :

Work 1 sc in each stitch around. (52)

Round 13 :

Work 1 sc in each stitch around. (52)

Round 14 :

Work 23 sc, 1 inc, 4 sc, 1 inc, 23 sc. (54)

Round 15 :

Work 1 sc in each stitch around. (54)

Round 16 :

Work 1 sc in each stitch around. (54)

Round 17 :

Work 1 sc in each stitch around. (54)

Round 18 :

Work 6 sc, 1 dec, 4 sc, 1 dec, 9 sc, 1 sc (place a stitch marker in this stitch to mark the first ear), 9 sc, 1 sc (place a stitch marker in this stitch to mark the second ear), 10 sc, 1 dec, 4 sc, 1 dec, 2 sc. (50)

Round 19 :

Work 4 sc, 1 dec, 2 sc, 1 dec, 34 sc, 1 dec, 2 sc, 1 dec. (46)

Round 20 :

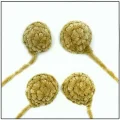
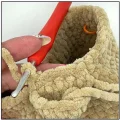
Work 1 inc, 2 sc, 1 inc, 2 sc, 1 inc, 33 sc, then work 6 sc going through both the first leg and the body stitches together. (49)

Info :

The start of your rounds has now shifted by one stitch. Move your main stitch marker to this new position for all subsequent rounds.

Round 21 :

Work 1 sc, 1 inc, 1 sc, work 6 sc through both the second leg and the body together, 13 sc, 1 dec, 4 sc, 1 dec, 13 sc, then work 1 sc in each of the remaining 6 stitches of the first leg. (48)

Info :

For the next round, do not work into the joined leg stitches from previous rounds; instead, you will work across the unworked outer stitches of the legs.

Round 22 :

Work 4 sc, work 1 sc in each of the 6 outer stitches of the second leg, 12 sc, 1 dec, 4 sc, 1 dec, 18 sc. (46)

Round 23 :

Work 9 sc, 1 dec, 28 sc, 1 dec, 5 sc. (44)

Round 24 :

Work 19 sc, 1 dec, 6 sc, 1 dec, 15 sc. (42)

Round 25 :

Work 1 sc in each stitch around. (42)

Round 26 :

Repeat (6 sc, 1 inc) six times around. (48)

Round 27 :

Work 1 sc in each stitch around. (48)

Round 28 :

Work 1 sc in each stitch around. (48)

Round 29 :

Work 1 sc in each stitch around. (48)

Round 30 :

Work 1 sc in each stitch around. (48)

Round 31 :

Work 43 sc, then work 6 sc going through both the third leg and the body together. (48)

Info :

The start of the round has shifted once more. Move your main marker to this new spot to keep your stitch counts accurate.

Round 32 :

Work 4 sc, work 6 sc through both the fourth leg and the body together, 32 sc, then work 1 sc in each of the 6 outer stitches of the third leg. (48)

Round 33 :

Work 4 sc, work 1 sc in each of the 6 outer stitches of the fourth leg, then work 38 sc. (48)

Round 34 :

Repeat (4 sc, 1 dec) eight times around. Start stuffing the body with fiberfill. (40)

Round 35 :

Repeat (3 sc, 1 dec) eight times around. (32)

Round 36 :

Repeat (2 sc, 1 dec) eight times around. (24)

Round 37 :

Repeat (1 sc, 1 dec) eight times around. Finish stuffing the body firmly, making sure it holds its shape. (16)

Round 38 :

Work 8 dec around. (8)

Info :

Fasten off, weave the tail through the remaining stitches to pull the opening closed, and hide the yarn end inside the body. Use the yarn tails from the legs to sew up any small gaps where they join the body.

β€” 4. Tangerine :

Round 1 :

Using orange yarn, work 6 sc into a MR. (6)

Round 2 :

Work an inc in each stitch around. (12)

Round 3 :

Repeat (1 sc, 1 inc) six times around. (18)

Round 4 :

Work 1 sc in each stitch around. (18)

Round 5 :

Work 1 sc in each stitch around. (18)

Round 6 :

Work 1 sc in each stitch around. (18)

Round 7 :

Repeat (1 sc, 1 dec) six times around. Stuff the tangerine lightly with fiberfill. (12)

Round 8 :

Work 6 dec around. (6)

Info :

Fasten off, pull the final opening closed, and leave a long tail for sewing it to the head.

β€” 5. Leaves :

Row 1 :

Using green yarn, ch 4, sl st into the first ch to make a loop, ch 4, sl st again into that same first ch. Fasten off, wrap the center of the double loop with the yarn tails, and tie a knot to secure.

Assembly Instructions

  • Position the folded ears over the marked stitches from Round 18 (spaced about 10 stitches apart) and sew them securely in place.
  • Thread your smaller needle with fine black yarn and insert it from the bottom of the head, coming out 3 rounds below the left ear and 5 stitches to the left to find the first eye point.
  • Form the left eye by making two passes of black yarn from the first point down 5 stitches and 1 stitch to the left, then repeat this process symmetrically for the right eye.
  • Embroider a wide, stylized 'Y' shape centered between the eyes on the snout to create the classic capybara nose, securing the ends inside the head.
  • Sew the green leaves directly to the top center of the orange tangerine, weaving in the green yarn ends to hide them.
  • Position the finished tangerine on top of the capybara's head, centered between the ears, and sew it down firmly using the orange yarn tail.

Important Notes

  • πŸ’‘Use a stitch marker at the beginning of every round, as plush yarn has a very dense pile that makes it easy to lose track of your stitch counts.
  • πŸ’‘Since individual tension and yarn brands vary, check that your leg placement is symmetrical before completing the join rounds; adjust by a stitch if needed.
  • πŸ’‘When working the leg joins, keep your tension slightly tighter than usual to prevent any visible gaps or loose loops around the leg seams.
  • πŸ’‘Embroider the facial details with a relatively thin yarn like sport weight cotton, as thick plush yarn will make the delicate features look bulky.
  • πŸ’‘Do not overstuff the ears; they are meant to lie flat and curved rather than puffy.

And there you have it! Your very own plush capybara is ready to bring some calm, cozy vibes to your space. I hope you enjoyed this unique seamless leg-joining technique as much as I doβ€”it really is a game-changer for amigurumi makers! Place your new little buddy on your desk, nestle them on a shelf, or gift them to someone special who needs a smile. Don't forget to share your finished creations with our crafting community. Happy crocheting! 🧢🍊✨

You ask,

we answer.

FAQs

Can I use a different yarn weight like worsted weight acrylic?

Absolutely! Just keep in mind that using worsted weight yarn with an appropriate hook (like 3.5 mm) will result in a much smaller capybara, perfect as a pocket pal, while the plush version is large and squishy.

The legs seem a bit twisted after I joined them. How can I fix this?

Since everyone's crochet tension and lean vary slightly, the legs might shift. If they look crooked, simply adjust the joining position by one or two stitches forward or backward in Round 20 and 31 so they line up straight.

How do I prevent stuffing from showing through the plush yarn?

Make sure to use a hook size that creates a dense fabric. If you see stuffing peeking through, go down a half hook size (to 4.0 mm) or try to keep your tension tighter, especially during decrease rounds.

Is it hard to sew the fine black yarn onto the plush head?

It can be a little tricky because the plush fibers swallow thin threads. To make the eyes pop, make sure to double your stitches over the same path to give the embroidery more definition and visibility.