About This Princess Zelda Amigurumi Pattern

She makes the most thoughtful handmade gift for any fan — display her on a shelf, tuck her into a gift bag, or keep her all for yourself. Either way, she's a keeper.
Ideal for those with basic crocheting experience, featuring slightly more advanced stitches and techniques to expand your skills.
Takes 5-7 hours, making it an enjoyable project to finish over a couple of days.
Playful characters full of personality, designed to spark imagination and become cherished playtime favorites.
She makes the most thoughtful handmade gift for any fan — display her on a shelf, tuck her into a gift bag, or keep her all for yourself. Either way, she's a keeper.
I love this pattern because it's one of those projects where every section feels like a little surprise. The hair cap with all its strands is unlike anything I've made before — it feels more like sculpting than crocheting, and when you glue those curls into place and see them frame her face, it's genuinely satisfying. The peplum and belt are tiny but they're what make her look finished and polished. I ended up making two of her.
I have a shelf full of amigurumi, and I'll be honest — most of them are animals. Bears, bunnies, the odd dinosaur. So when I picked up this pattern I wasn't sure how I'd feel about making a full doll with hair and a tiara and a layered dress. Turns out I was completely hooked from Round 1.
The section I was most nervous about was the hair. There are individual strands attached to a base cap, each one crocheted separately and then glued and arranged around the head. It sounds fiddly, and it is — but it's the most satisfying kind of fiddly. Working those strands loosely is genuinely important. My first attempt I crocheted them at normal tension and they stuck out like little planks. Ripped them back, went much looser, and the difference was night and day.
One thing I'd tell anyone attempting this: don't rush the assembly. The hair placement, the ear positioning, getting the tiara to sit just right — these take time and a lot of pins. I had this little doll pinned to a foam block like some kind of crafting crime scene while I figured out exactly where everything belonged. Totally worth it.
For a fun color variation, I've seen people make her in all-white with silver for the tiara — she looks stunning as an ice-queen version. You could also swap the lilac for deep purple and the mustard for gold to give her a richer, more dramatic look. The construction is exactly the same either way, so it's an easy way to make a second one feel completely different.
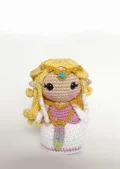
This little princess is going to keep you company through every round, and honestly, you might not want to put her down once you start. She's got her flowing golden hair, her lilac and white gown, the tiny mustard belt with a dangling pennant — every detail is there waiting for you to bring it to life. If you've ever wanted a crochet project that feels like a love letter to a game you grew up with, this is the one. She finishes at about 14cm tall, which makes her the perfect desk companion or a gift that'll genuinely make someone gasp.
Begin with white yarn.
Start with a magic ring and work 6 sc into it. [6]
(1 sc, inc) repeated around. [9]
Sc around. [9]
(1 sc, dec) repeated around. [6]
Sc around. [6]
Switch to beige yarn.
Sc around. [6]
Fold the arm flat and close the opening by working 2 sc across. Fasten off.
Begin with brown yarn.
Start with a magic ring and work 6 sc into it. [6]
Inc in every stitch around. [12]
(3 sc, inc) repeated around. [15]
Sc around. [15]
Switch to white yarn.
Sc around. [15] Fasten off after Round 10.
Using white yarn, join both finished legs together with a slip stitch.
Sc around both legs together. [30]
6 sc, dec, 6 sc, dec, 6 sc, dec, 6 sc. [27]
Sc around. [27] Stuff the legs at this point.
6 sc, dec, 5 sc, dec, 5 sc, dec, 5 sc. [24]
Sc in back loops only around. [24]
Sc around. [24]
Switch to lilac yarn.
5 sc, dec, 4 sc, dec, 4 sc, dec, 5 sc. [21]
Sc around. [21]
4 sc, dec, 4 sc, dec, 4 sc, dec, 3 sc. [18] Stuff the body. Pause here to make the skirt before continuing.
Work into the front loops left unused from Round 15 of the body. Begin with white yarn.
(2 hdc, inc) repeated around. [32]
32 hdc around. [32]
(3 hdc, inc) repeated around. [40]
40 hdc around. [40]
Switch to lilac yarn.
40 sc around. [40]
Switch to white yarn.
40 sc around. [40] Fasten off.
This is the round where the arms are joined. Before starting, check that the arms will sit centered on either side of the body. If needed, adjust by beginning with 5 sc or 3 sc instead of 4.
4 sc, then join the first arm with 2 sc, 7 sc, then join the second arm with 2 sc, 3 sc. [18] Fasten off and leave a long yarn tail for sewing.
Chain 26 to begin.
Slst 1, 1 hdc, 1 dc, (3 tr, tr-inc) x4, 3 tr, 1 dc, 1 hdc, slst 1. Fasten off and leave a tail for sewing. Wrap the peplum around the doll's waist and sew it to the front.
Start with a magic ring and work 6 sc into it. [6]
Inc in every stitch around. [12]
(1 sc, inc) repeated around. [18]
(2 sc, inc) repeated around. [24]
(3 sc, inc) repeated around. [30]
(4 sc, inc) repeated around. [36]
(5 sc, inc) repeated around. [42]
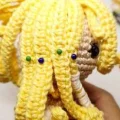
Sc around. [42] Before starting Round 15, embroider the eyelashes and insert the 9mm safety eyes between rounds 11 and 12, eight stitches apart from each other.
(5 sc, dec) repeated around. [36]
(4 sc, dec) repeated around. [30]
(3 sc, dec) repeated around. [24]
(2 sc, dec) repeated around. [18] Fasten off and stuff the head. Pin it onto the body and sew in place.
Each sleeve is a small triangular piece worked in a single row from a chain foundation.
Ch 6, skip 1 chain, slst 1, 1 hdc, then work {1 hdc, ch 2, slst 1 (picot), 1 hdc} all into the next stitch, 1 hdc, slst 1, ch 5, skip 1, slst 1 (picot), ch 4. Fasten off and leave a tail for sewing.
Drape both sleeve triangles over the doll's shoulders. Sew the chain sections down and weave in all ends neatly.
Begin with mauve yarn. Chain 8, skip the first two chains, then work 2 sc.
Switch to light blue: 3 sc. Switch to light green: work {2 sc, ch 2, slst 1 (picot), 2 sc} all into the same chain stitch. Continue back along the other side of the chain — switch to light blue: 3 sc. Switch to mauve: 2 sc, ch 2, slst 1 with the last stitch. Fasten off.
Belt (mustard): Ch 15, slst 1 into the right corner of the pennant, ch 3, slst 1 (picot), ch 1, slst 1 attaching the belt to the other corner of the pennant, ch 14. Try the belt around the waist — it should hang loosely with the pennant sitting below the peplum. Add more chains if needed. Fasten off and leave a long tail.
Work with deliberately loose tension throughout the hair cap and all strands to add volume and natural drape. Use light yellow yarn.
Start with a magic ring and work 6 sc into it. [6]
Inc in every stitch around. [12]
(1 sc, inc) repeated around. [18] From this point, begin working the individual strands. Attach each strand to the hair base with a slst before starting the next one.
Ch 27, skip 1, 26 hdc.
Ch 23, skip 1, slst 12, 1 sc, 9 hdc.
Ch 27, skip 1, 26 hdc.
Ch 10, skip 1, slst 5, 1 sc, 2 hdc, 1 dc. Then on the base itself: 2 dc.
Ch 10, skip 1, slst 5, 1 sc, 2 hdc, 1 dc, slst 1 in the same stitch where this strand's chains began.
Ch 27, skip 1, 26 hdc.
Ch 23, skip 1, slst 12, 1 sc, 9 hdc.
Ch 27, skip 1, 26 hdc. Fasten off after the last strand.
Braids: Take a length of white yarn and wrap it around sections of both 23-chain strands. Use the tapestry needle to pass through a few stitches of each strand to anchor the wrapping securely. Fasten off.
Ch 5, skip 1 chain. Slst 1, 1 sc, 1 hdc, slst 1. Fasten off and leave a tail for sewing.
Work with tight tension throughout. The slip stitches form picots and are always worked into the second chain from the hook.
Ch 5, slst 1, (ch 3, slst 1) x3.
Ch 3, skip 2 chains, 2 hdc, ch 2, slst 1 in the same stitch as the 2 hdc.
Ch 2, slst 1, (ch 3, slst 1) x3, ch 2. Fasten off.
Jewel (turquoise): Ch 3, fasten off and tie both ends together to form a small knot. Attach this to the center of the tiara.
She might be 14cm tall, but she's got a whole lot of heart packed into every single stitch. 🧶 From her golden flowing hair and pointy little ears to that mustard tiara with the tiny turquoise jewel, every piece of this pattern is genuinely satisfying to make. You'll work through the body, build her gown from the skirt up, sculpt her hair cap with all its beautiful strands, and finish with the most adorable crown you've ever crocheted. Whether you're making her for yourself or gifting her to someone who'll immediately put her on their bookshelf — she's going to be loved. ✨ Happy making!
Yes, it's a great next step. The body and head are worked in standard single crochet rounds, so those sections feel familiar. The hair is the trickiest part — you're attaching individual strands with slip stitches as you go, which is new for a lot of crafters, but the instructions walk you through each strand one at a time. Just remember to keep your tension deliberately loose on the hair section.
The pattern is designed for cotton yarn used with a 3mm hook — cotton gives you that firm, defined stitch definition that keeps amigurumi looking crisp and holds the hair strands in their shape. Acrylic will work but tends to be stretchier, which can make the body a little looser and the hair strands less defined. If you go acrylic, try dropping to a 2.5mm hook to compensate.
Yes, the pattern actually notes this directly. If the arms don't land centered on the sides when you start with 4 sc, adjust by beginning with 3 sc or 5 sc instead. The total stitch count stays the same at 18 — you're just shifting where the round begins so the arms sit correctly on either side.
The key is to only glue the strands down to about halfway down the head and let the rest hang loose — pressing them all the way down is what makes them flop. Work two strands at a time, hold them in place until the glue sets a little, and then move on. Pins help a lot while you wait. The braided side strands get glued curved rather than straight down, which locks the whole style into place.
You can scale her up by switching to a heavier yarn (DK or worsted) and a matching larger hook. Going from a 3mm to a 4mm hook with DK weight would add roughly 30–40% to the finished size, making her closer to 19–20cm. Keep in mind the hair and accessory pieces will also need proportional adjustments, and you'll need larger safety eyes — 12mm would suit a scaled-up version better than 9mm.
