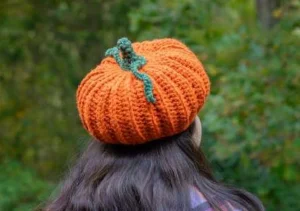
This pumpkin hat is one of those projects that just makes people stop and stare — in the best way. You'll end up with a squishy, stuffed hat that looks like a real pumpkin sitting on your head, complete with a little green stem and curly vine tendrils. The ribbed outer texture is what really sells it, and once you figure out the rhythm of those ribbing rows, it's honestly kind of addictive. If you love making things that are equal parts functional and ridiculous (the good kind), this one's for you. It fits teen and adult heads and works up in a weekend.
Progress Tracker
0% Complete
— 1. Hat Base Cap :
Info :
Color: Pumpkin orange. Work in continuous rounds. The increases are intentionally staggered across rounds to create a circular shape rather than a hexagonal one. You can add or remove an increase round to adjust sizing — just keep your final stitch count a multiple of 6. You can also add or remove plain rounds to adjust the depth of the hat. The stitch counts below reflect the standard version of the pattern.
Round 1 :
Start with a magic circle and work 6 SC into it. Pull the circle closed. (6)
Round 2 :
Place a stitch marker in the first stitch. SC INC in every stitch around — that's 6 increases total. (12)
Round 3 :
Place a stitch marker in the first stitch. *SC in the next stitch, SC INC in the following stitch.* Repeat from * to * 5 more times around. (18)
Round 4 :
Place a stitch marker in the first stitch. SC INC in the first stitch, then SC in the next 2 stitches. *SC INC in the next stitch, SC in the following 2 stitches.* Repeat from * to * 4 more times. (24)
Round 5 :
Place a stitch marker in the first stitch. SC in the next 2 stitches, SC INC in the next stitch. *SC in the next 3 stitches, SC INC in the following stitch.* Repeat from * to * 4 more times. (30)
Round 6 :
Place a stitch marker in the first stitch. SC INC in the first stitch, SC in the next 4 stitches. *SC INC in the next stitch, SC in the following 4 stitches.* Repeat from * to * 4 more times. (36)
Round 7 :
Place a stitch marker in the first stitch. SC in the next 4 stitches, SC INC in the next stitch. *SC in the following 5 stitches, SC INC in the next stitch.* Repeat from * to * 4 more times. (42)
Round 8 :
Place a stitch marker in the first stitch. SC INC in the first stitch, SC in the next 6 stitches. *SC INC in the next stitch, SC in the following 6 stitches.* Repeat from * to * 4 more times. (48)
Round 9 :
Place a stitch marker in the first stitch. SC in each of the next 47 stitches. (48)
Round 10 :
Place a stitch marker in the first stitch. SC in each of the next 47 stitches. (48)
Round 11 :
Place a stitch marker in the first stitch. SC in each of the next 47 stitches. (48)
Round 12 :
Place a stitch marker in the first stitch. SC in each of the next 47 stitches. (48)
Round 13 :
Place a stitch marker in the first stitch. SC in each of the next 47 stitches. (48)
Round 14 :
Place a stitch marker in the first stitch. SC in each of the next 47 stitches. (48)
Round 15 :
Place a stitch marker in the first stitch. SC in each of the next 47 stitches. (48)
Round 16 :
Place a stitch marker in the first stitch. SC in each of the next 47 stitches. (48)
Round 17 :
Place a stitch marker in the first stitch. SC in each of the next 47 stitches. (48)
Round 18 :
Place a stitch marker in the first stitch. SC in each of the next 47 stitches. (48)
Round 19 :
Working into FRONT LOOPS ONLY throughout this entire round: place a stitch marker in the first stitch, then SC FLO into each of the next 47 stitches. (48) — This is the turning round where the outer ribbing will attach.
— 2. Hat Outer Ribbing :
Info :
Color: Pumpkin orange. These rows run perpendicular to the base cap rounds and create the pumpkin ribbing texture. The ribbing rows attach to the base cap as you go — one stitch per row joins into the next stitch of the base cap round. The foundation chain of 16 should reach roughly the full height of the base cap when held flat against it. Feel free to adjust the chain length, but keep the count even. All stitch counts below are based on a chain of 16.
Row Foundation :
SS into the first stitch of Round 19. CH 16 — check that this chain lays flush against the base cap and spans its full height from the last round up to the magic circle center. CH 1 and turn.
Info :
Row 1 is worked twice with slightly different join instructions: the very first time you work Row 1, the final stitch joins to the same stitch you chained from (the first stitch of the round). Every subsequent time you work Row 1 (as part of the repeat), the final stitch joins BLO to the next stitch in the round instead.
Row 1 :
SS in the next 3 stitches, SC in the next 3 stitches, HDC INC in the next stitch. *HDC in the next stitch, HDC INC in the next stitch.* Repeat from * to * 4 more times until 1 stitch remains. For the very first Row 1 only: join the last stitch together with the stitch you originally chained from by working a joined HDC (yarn over, insert hook into last stitch, insert hook into the chain-from stitch, yarn over, pull through both stitches, yarn over, pull through all 3 loops). For all repeated Row 1s: join the last stitch BLO together with the next stitch in the base cap round (yarn over, insert hook into last stitch BLO, insert hook into next base cap stitch, yarn over, pull through stitch and loop, yarn over, pull through all 3 loops). (21)
Row 2 :
SS into the next stitch in the base cap round. Turn. HDC BLO in the next 15 stitches (skipping the SS). SC BLO in the next 3 stitches. SS BLO in the next 3 stitches. CH 1 and turn. (21, not counting chain)
Row 3 :
SS BLO in the next 3 stitches. SC BLO in the next 3 stitches. HDC BLO in the next 14 stitches. Join the last stitch BLO to the next base cap stitch: yarn over, insert hook into last stitch BLO, insert hook into the next base cap stitch, yarn over, pull through stitch and loop, yarn over, pull through all 3 loops. (21)
Row 4 :
SS into the next stitch in the base cap round. Turn. HDC BLO in the next 15 stitches (skipping the SS). SC BLO in the next 3 stitches. SS BLO in the next 3 stitches. CH 1 and turn. (21, not counting chain)
Row 5 :
SS BLO in the next 3 stitches. SC BLO in the next 3 stitches. HDC BLO in the next 14 stitches. Join the last stitch BLO to the next base cap stitch: yarn over, insert hook into last stitch BLO, insert hook into the next base cap stitch, yarn over, pull through stitch and loop, yarn over, pull through all 3 loops. (21)
Row 6 :
SS into the next stitch in the base cap round. Turn. HDC BLO in the first stitch (skipping SS). HDC DEC using the next 2 stitches. *HDC BLO in the next stitch, HDC DEC using the next 2 stitches.* Repeat from * to * 3 more times. SC BLO in the next 3 stitches. SS BLO in the next 3 stitches. CH 1 and turn. HDC DEC method: yarn over, insert hook into back loop of first stitch, insert hook into back loop of second stitch, yarn over, pull through 2 loops, yarn over, pull through all 3 loops. (16, not counting chain)
Info :
Rows 7–42: Repeat Rows 1–6 six more times (6 full repeats).
Info :
Rows 43–47: Work Rows 1–5 one final time.
Row 48 :
This is the last row — it decreases and also closes the ribbing by joining to the leftover loops of the very first foundation chain. SS into the next stitch in the base cap round. Turn. *HDC BLO the first stitch in the current row together with the first unused loop of the original foundation chain (yarn over, insert hook into back loop of current stitch, insert hook into the unused foundation chain loop, yarn over, pull through 2 loops, yarn over, pull through all 3 loops). HDC DEC using the next 2 stitches and the next unused foundation chain loop together (yarn over, insert hook into back loop of current stitch, insert hook into back loop of next current stitch, insert hook into next unused chain loop, yarn over, pull through 3 loops, yarn over, pull through all 3 loops).* Repeat from * to * 3 more times. SC BLO the next 3 stitches together with the next 3 unused chain loops. SS BLO the next 3 stitches together with the final 3 unused chain loops. Fasten off, leaving a long tail for gathering and sewing.
— 3. Stuffing & Closing :
Info :
Thread the long yarn tail onto your yarn needle before beginning.
Step 1 :
Using a running stitch, sew through the outermost loops along the raw edges of the ribbing rows, working all the way around until you return to your starting point.
Step 2 :
Begin stuffing the interior of the hat in small handfuls. Try the hat on periodically to check the shape — the base cap should remain concave so it sits comfortably on your head. Keep adjusting the stuffing as you go and avoid packing it too tightly.
Step 3 :
Once you're happy with the stuffing level, pull the running stitch yarn to gather the ribbing edges together. Check that the overall pumpkin shape looks right before committing.
Step 4 :
Align the gathered edges with the very top of the hat's base cap and sew them securely in place so the shape stays put. Tie off the yarn and weave in the ends.
— 4. Stem :
Info :
Color: Kale (dark green). The stem is worked in continuous rounds.
Round 1 :
Start with a magic circle and work 6 SC into it. Pull closed. (6)
Round 2 :
Place a stitch marker. SC in each of the next 5 stitches. (6)
Round 3 :
Place a stitch marker. SC in each of the next 5 stitches. (6)
Round 4 :
Place a stitch marker. SC in each of the next 5 stitches. (6)
Round 5 :
Place a stitch marker. SC in the first stitch, SC INC in the next stitch. *SC in the next stitch, SC INC in the following stitch.* Repeat from * to * 1 more time. (9)
Info :
Note: The PDF labels the next round as 'Round 5' again, which appears to be a numbering error in the source. This is treated as Round 6. Verify placement before continuing.
Round 6 :
Place a stitch marker. *SC INC in the next stitch, SC in the following stitch.* Repeat from * to * 4 more times around. (13)
Vine Tendril 1 :
SS into the first stitch in the round. CH 21. Turn. SS down 20 stitches back along the chain. SS into the next stitch in the round. SS across to the other side of the round.
Vine Tendril 2 :
CH 21. Turn. SS down 20 stitches back along the chain. SS into the next stitch in the round. SS back around to the beginning of the round. Fasten off, leaving a tail long enough to sew the stem to the hat top and weave in ends.
— 5. Finish :
Step 1 :
Using your yarn needle, sew the stem securely onto the very top of the hat. Tie off and weave the yarn tail into the inside of the hat.
Step 2 :
Find the loose yarn tail from where you tightened the magic circle on the stem, and weave it securely into the interior of the hat as well.
There's something genuinely magical about watching a flat crocheted cap transform into a round, squishy pumpkin hat — and the moment you put it on for the first time, stuffed and stemmed and silly in the best way, you'll totally get it. 🎃 This pattern is a little technical in the ribbing section but nothing you can't handle, and every tricky row has a clear payoff. Whether you make it for yourself, a friend, or just because autumn deserves a project this fun, I hope you love every stitch of it. Happy making! 🧶✨