About This Rac the Stretchy Raccoon Amigurumi Pattern
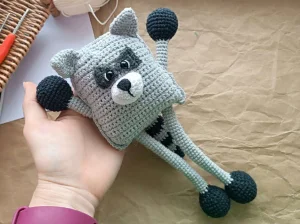
A wonderful interactive toy that helps toddlers develop fine motor skills, while looking absolutely charming sitting on a nursery shelf or tossed in a playroom basket.
Ideal for those with basic crocheting experience, featuring slightly more advanced stitches and techniques to expand your skills.
Takes 5-7 hours, making it an enjoyable project to finish over a couple of days.
Delightful animal designs with sweet details that capture the essence of your favorite woodland and farmyard friends.
A wonderful interactive toy that helps toddlers develop fine motor skills, while looking absolutely charming sitting on a nursery shelf or tossed in a playroom basket.
I absolutely love how this design turns standard amigurumi on its head! Crocheting the long, slide-through limbs is such a satisfying process, and assembling the flat body panels around them feels like magic. It's the perfect project for when you want to make something truly unique that will actually get played with, rather than just sitting there looking cute.
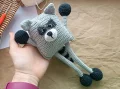
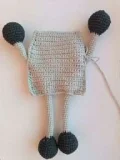
I still remember the first time I made one of these stretchy-limb toys. The look of pure wonder on my nephew's face when he realized he could pull the arm to make the leg shrink was absolutely priceless! It's what makes this raccoon pattern so special—it's not just a cute shelf decoration, but a real, interactive toy that sparks imagination.
When choosing your colors, don't feel limited to the classic raccoon grey and black! I once made a 'fantasy raccoon' using pastel pink, mint green, and cream stripes for the tail, and it turned out incredibly darling. It looked like a sweet little candy-shop creature. If you want to keep it traditional but add a bit of rustic charm, a warm forest green or a deep cocoa brown works beautifully too.
My top tip for this project is to take your time with the body assembly. Pinning everything in place before you start crocheting the edges together ensures that your limb channels are perfectly positioned. It's a little extra step, but it makes a world of difference in how smoothly those arms and legs slide!
Meet Rac, the most playful little raccoon you'll ever crochet! With his unique stretchy limbs that pull up and down, he's designed to keep little hands busy and happy. I wanted to create a toy that is as interactive as it is adorable, and this pattern is exactly that. You will love watching this clever design come together stitch by stitch, making a companion that brings endless joy and giggles to your favorite kiddos.
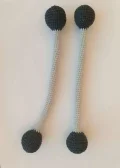
We will crochet the arms and legs as a single, long continuous piece. Start with your black yarn and the 2.0 mm hook.
Create a MR and work 6 SC into it. (6)
Work 1 INC in each of the 6 stitches around. (12)
Work a sequence of (1 SC, 1 INC) 6 times. (18)
Work a sequence of (2 SC, 1 INC) 6 times. (24)
Work a sequence of (3 SC, 1 INC) 6 times. (30)
Work 1 SC in each of the 30 stitches around for 4 rounds. (30)
Work a sequence of (1 DEC, 3 SC) 6 times. (24)
Work a sequence of (1 DEC, 2 SC) 6 times. (18)
Work a sequence of (1 DEC, 1 SC) 6 times. Stuff this end piece firmly. (12)
Work a sequence of (1 DEC, 4 SC) 2 times. (10)
Switch to your grey yarn to begin the sliding middle section.
Do not put any stuffing inside this grey portion of the limb.
Work 1 SC in each of the 10 stitches around for 52 rounds. (10)
Switch back to your black yarn for the second end piece.
Work a sequence of (1 INC, 4 SC) 2 times. (12)
Work a sequence of (1 SC, 1 INC) 6 times. (18)
Work a sequence of (2 SC, 1 INC) 6 times. (24)
Work a sequence of (3 SC, 1 INC) 6 times. (30)
Work 1 SC in each of the 30 stitches around for 4 rounds. (30)
Work a sequence of (1 DEC, 3 SC) 6 times. (24)
Work a sequence of (1 DEC, 2 SC) 6 times. (18)
Work a sequence of (1 DEC, 1 SC) 6 times. Stuff this end piece firmly. (12)
Work 6 DEC. Fasten off and secure the end. (6)
Crochet the ears using your grey yarn and the 2.0 mm hook.
Create a MR and work 6 SC into it. (6)
Work a sequence of (1 SC, 1 INC) 3 times. (9)
Work 1 SC in each of the 9 stitches around for 1 round. (9)
Work a sequence of (2 SC, 1 INC) 3 times. (12)
Work a sequence of (3 SC, 1 INC) 3 times. (15)
Work 1 SC in each of the 15 stitches around for 1 round. (15)
Work a sequence of (4 SC, 1 INC) 3 times. (18)
Work 1 SC in each of the 18 stitches around for 1 round. (18)
Flatten the ear and work 9 SC through both layers to close the bottom. Leave a long yarn tail for sewing.
Crochet the snout using white yarn and your 2.0 mm hook.
Create a MR and work 6 SC into it. (6)
Work 1 INC in each of the 6 stitches around. (12)
Work 1 INC in each of the 12 stitches around. (24)
Work 1 SC in each of the 24 stitches around for 3 rounds. (24)
Stuff the piece firmly and leave a long yarn tail for sewing.
We will make the eye patches in dark grey using the 2.0 mm hook. Work in rows, turning at the end of each row.
CH 4, but do not join. Work 1 SC in each of the 4 chains, CH 1, turn. (4)
Work 1 SC in each of the 4 stitches across, CH 1, turn. (4)
Work 1 INC, 2 SC, 1 INC across, CH 1, turn. (6)
Work 1 SC in each of the 6 stitches across for 2 rows, making a CH 1 and turning at the end of each row. (6)
Fasten off, leaving a long yarn tail for sewing.
We will alternate between black and grey yarn every 3 rounds. Use your 2.0 mm hook and stuff the tail gradually as you go. Start in black.
Create a MR and work 6 SC into it. (6)
Work a sequence of (1 SC, 1 INC) 3 times. (9)
Work 1 SC in each of the 9 stitches around for 1 round. (9)
Work 1 INC in each of the 9 stitches around. (18)
Work 1 SC in each of the 18 stitches around for 1 round, then switch to grey. (18)
With grey, work a sequence of (1 SC, 1 INC) 9 times. (27)
Work 1 SC in each of the 27 stitches around for 2 rounds, then switch to black. (27)
With black, work 1 SC in each of the 27 stitches around for 3 rounds, then switch to grey. (27)
With grey, work 1 SC in each of the 27 stitches around for 3 rounds, then switch to black. (27)
With black, work a sequence of (1 SC, 1 DEC) 9 times. (18)
Work 1 SC in each of the 18 stitches around for 2 rounds, then switch to grey. (18)
With grey, work 1 SC in each of the 18 stitches around for 3 rounds, then switch to black. (18)
With black, work 1 SC in each of the 18 stitches around for 3 rounds, then switch to grey. (18)
With grey, work 1 SC in each of the 18 stitches around for 2 rounds. (18)
Work a sequence of (1 SC, 1 DEC) 6 times, then switch to black. (12)
With black, work 1 SC in each of the 12 stitches around for 3 rounds. (12)
Flatten the opening and work 6 SC through both layers to close the tail. Leave a long yarn tail for sewing.
We will make two flat body panels. Use your grey yarn and the 3.0 mm hook.
CH 25. Starting in the second chain from your hook, work 24 SC, CH 1, turn. (24)
Work 24 SC across, making a CH 1 and turning at the end of each row. (24)
Work 1 SC, 1 DEC, 18 SC, 1 DEC, 1 SC, CH 1, turn. (22)
Work 22 SC across, CH 1, turn. (22)
Work 1 SC, 1 DEC, 16 SC, 1 DEC, 1 SC, CH 1, turn. (20)
Work 20 SC across for 3 rows, making a CH 1 and turning at the end of each row. (20)
Fasten off and weave in your yarn tails.
I hope you have the absolute best time bringing Rac the Raccoon to life! There is something so incredibly magical about watching a flat piece of crochet transform into a whimsical, interactive toy. Whether you're gifting him to a special little one or keeping him as a fun conversation starter on your own shelf, he is sure to bring smiles. Don't forget to play with his stretchy limbs once you're done—it's seriously addictive! Happy crocheting, my friends! 🧶✨🦝
This usually happens if the grey middle section of the limb was stuffed, or if you accidentally caught the grey yarn with your crochet stitches when joining the body panels. Make sure the grey tube remains completely empty of stuffing and is free to slide through the channels.
For safety with very young children, it's best to embroider the eyes using black yarn instead of using plastic safety eyes, as plastic eyes can present a choking hazard.
Check your row count on both panels first. If they both have exactly 25 rows, the discrepancy is likely due to a slight tension change between making the first and second panels. Blocking them lightly before joining can help match their shapes.
Yes! You can absolutely use worsted weight yarn, but keep in mind that it will make your raccoon larger than the standard 27 cm. Just remember to scale up your hook sizes accordingly (e.g., a 3.0 mm hook for the limbs and a 4.0 mm hook for the body).
