About This Sleepy Fox Rattle Toy Amigurumi Pattern
This fox rattle makes one of those handmade baby gifts people genuinely gasp over — thoughtful, safe, tactile, and so much more personal than anything you'd find in a shop.
Ideal for those with basic crocheting experience, featuring slightly more advanced stitches and techniques to expand your skills.
Fits nicely into a free afternoon — 2 to 5 hours of focused, enjoyable crocheting.
Small, sweet, and gift-worthy creations that fit perfectly in the palm of your hand with detailed charm.
This fox rattle makes one of those handmade baby gifts people genuinely gasp over — thoughtful, safe, tactile, and so much more personal than anything you'd find in a shop.
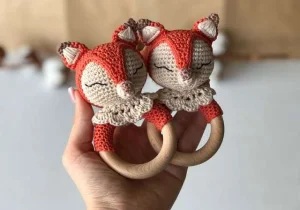
Honestly, I fell for this one the moment I saw how the orange cap piece drapes over the beige head — it looks so much more complex than it actually is to make, and that's my favorite kind of pattern. I love that the rattle goes inside the head before you close it up, so the finished toy has this satisfying little shake to it. The collar is three rows and looks like a million bucks. Every time I've made this, someone asked me if I bought it somewhere, and that never gets old.

I made this fox for the first time as a last-minute baby shower gift, and I will never forget the moment the mom-to-be pulled it out of the bag. That little sleepy face with the lacy collar — everyone in the room wanted to hold it. I've made her three times since then and I'm still not tired of it.
One thing I'd tell anyone tackling this pattern for the first time: don't skip the test fit before you sew anything. Hold the orange cap piece against the head, place the nose where it looks right, and just live with it for a minute before committing. The whole face composition — eyes, nose, that calm little expression — depends on getting the placement right before a single stitch of assembly goes in.
For color variations, the classic orange and beige is obviously the most fox-like, but I've seen makers do this in dusty rose and cream for a more fantasy feel, or deep teal and ivory for something unexpected. The construction works with any two contrasting colors, so honestly the world is your woodland creature.
The collar is three rows and it looks genuinely impressive when it's done. Row 2 is the only one that requires any attention — that sk1 repeat is what creates the little arched spaces that Row 3 fills with fans of dc stitches. If you've ever made a simple shell stitch border, this is the same energy. Don't be intimidated by how it reads on the page.
And that rattle hidden inside the head — that detail is just *chef's kiss*. Babies love the sound, and you'd never know from looking at her that there's anything inside. Pure magic.
This little fox is the kind of project that makes you excited to pick up your hook. She's compact, charming, and comes together faster than you'd expect — with that dreamy face and russet-and-cream color combo that just works so well in cotton. You'll crochet a stuffed rattle head, a two-tone fox cap piece, tiny ears, a little muzzle, and a sweet lacy collar — all coming together on a natural wooden teething ring. Whether you're making it as a baby shower gift or just because you saw it and couldn't not make it, this one is going to be a favorite in your finished-objects collection.
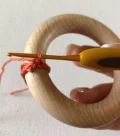
The stitch count for working around the ring depends on the size of your wooden ring and your yarn thickness. For a ring of approximately 60–70mm, ch10 using the 2.5mm hook, then switch to the 2mm hook to work around the ring itself.
Join the chain to the ring with a sl st, then sc in each st around the ring. The first round is the trickiest — keep your tension firm. If the stitches slide around on the wood, switch to a smaller hook or rip back and try with one fewer ch.
After the first round, cont working in a continuous spiral — sc in each st around, keeping the fabric snug against the wood. Work until half, or just under half, of the ring is covered. End with sl st. Both the starting and finishing yarn ends should sit on the inside of the ring. Thread the end through the final round to cinch the fabric against the wood, then pass it through the fabric on the inside to secure.
If the spiral method feels too fiddly, you can make a flat rectangle instead. For a 60–70mm ring, ch20 and work sc flat for 9 rows. When the rectangle is finished, fold it over the ring and sew the edges together so the fabric sits tightly against the wood, with the seam hidden on the inside. Weave in all ends with a tapestry needle.
Start with a magic ring, work 6 sc into the ring. Pull tight to close. (6 sts)
(inc) * 6 times. (12 sts)
(inc, sc in next st) * 6 times. (18 sts)
(inc, sc in next 2 sts) * 6 times. (24 sts)
(inc, sc in next 3 sts) * 6 times. (30 sts)
(inc, sc in next 4 sts) * 6 times. (36 sts)
(inc, sc in next 5 sts) * 6 times. (42 sts)
(inc, sc in next 6 sts) * 6 times. (48 sts)
sc in every st around. (48 sts)
sc in every st around. (48 sts)
sc in every st around. (48 sts)
sc in every st around. (48 sts)
sc in every st around. (48 sts)
sc in every st around. (48 sts)
sc in every st around. (48 sts)
(dec, sc in next 6 sts) * 6 times. (42 sts)
(dec, sc in next 5 sts) * 6 times. (36 sts)
(dec, sc in next 4 sts) * 6 times. (30 sts)
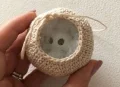
(dec, sc in next 3 sts) * 6 times. (24 sts) — At this point, fill the head with stuffing and drop the rattle insert inside before continuing.
(dec, sc in next 2 sts) * 6 times. (18 sts) — Continue packing the head firmly; tweezers can help reach the center.
(dec, sc in next st) * 6 times. (12 sts)
(dec) * 6 times. (6 sts) — Close the remaining 6 sts using a tapestry needle. Leave a long yarn tail of approximately 18–20 inches (45–50cm) for attaching the head to the wooden ring later.
Start with a magic ring, work 6 sc into the ring. (6 sts)
(inc) * 6 times. (12 sts)
(inc, sc in next st) * 6 times. (18 sts)
(inc, sc in next 2 sts) * 6 times. (24 sts)
(inc, sc in next 3 sts) * 6 times. (30 sts)
(inc, sc in next 4 sts) * 6 times. (36 sts)
(inc, sc in next 5 sts) * 6 times. (42 sts)
(inc, sc in next 6 sts) * 6 times. (48 sts)
sc in every st around. (48 sts)
sc in every st around. (48 sts)
sc in every st around. (48 sts)
sc in every st around. (48 sts)
sc in every st around. (48 sts)
(dec, sc in next 6 sts) * 6 times. (42 sts)
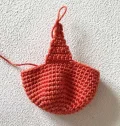
sc in every st around. (42 sts) — After this round, turn the piece and begin working flat.
ch1, sc in next 6 sts, turn.
ch1, sc in next 6 sts, turn.
Starting from the 2nd st from the hook, sc in next 5 sts, turn.
Starting from the 2nd st from the hook, sc in next 4 sts, turn.
ch1, sc in next 4 sts, turn.
Starting from the 2nd st from the hook, sc in next 3 sts, turn.
Starting from the 2nd st from the hook, sc in next 2 sts, turn.
ch1, sc in next 2 sts, turn.
ch1, sc in next 2 sts, turn.
ch1, sc in next 2 sts — do not turn. Then sc in every remaining st around the entire edge of the upper head piece to finish it. End with sl st in the next st and fasten off, leaving a long tail of approximately 25–27 inches (65–70cm) for sewing this piece to the head.
Start with a magic ring, work 5 sc into the ring. (5 sts)
(inc) * 5 times. (10 sts)
sc in every st around. (10 sts)
sc in every st around. (10 sts)
sc in every st around. (10 sts) — End with sl st, fasten off leaving a tail for sewing. Stuff the nose firmly before attaching.
For the nose tip: using CC1 (brown) or black yarn, work 6 sc into a magic ring, fasten off. Either sew this small circle onto the tip of the muzzle, or simply embroider the nose tip directly onto the muzzle using brown or black yarn.
Using brown yarn, start with a magic ring and work 6 sc into it. (6 sts)
sc in every st around. (6 sts)
(inc, sc in next 2 sts) * 2 times. (8 sts)
Switch to CC (orange) yarn and continue.
(inc, sc in next st) * 4 times. (12 sts)
(inc, sc in next 5 sts) * 2 times. (14 sts)
(inc, sc in next 6 sts) * 2 times. (16 sts)
sc in every st around. (16 sts) — End with sl st, fasten off leaving a long tail for sewing to the head. Using MC (beige) yarn, embroider a small triangle shape on the front of the ear. Repeat all steps for the second ear.
Using MC yarn, ch22.
sc in the 2nd st from the hook, then sc in each of the next 20 sts. Turn. (21 sts)
ch4, dc in the 1st st, [sk1, dc in next st, ch1, dc in the same st] 10 times. Turn.
ch2, 2 dc in the next ch space, sc in next st, [5 dc in next ch space, sc in next st] 10 times, 3 dc in the last post. The collar is finished — sew it around the fox's neck where the head meets the wooden ring.
There's something really special about making a toy that a baby will actually hold and shake and chew on — something that's safe, natural, and completely handmade with care. This little fox has all of that going for her. 🧶 She's made with cotton yarn against a real wooden ring, stuffed with a rattle that delights tiny hands, and finished with a lacy collar that makes her look like the fanciest fox in the forest. ✨ Whether you're gifting her at a baby shower or keeping her for your own little one, she's the kind of project that feels meaningful to make. I hope you enjoy every round of her! 🧵
You can, but the finished head will be noticeably larger — likely 30–40% bigger — which may not fit properly over the specified 60–70mm wooden ring. If you go up in yarn weight, you'll also need to increase your ring size accordingly and recheck how the head sits on the wood before sewing it down.
The pattern calls for a rattle approximately 24–30mm (about 1 inch) in diameter. You want it small enough to fit easily through the head opening before Round 20, but large enough that it rattles audibly inside the finished, stuffed head. Baby-safe rattle inserts sold for toy making work perfectly.
Before sewing, spend time pinning the upper piece in place and looking at the fox from the front, back, and both sides. The pointed top of the cap should sit centered over the crown of the head. The long sewing tail gives you plenty of yarn to take your time — don't rush the attachment.
The pattern uses embroidered eyes rather than safety eyes, which is great for very young babies. Make sure your yarn ends are woven in very securely and that you use a beech wood ring free of splinters or finishes. Always supervise young children with handmade toys and ensure all pieces, especially the collar, are tightly attached.
Option 2 (the rectangle sewn around the ring) is much more beginner-friendly. Crocheting directly around the ring in a spiral (Option 1) takes practice to keep even tension, and the first round especially can feel fiddly. The rectangle method gives you the same covered result without the frustration.
