🧶 Beautiful ✨ Detailed 💝 Adorable

Sleepy Mouse in a Teacup Amigurumi Pattern

Sleepy Mouse in a Teacup Amigurumi Pattern
3.9★Rating
5-7 HoursTime Needed
3.7KMade This
✂️

Intermediate Level

Ideal for those with basic crocheting experience, featuring slightly more advanced stitches and techniques to expand your skills.

⏱️

Weekend Treat

Takes 5-7 hours, making it an enjoyable project to finish over a couple of days.

🐰

Whimsical Buddy

Playful characters full of personality, designed to spark imagination and become cherished playtime favorites.

About This Sleepy Mouse in a Teacup Amigurumi Pattern

Sleepy Mouse in a Teacup Amigurumi Pattern crochet pattern - detailed view

Perfect for the kind of crafter who loves tiny details and storytelling. This little mouse makes an incredible Christmas Eve gift for children to find before they head to bed.

Why You'll Love This Sleepy Mouse in a Teacup Amigurumi Pattern

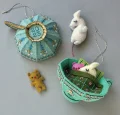
I honestly obsessed over getting the cup structure just right so it doesn't flop over. Seeing all the pieces come together—the tiny pillow, the mouse's little ears, and that teeny teddy—is just so satisfying for any amigurumi fan.

Sleepy Mouse in a Teacup Amigurumi Pattern step 1 Sleepy Mouse in a Teacup Amigurumi Pattern step 2 Sleepy Mouse in a Teacup Amigurumi Pattern step 3 Sleepy Mouse in a Teacup Amigurumi Pattern step 4

Switch Things Up

I’ve always felt that the best ornaments are the ones that feel like they have a little secret. When I was designing this crochet version of the sleepy mouse, I spent way too much time making sure the quilt felt 'tuck-able.' There's just something so nostalgic about miniature things, isn't there? I remember my grandmother having these tiny dioramas, and that’s exactly the vibe I wanted here.

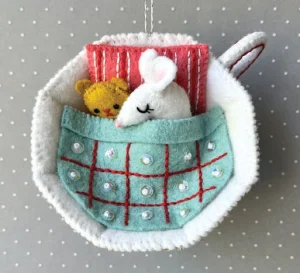
If you want to spice things up, try using a variegated yarn for the quilt to give it a scrappy, vintage look without having to change colors every row. And for the teacup, don't feel limited to white! A dusty rose or a mint green with some gold embroidery would look absolutely stunning. I actually made one in a deep navy blue with silver 'stars' (beads) and it looked like a little midnight dream.

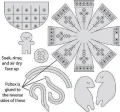
One quick tip: when you're sewing the lining into the cup, try to align the 'seams' (where your rounds started) so they stay hidden in the back near the handle. It’s a tiny detail, but it makes the finished piece look so professional!

Common Mistakes & How to Fix Them

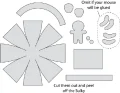
✗ If your inner cup is the same size as the outer cup, it will bunch up inside; make sure to use a slightly tighter tension or a smaller hook for the lining.✗ Attaching the handle too high on the rim can make the cup tip when it's hanging, so aim for the panel just below the top edge.✗ Don't overstuff the mouse's snout or it will lose that delicate, sleepy profile we're going for—keep the filling light in the very tip.✗ When working the quilt grid, if your surface crochet is too tight, the fabric will curl like a potato chip—keep those slip stitches nice and loose.

Sleepy Mouse in a Teacup Amigurumi Pattern

There is something so magical about the 'Twas the Night Before Christmas' poem, and I wanted to bring that quiet, cozy moment to your crochet hook. This project isn't just a toy; it's a little scene you can tuck away on a bookshelf or hang from your tree. You'll love seeing the tiny mouse actually fit inside the cup under his own little quilt!

Intermediate 5-7 Hours

Materials Needed for Sleepy Mouse in a Teacup Amigurumi Pattern

— Main Fabric

  • 01
    DK weight cotton or wool blend yarn in a soft cream or white for the teacup
  • 02
    Small amounts of DK yarn in light grey or tan for the mouse
  • 03
    Scraps of golden yellow or brown for the tiny teddy bear
  • 04
    Contrast colors in red, blue, or green for the quilt and embroidery details
  • 05
    A tiny bit of pink yarn for the nose and inner ear accents

— Tools Required

  • 01
    2.5mm crochet hook to keep your stitches nice and tight
  • 02
    Small sharp embroidery needle for the facial details
  • 03
    Pair of 5mm safety eyes or black embroidery floss for a sleepy look
  • 04
    Polyester fiberfill stuffing
  • 05
    Two 6-inch cotton pipe cleaners to give the cup handle and mouse arms some shape
  • 06
    Stitch markers to keep track of your continuous rounds
  • 07
    A few 4mm sequins and seed beads for the teacup 'china' decorations

Progress Tracker

0% Complete

— 1. Outer Teacup :

Round 1 :

Start with your main cup color and make 8 sc into a mr (8)

Round 2 :

8 x inc (16)

Round 3 :

8 x (1 sc, inc) (24)

Round 4 :

8 x (2 sc, inc) (32)

Round 5 :

8 x (3 sc, inc) (40)

Round 6 :

8 x (4 sc, inc) (48)

Round 7 :

Working in the blo for this round only, 48 sc (48)

Round 8 :

8 x (5 sc, inc) (56)

Round 9 :

56 sc around (56)

Round 10 :

8 x (6 sc, inc) (64)

Round 11-16 :

64 sc around for these six rounds (64)

Round 17 :

8 x (7 sc, inc) (72)

Round 18 :

72 sc around (72)

Info :

Fasten off and leave a very long tail for joining the lining later.

— 2. Inner Cup Lining :

Round 1 :

Using your lining color, make 8 sc into a mr (8)

Round 2 :

8 x inc (16)

Round 3 :

8 x (1 sc, inc) (24)

Round 4 :

8 x (2 sc, inc) (32)

Round 5 :

8 x (3 sc, inc) (40)

Round 6 :

8 x (4 sc, inc) (48)

Round 7 :

Working in the blo, 48 sc (48)

Round 8 :

8 x (5 sc, inc) (56)

Round 9-14 :

56 sc around for these six rounds (56)

Round 15 :

8 x (6 sc, inc) (64)

Round 16 :

64 sc around (64)

Info :

Fasten off. This piece should be slightly shorter than the outer cup so it sits snugly inside.

— 3. Cup Foot :

Round 1 :

ch 32, join with a sl st to form a ring (32)

Round 2 :

32 sc around (32)

Round 3 :

Working in the flo, 8 x (3 sc, inc) (40)

Round 4 :

40 sc around (40)

Info :

Fasten off and leave a tail to sew to the base of the outer cup.

— 4. Teacup Handle :

Round 1 :

Make 6 sc into a mr (6)

Round 2-25 :

6 sc around until the tube is about 4 inches long (6)

Info :

Insert a pipe cleaner into the tube before fastening off. This allows you to curve the handle into a fancy 'C' shape.

— 5. Sleepy Mouse :

Round 1 :

Starting at the nose with grey yarn, 6 sc in a mr (6)

Round 2 :

6 sc around (6)

Round 3 :

3 x (1 sc, inc) (9)

Round 4 :

9 sc around (9)

Round 5 :

3 x (2 sc, inc) (12)

Round 6 :

6 x (1 sc, inc) (18)

Round 7 :

18 sc around (18)

Round 8 :

6 x (2 sc, inc) (24)

Round 9-13 :

24 sc around for these five rounds (24)

Round 14 :

6 x (2 sc, dec) (18)

Round 15 :

Stuff the head and body firmly at this point (18)

Round 16 :

6 x (1 sc, dec) (12)

Round 17 :

6 x dec (6)

Info :

Close the hole and weave in your ends.

— 6. Mouse Ears & Arms :

Ear Round 1 :

Make 6 sc into a mr, do not join (6)

Ear Round 2 :

ch 1, turn, 6 x inc across (12)

Arm Round 1 :

Make 5 sc into a mr (5)

Arm Round 2-6 :

5 sc around (5)

Info :

Make two ears and two arms. Leave tails for sewing.

— 7. Teeny Teddy :

Round 1 :

With brown yarn, 6 sc in a mr (6)

Round 2 :

6 x inc (12)

Round 3-4 :

12 sc around (12)

Round 5 :

6 x dec (6)

Round 6 :

6 x inc (12)

Round 7-8 :

12 sc around (12)

Round 9 :

6 x dec (6)

Info :

Fasten off. Add tiny stitches for ears and limbs directly onto the body.

— 8. Bedding (Pillow & Quilt) :

Pillow Row 1 :

ch 11, sc in second ch from hook and across (10)

Pillow Row 2-10 :

ch 1, turn, 10 sc across (10)

Info :

Fold in half and sc around the edges, stuffing lightly before closing.

Quilt Row 1 :

ch 21, sc in second ch from hook and across (20)

Quilt Row 2-20 :

ch 1, turn, 20 sc across (20)

Info :

Use a contrast color to surface sl st a grid pattern onto the quilt square.

Assembly Instructions

  • Place the inner cup lining inside the outer cup and whipstitch the top rims together using the long tail you left earlier.
  • Center the foot on the bottom of the cup and sew it securely so the cup can stand upright without wobbling.
  • Bend your handle into shape and attach the top end just below the rim and the bottom end near the base of the cup.
  • Sew the mouse's ears to the top of the head at Round 7 and attach the arms to the sides of the body at Round 10.
  • Embroider two tiny 'V' shapes for sleepy eyes and a small pink stitch for the nose on the mouse's face.
  • Tuck the pillow into the cup first, then slide the mouse in, and finally drape the quilt over him, securing with a few hidden stitches if you want it permanent.
  • Thread a 9-inch piece of metallic floss through the rim of the cup to create a hanging loop for your tree.

Important Notes

  • 💡If you want the mouse to be removable, don't sew the quilt down all the way around—just tack it on one side.
  • 💡Using a cotton pipe cleaner inside the handle is much better than standard craft wire because the fuzz helps it grab the yarn.
  • 💡For the most realistic teacup look, try to keep your stitches as tight as possible to create a stiff, porcelain-like fabric.
  • 💡You can add a small circle of plastic canvas or cardboard between the inner and outer cup bottoms to make it extra sturdy.
  • 💡If the mouse feels too small for the cup, you can add a few extra rounds to his middle body section.

I hope this little sleepy mouse brings a bit of quiet peace to your crafting corner! There's something so special about making a project that tells a story, and I can just imagine this little guy being passed down through your family for years to come. Don't forget to take a photo of your finished teacup and tag me—I'd love to see the colors you chose for your tiny quilt! Happy stitching, and may your holiday season be as cozy as a mouse in a teacup. 🧶✨🐭

You ask,

we answer.

FAQs

Can I use safety eyes instead of embroidery for the mouse?

You definitely can! 5mm safety eyes work well, but keep in mind that embroidery allows you to create that specific 'sleepy' closed-eye look that makes this pattern so charming.

My teacup is leaning to one side. How do I fix it?

This usually happens if the foot isn't perfectly centered. Try removing it and pinning it in place first, then set the cup on a flat surface to check the balance before you sew it down permanently.

The inner lining is too big for my outer cup. What did I do wrong?

Crochet tension can vary! If it's too big, try working the lining with a hook that is 0.5mm smaller than the one you used for the outer cup to ensure it nests perfectly.

Is the pipe cleaner necessary for the handle?

It's highly recommended! Without it, the handle will likely go limp and lose that elegant curved shape. If you're making this for a very small child, you can omit it and stuff the handle firmly instead.