🧢 Beautiful ✨ Detailed πŸ’ Adorable

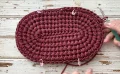
Slice Crochet Handbag Pattern

Slice Crochet Handbag Pattern
4.4β˜…Rating
5-7 HoursTime Needed
4.0KMade This
βœ‚οΈ

Intermediate Level

Ideal for those with basic crocheting experience, featuring slightly more advanced stitches and techniques to expand your skills.

⏱️

Weekend Treat

Takes 5-7 hours, making it an enjoyable project to finish over a couple of days.

✨

Stylish Touch

An elegant detail to elevate any look, combining traditional techniques with contemporary design sensibilities.

About This Slice Crochet Handbag Pattern

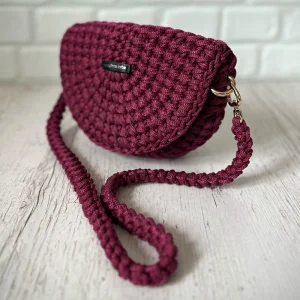
Slice Crochet Handbag Pattern crochet pattern - detailed view

This design is the ultimate accessory for someone who loves minimalist chic. It looks stunning in neutral tones for everyday use or in a bold jewel tone to act as a statement piece for a night out.

Why You'll Love This Slice Crochet Handbag Pattern

I honestly adore how the diagonal single crochet technique transforms the look of the fabric. It removes that typical 'crochet' look and gives it a woven, high-end texture. Plus, working with thick cord is so satisfying because the progress is incredibly visible with every single row you finish.

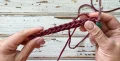
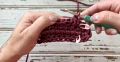
Slice Crochet Handbag Pattern step 1 Slice Crochet Handbag Pattern step 2 Slice Crochet Handbag Pattern step 3 Slice Crochet Handbag Pattern step 4

Switch Things Up

I have always been obsessed with the way different materials can completely change the vibe of a crochet project. When I first picked up a spool of 4mm polyester cord, I knew it needed to be something structured, something with a bit of "architectural" flair. That is how the Slice Handbag was born! The secret to that gorgeous, dense texture is the alternating rows of slip stitches and single crochets.

One thing I really want to emphasize before you start is your tension. If you are a naturally tight crocheter, you might find those slip stitch rows a bit of a challenge. Try to keep them loose and airyβ€”I promise the cord will provide all the structure you need. Also, do not be intimidated by the "diagonal" single crochet. Once you get the rhythm of inserting the hook under the "leg" of the stitch, it becomes second nature and creates such a polished look.

I personally love making this in deep jewel tones like burgundy or forest green, but a crisp cream or sand color would look incredible for a summer wedding. It is the perfect size for your phone, keys, and a favorite lipstick. I can't wait to see the colors you choose for yours!

Common Mistakes & How to Fix Them

βœ— Working your SlSt rows too tightly will make it nearly impossible to insert your hook for the following SC row; keep your tension relaxed and fluid.βœ— Forgetting to rearrange your markers in the odd-numbered rows can lead to a lopsided 'slice' shape, as these markers guide your increases and decreases.βœ— If you skip the diagonal stitch method for the SC rows, the signature textured 'ribs' of the bag will lose their definition and look flat.βœ— Sewing the magnetic button through all layers of the fabric will cause the stitches to show on the exterior; ensure you only catch the inner loops of the cord.

Slice Crochet Handbag Pattern

If you have been looking for a project that blends modern style with a truly professional finish, you are going to love making this handbag. It is all about that gorgeous, structured texture that only a high-quality macrame cord can provide. You will explore unique stitch placements that create a fabric so sturdy, it feels more like a boutique find than a DIY project. It is the kind of accessory that makes people stop and ask, "Where did you get that?" and you get the joy of saying you made it yourself.

Intermediate 5-7 Hours

Materials Needed for Slice Crochet Handbag Pattern

β€” Main Fabric

  • 01
    Approximately 165 meters (185 yards) of 4mm propylene or polyester macrame cord
  • 02
    The sample shown uses two skeins of PP Macrame Medium cord in a rich burgundy shade

β€” Tools Required

  • 01
    5.5 mm crochet hook
  • 02
    One 18 mm magnetic sewing button
  • 03
    Two 20 mm snap hook rings
  • 04
    Two 30 mm snap hooks for the strap
  • 05
    4 stitch markers
  • 06
    Strong sewing needle and matching thread
  • 07
    Scissors
  • 08
    Lighter for sealing the cord ends

Progress Tracker

0% Complete

β€” 1. The Oval Base :

Info :

Start by leaving a tail of about 80 inches (2 meters) to use for closing the rows later. Begin with a slip knot.

Foundation :

Work 13 CH using two strands of cord, keeping your loops loose and even.

Row 1 :

Starting in the 2nd loop from your hook, work 11 SC. In the next stitch, work 3 SC. Rotate and work 11 SC along the opposite side of the chain. Work the final SC using the long tail. Pull the tail through to close the row seamlessly (26).

Info :

When working SC in this pattern, pull your working loop up to a height of about 20mm to maintain the correct gauge and texture.

Info :

Identify the 10 stitches between the ends. Place 4 markers in the 1st and 10th stitches on the front loops only. You will move these markers up into the corresponding loops of every odd-numbered row.

Row 2 :

Insert your hook into the 2nd loop directly behind the marker. Work 25 SlSt into the BLO around the oval. Close the row using the long tail (26).

Info :

All SC rows from here on should be worked as diagonal stitches. Insert your hook under the right 'leg' from the front and between the 'legs' from the back.

Row 3 :

Insert hook in the 2nd loop to the left of the marker. Work 8 SC, 3 Inc, 10 SC, 3 Inc, 1 SC. Finish the last stitch with the tail and close (32).

Row 4 :

Insert hook in the 3rd loop to the left of the marker. Work 31 SlSt into the BLO. Close the row with the tail (32).

Row 5 :

Insert hook in the 5th loop to the left of the marker. Work 5 SC, (SC, Inc) 3 times, 10 SC, (SC, Inc) 3 times, 4 SC. Close the row with the tail (38).

Row 6 :

Insert hook in the 5th loop to the left of the marker. Work 37 SlSt into the BLO. Close the row with the tail (38).

Row 7 :

Insert hook in the 5th loop to the left of the marker. Work 5 SC, (2 SC, Inc) 3 times, 10 SC, (2 SC, Inc) 3 times, 4 SC. Close the row with the tail (44).

Row 8 :

Insert hook in the 5th loop to the left of the marker. Work 43 SlSt into the BLO. Close the row with the tail (44).

Row 9 :

Insert hook in the 5th loop to the left of the marker. Work 5 SC, (Inc, 3 SC) 3 times, 10 SC, (Inc, 3 SC) 3 times, 4 SC. Close the row with the tail (50).

Row 10 :

Insert hook in the 5th loop to the left of the marker. Work 49 SlSt into the BLO. Close the row with the tail (50).

Row 11 :

Insert hook in the 5th loop to the left of the marker. Work 5 SC, (4 SC, Inc) 3 times, 10 SC, (4 SC, Inc) 3 times, 4 SC. Close the row with the tail (56).

Row 12 :

Insert hook in the 5th loop to the left of the marker. Work 55 SlSt into the BLO. Close the row with the tail (56).

Row 13 :

Insert hook in the 5th loop to the left of the marker. Work 5 SC, 2 SC, Inc, (5 SC, Inc) 2 times, 3 SC, 10 SC, 2 SC, Inc, (5 SC, Inc) 2 times, 3 SC, 4 SC. Close the row with the tail (62).

Row 14 :

Insert hook in the 5th loop to the left of the marker. Work 61 SlSt into the BLO. Close the row with the tail (62).

Row 15 :

Insert hook in the 5th loop to the left of the marker. Work 5 SC, (6 SC, Inc) 3 times, 10 SC, (6 SC, Inc) 3 times, 4 SC. Close the row with the tail (68).

β€” 2. The Side Part :

Info :

Position the oval with the seam facing upward. Take off the two markers on the left side and shift the right-side markers 5 stitches over to the left.

Row 16 :

Place your hook in the marked stitch. Work 32 SlSt into the BLO until you reach the second marker.

Row 17 :

Work 32 SC, then 1 CH.

Info :

Secure the tail used for closing rows and carefully seal the end with a flame. Move markers to the 5th stitch from each side.

Row 18 :

Work 27 SlSt across the BLO until you hit the second marker.

Row 19 :

Work 22 SC until you reach the first marker, then 1 CH.

Info :

Add two more markers by counting 5 additional stitches inward from the current side markers.

Row 20 :

Work 17 SlSt across the BLO until you hit the third marker.

Row 21 :

Work 12 SC until you reach the second marker, then 1 CH.

Row 22 :

Work 17 SlSt across the BLO until you hit the final marker.

Row 23 :

Remove the 2nd and 3rd markers. Work 22 SC until you reach the 1st marker, then 1 CH.

Row 24 :

Remove the last marker. Work 27 SlSt across the BLO.

Row 25 :

Remove the 1st marker. Work 32 SC, then 1 CH.

Row 26 :

Work 32 SlSt across the BLO.

β€” 3. The Front Part :

Info :

Place markers in the 4th stitches from each side. Move these markers up into the corresponding loops of every odd row.

Row 27 :

Work 4 SC, (6 SC, Dec) 3 times, 4 SC, then 1 CH (29).

Row 28 :

Work 29 SlSt across the BLO.

Row 29 :

Work 4 SC, 2 SC, Dec, (5 SC, Dec) 2 times, 3 SC, 4 SC, then 1 CH (26).

Row 30 :

Work 26 SlSt across the BLO.

Row 31 :

Work 4 SC, (4 SC, Dec) 3 times, 4 SC, then 1 CH (23).

Row 32 :

Work 23 SlSt across the BLO.

Row 33 :

Work 4 SC, (Dec, 3 SC) 3 times, 4 SC, then 1 CH (20).

Row 34 :

Work 20 SlSt across the BLO.

Row 35 :

Work 4 SC, (2 SC, Dec) 3 times, 4 SC, then 1 CH (17).

Row 36 :

Work 17 SlSt across the BLO.

Row 37 :

Work 4 SC, (SC, Dec) 3 times, 4 SC, then 1 CH (14).

Row 38 :

Work 14 SlSt across the BLO.

Row 39 :

Work 4 SC, 3 Dec, 4 SC, then 1 CH (11).

Row 40 :

Work 11 SlSt across the BLO.

Info :

Leave a 29-inch (75 cm) tail for joining. Cut the cord and pull the end through.

β€” 4. The i-Cord Handle :

Foundation :

Put your hook through the eyelet of a snap hook. Twist the cord over the hook, pull a loop through, work 1 CH, and pull tight.

Step 1 :

Work 2 SC directly through the snap hook eyelet. Turn the piece.

Step 2 :

Work 1 SC into the 2nd loop from the hook. Turn the work counter-clockwise.

Step 3 :

Insert hook under the two side loops, pull a loop through, and complete the stitch. Turn and repeat until the cord reaches 36 inches (90 cm).

Finishing :

Leave 2 loops on your hook and work them through the eyelet of the 2nd snap hook. Turn and work 2 SC through the middle of the cord and eyelet. Secure and seal the ends.

Assembly Instructions

  • Align the front panel with the body of the bag and use the long tail to join them. Work 5 stitches twice each, inserting your hook under the chain and slip-stitching into each SC of Row 39.
  • Fasten off the cord on the inside of the bag. Use a lighter to carefully melt and press the end to the fabric for a permanent bond.
  • Gently shape the bag with your hands to round out the sides and establish the half-moon curve.
  • Attach the snap hook rings to Row 19, positioning them precisely between the 1st and 2nd SC on each side of the bag.
  • Sew the lower half of the magnetic button just below the seam on the body. Ensure you make several passes through each hole for security.
  • Position the top half of the button on the flap. Sew it carefully so the needle only enters the back of the cord and never pierces through to the front of the bag.
  • Clip the finished i-cord handle onto the side rings to complete your accessory.

Important Notes

  • πŸ’‘When working with polyester or propylene cord, always use a lighter to seal the ends immediately after cutting to prevent fraying.
  • πŸ’‘The 'diagonal' single crochet is vital for the structure; if you find it difficult, practice on a small swatch first to master the hook placement.
  • πŸ’‘Your slip stitch rows define the bag's height and rigidity; keep them consistent and avoid pulling too tight, or the bag will warp.
  • πŸ’‘The 20mm loop height for SC is not a suggestionβ€”it is required to achieve the correct dimensions and the signature open-yet-sturdy texture.
  • πŸ’‘Always count your stitches after the decrease rows in the front part to ensure the flap tapers symmetrically.
  • πŸ’‘If your cord is very stiff, you may find a metal hook easier to work with than a plastic or ergonomic one.

There is something so satisfying about finishing a project that feels as sturdy and professional as this handbag. I hope you feel a huge sense of pride every time you snap that magnetic button shut. This pattern is meant to be a slow, enjoyable processβ€”savor those textured rows! If you run into any snags or just want to share a photo of your finished "slice," I would love to hear from you. Your creativity is what keeps this community so vibrant and inspiring. Now, go find the perfect outfit to pair with your brand-new, handmade masterpiece! 🧢✨

You ask,

we answer.

FAQs

Can I use cotton cord instead of polyester macrame cord?

You can, but cotton has much more 'give' and less natural structure. Your bag might turn out slightly softer and may require a lining to keep its shape over time compared to the polyester version.

My bag looks smaller than the dimensions in the pattern. What happened?

This is usually due to the loop height. Ensure you are pulling your SC loops up to the full 20mm height. If they are shorter, the bag will be significantly more compact.

Is a lining necessary for this handbag?

Thanks to the dense alternating rows of slip stitches and the thickness of the 4mm cord, this bag is remarkably sturdy and opaque. Most crafters find it doesn't need a lining at all!

How do I clean the bag if it gets dirty?

Since it is made of polyester cord, you can spot clean it with a damp cloth and mild soap. Avoid machine washing, as the hardware and magnetic button could be damaged.

Can I make the strap longer for a crossbody fit?

Absolutely! The i-cord is worked until you reach your desired length. Just continue the repeating steps until it's long enough for your height, then attach the second hook.