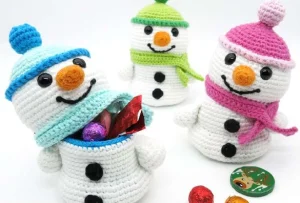
This little guy is such a joy to whip up! He's not just a cute winter decoration; he actually doubles as a secret stash for your favorite holiday treats. You'll love how the head pops off to reveal a hidden compartment inside the body. It's the perfect way to add a handmade touch to your seasonal decor while keeping those chocolate truffles tucked away from prying eyes.
Progress Tracker
0% Complete
— 1. Arms (Make 2) :
Round 1 :
Start with a magic ring containing 6 sc (6)
Round 2 :
Work 2sc in every st around (12)
Round 3 :
*2sc in next st, sc in next st* repeat around (18)
Round 4 :
sc in each st around (18)
Round 5 :
sc in each st around (18)
Round 6 :
*inv_dec, sc in next st* repeat around (12)
Round 7 :
*inv_dec, sc in next 4 st* repeat twice (10)
Info :
Lightly stuff the arm.
Round 8 :
Flatten the opening and sc through both layers for 4 stitch-pairs to close (4)
— 2. Optional Buttons (Make 2) :
Round 1 :
Create a magic ring with 6 sc. Fasten off leaving a long tail for sewing (6)
— 3. Nose :
Round 1 :
Start with a magic ring of 6 sc (6)
Round 2 :
sc in every st around (6)
Round 3 :
*2sc in next st, sc in next st* repeat 3 times (9)
Round 4 :
*2sc in next st, sc in next 2 st* repeat 3 times (12)
Round 5 :
Mark the 2nd stitch of this round. sc in every st around, finishing with a sl st in the final stitch (12)
— 4. Body :
Round 1 :
Using contrast color, start with a magic ring of 8 sc (8)
Round 2 :
Work 2sc in every st around (16)
Round 3 :
*2sc in next st, sc in next st* repeat around (24)
Info :
The increase pattern changes here; you will now add 6 stitches per round.
Round 4 :
*2sc in next st, sc in next 3 st* repeat around (30)
Round 5 :
*2sc in next st, sc in next 4 st* repeat around (36)
Round 6 :
*2sc in next st, sc in next 5 st* repeat around (42)
Round 7 :
*2sc in next st, sc in next 6 st* repeat around (48)
Round 8 :
*2sc in next st, sc in next 7 st* repeat around (54)
Round 9 :
*2sc in next st, sc in next 17 st* repeat 3 times (57)
Round 10 :
sc in every st around (57)
Round 11 :
sc in every st around (57)
Round 12 :
sc in every st around (57)
Round 13 :
*inv_dec, sc in next 17 st* repeat 3 times (54)
Round 14 :
*inv_dec, sc in next 7 st* repeat 6 times (48)
Round 15 :
*inv_dec, sc in next 4 st* repeat 8 times (40)
Round 16 :
Working in back loops only, sc in each st around (40)
Round 17 :
sc in every st around (40)
Round 18 :
sc in every st around (40)
Round 19 :
sc in every st around (40)
Round 20 :
sc in every st around (40)
Round 21 :
sc in every st around (40)
Round 22 :
*2sc in next st, sc in next 9 st* repeat 4 times, changing to white yarn on the final stitch (44)
Round 23 :
Working in back loops only, sc in every st around (44)
Round 24 :
sc in every st around (44)
Round 25 :
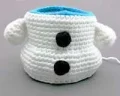
sc in next 9 st. Place first arm and sc through both arm and body for 4 st. sc in next 18 body st. Place second arm and sc through both arm and body for 4 st. sc in next 9 body st (44)
Round 26 :
sc in every st around (44)
Round 27 :
sc in every st around (44)
Round 28 :
sc in every st around (44)
Info :
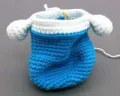
Now add the decorative edge. Connect contrast color to a front loop on the back where you changed colors. sl st in every front loop around (44). Fasten off.
Round 29 :
*inv_dec, sc in next 20 st* repeat twice (42)
Round 30 :
sc in every st around (42)
Round 31 :
Working in front loops only, *2sc in next st, sc in next 6 st* repeat around (48)
Round 32 :
sc in next 4 st, *2sc in next st, sc in next 7 st* repeat 5 times. 2sc in next st, sc in next 3 st (54)
Round 33 :
*2sc in next st, sc in next 8 st* repeat around (60)
Round 34 :
sc in every st around (60)
Round 35 :
sc in every st around (60)
Round 36 :
sc in every st around (60)
Info :
Push the contrast color lining to the inside. Sew your buttons to the front now.
Round 37 :
*inv_dec, sc in next 8 st* repeat around (54)
Round 38 :
sc in next 4 st, *inv_dec, sc in next 7 st* repeat 5 times. inv_dec, sc in next 3 st (48)
Round 39 :
*inv_dec, sc in next 6 st* repeat around (42)
Round 40 :
sc in next 3 st, *inv_dec, sc in next 5 st* repeat 5 times. inv_dec, sc in next 2 st (36)
Round 41 :
Working in back loops only, *dec, sc in next 4 st* repeat around (30)
Round 42 :
*inv_dec, sc in next 3 st* repeat around (24)
Round 43 :
*inv_dec, sc in next st* repeat 8 times (16)
Round 44 :
inv_dec around (8)
— 5. Head :
Round 1 :
Using white yarn, start with a magic ring of 6 sc (6)
Round 2 :
Work 2sc in every st around (12)
Round 3 :
*2sc in next st, sc in next st* repeat around (18)
Round 4 :
*2sc in next st, sc in next 2 st* repeat around (24)
Info :
Sequence change: you will now add 8 stitches per round.
Round 5 :
*2sc in next st, sc in next 2 st* repeat 8 times (32)
Round 6 :
*2sc in next st, sc in next 3 st* repeat 8 times (40)
Round 7 :
sc in every st around (40)
Round 8 :
sc in every st around (40)
Round 9 :
sc in every st around (40)
Round 10 :
sc in every st around (40)
Round 11 :
sc in every st around (40)
Round 12 :
sc in every st around (40)
Round 13 :
Working in back loops only, *2sc in next st, sc in next 9 st* repeat 4 times (44)
Round 14 :
sc in every st around (44)
Round 15 :
Working in back loops only, *2sc in next st, sc in next 10 st* repeat 4 times. Mark stitches #26 and #28 for the mouth, and mark front loop #17 for the scarf (48)
Round 16 :
*2sc in next st, sc in next 7 st* repeat around (54)
Round 17 :
sc in next 5 st, *2sc in next st, sc in next 8 st* repeat 5 times. 2sc in next st, sc in next 3 st. Mark stitches #30 and #38 for the mouth (60)
Round 18 :
sc in next 32 st. Crochet the nose on by working through the back loops of the nose and the head stitches for 3 stitch-pairs. sc in remaining 25 st (60)
Round 19 :
sc in every st around (60)
Round 20 :
sc in every st around (60)
Round 21 :
sc in next 32 st. Stuff the nose. Skip 3 stitches on the nose and crochet the top part on using 3 stitch-pairs through back loops. sc in remaining 25 st. Mark stitches #30 and #39 for the eyes (60)
Info :
Embroider the mouth using your markers. Insert the safety eyes into the marked spots and secure.
Round 22 :
*inv_dec, sc in next 8 st* repeat around (54)
Round 23 :
sc in next 3 st, *inv_dec, sc in next 7 st* repeat 5 times. inv_dec, sc in next 4 st (48)
Round 24 :
*inv_dec, sc in next 6 st* repeat around, changing to hat color on the last stitch (42)
Round 25 :
Working in back loops only, *2sc in next st, sc in next 6 st* repeat around (48)
Round 26 :
sc in every st around (48)
Info :
Add the hat brim: Connect contrast color to a front loop from round 25. *sc in next st, ch 1* repeat all the way around. Fasten off. Lightly stuff the head.
Round 27 :
*inv_dec, sc in next 6 st* repeat around (42)
Round 28 :
sc in next 3 st, *inv_dec, sc in next 5 st* repeat 5 times. inv_dec, sc in next 2 st (36)
Round 29 :
*inv_dec, sc in next 4 st* repeat around (30)
Round 30 :
sc in next 2 st, *inv_dec, sc in next 3 st* repeat 5 times. inv_dec, sc in next st (24)
Round 31 :
*inv_dec, sc in next 2 st* repeat around (18)
Round 32 :
*inv_dec, sc in next st* repeat around (12)
Round 33 :
inv_dec around, changing to pompom color on the last stitch (6)
Round 34 :
Working in front loops only, *2sc in next st* repeat around (12)
Round 35 :
*2sc in next st, sc in next st* repeat around (18)
Round 36 :
sc in every st around (18)
Round 37 :
sc in every st around (18)
Round 38 :
*inv_dec, sc in next st* repeat around (12)
Round 39 :
inv_dec around (6)
— 6. Scarf :
Row 1 :
ch 64. ch 1 + turn, sc in next 10 st. Connect to the head by sc through next 44 scarf stitches and the marked front loops on the head. sc in final 10 scarf stitches (64)
Row 2 :
ch 1 + turn. sc in next 6 st, ch 4, skip 4 st to create a hole. *2sc in next st, sc in next 10 st* repeat 4 times. sc in final 10 st (68)
Row 3 :
ch 1 + turn. sc in every st across (68)
Row 4 :
ch 1 + turn. Working in back loops only, sl st in every st across. Fasten off (68)
I hope you have as much fun making this little frosty friend as I did! There's something so satisfying about finishing the scarf and seeing his whole personality come to life. Whether you keep him on your desk for a mid-day sugar boost or give him away as a heartfelt gift, he's sure to bring a smile to anyone's face. Don't forget to play around with different hat and scarf colors to make a whole family of snowmen! Happy hooking, and enjoy every stitch of your new winter companion! 🧶✨☃️