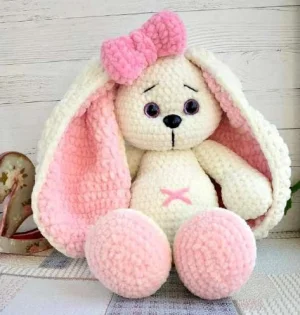
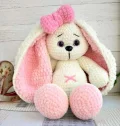
This sweet bunny is such a joy to make, especially because of those oversized, colorful ears that give her so much character. I've designed her to be super cuddly using plush yarn, making her the perfect companion for little ones or a standout piece for your shelf. You'll love seeing her personality come to life as you add the final touches to her face and belly.
Progress Tracker
0% Complete
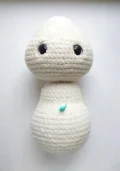
— 1. Body and Head :
Info :
Start with cream yarn. Stuff the body firmly as you progress through the rounds.
Round 3 :
[1 sc, inc] x6 (18)
Round 4 :
[2 sc, inc] x6 (24)
Round 5 :
[3 sc, inc] x6 (30)
Round 6 :
[4 sc, inc] x6 (36)
Round 8 :
[5 sc, inc] x6 (42)
Round 9 :
[6 sc, inc] x6 (48)
Round 17 :
[6 sc, dec] x6 (42)
Round 18 :
[5 sc, dec] x6 (36)
Round 19 :
3 sc, 6 x dec, 21 sc (30). Note: Place a marker between the 3rd and 4th decrease to mark the center of the belly for muzzle placement later.
Round 24 :
[3 sc, dec] x6 (24)
Info :
Now we begin the head. Ensure the neck is stuffed very firmly between Round 26 and 27 to prevent wobbling.
Round 28 :
[1 sc, inc] x12 (36)
Round 29 :
[5 sc, inc] x6 (42)
Round 30 :
[6 sc, inc] x6 (48)
Round 31 :
[7 sc, inc] x6 (54)
Round 32 :
[8 sc, inc] x6 (60)
Round 38 :
[8 sc, dec] x6 (54)
Round 39 :
[7 sc, dec] x6 (48)
Round 40 :
[6 sc, dec] x6 (42)
Round 42 :
[5 sc, dec] x6 (36)
Round 43 :
[4 sc, dec] x6 (30)
Round 45 :
[3 sc, dec] x6 (24)
Info :
Stuff the head tightly but leave enough room for the needle to pass through during the eye cinching step. Eyes should be placed around Rounds 35-36, roughly 7-8 stitches apart.
Round 47 :
[2 sc, dec] x6 (18)
Round 48 :
[1 sc, dec] x6 (12)
Info :
Cut the yarn and weave in your ends to close the head.
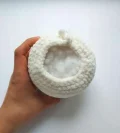
— 2. Legs (Make 2) :
Info :
Start with light pink yarn and stuff the legs as you go.
Row 1 :
7 ch, then starting in 2nd ch from hook: 5 sc, 3 sc in the final ch, rotate to work on other side of chain, 4 sc, inc (14)
Round 2 :
inc, 4 sc, 3 x inc, 4 sc, 2 x inc (20)
Round 3 :
1 sc, inc, 5 sc, inc, 3 sc, inc, 5 sc, inc, 2 sc (24)
Round 4 :
2 sc, inc, [5 sc, inc] x3, 3 sc (28)
Round 5 :
[1 sc, inc] x2, 5 sc, inc, 1 sc, inc, 3 sc, inc, 1 sc, inc, 5 sc, inc, 1 sc, inc, 2 sc (36)
Round 6 :
Switch to cream yarn. Working in BLO only: 36 sc (36)
Round 9 :
9 sc, dec, [1 sc, dec] x5, 8 sc, dec (29)
Round 10 :
8 sc, 2 x dec, 3 sc, 2 x dec, 8 sc, dec (24)
Round 11 :
8 sc, 4 x dec, 8 sc (20)
Round 12 :
6 sc, dec, 4 sc, dec, 6 sc (18)
Round 13 :
7 sc, 2 x dec, 7 sc (16)
Info :
Make 2 sc to reach the side, then flatten the top edge. Join with 4 sc through both layers. Fasten off and leave a long tail for sewing.
— 3. Arms (Make 2) :
Info :
Use cream yarn and stuff the arms lightly as you work.
Row 1 :
4 ch, then starting in 2nd ch from hook: 2 sc, 3 sc in the final ch, rotate to work on other side of chain, 1 sc, inc (8)
Round 2 :
inc, 1 sc, 3 x inc, 1 sc, 2 x inc (14)
Round 3 :
1 sc, inc, 3 sc, inc, [1 sc, inc] x2, 3 sc, inc (19)
Round 9 :
7 sc, dec, 1 sc, dec, 7 sc (17)
Round 10 :
4 sc, 2 x dec, 1 sc, 2 x dec, 4 sc (13)
Round 20 :
6 x dec, 1 sc (7)
Info :
Make 2 sc to reach the side, flatten the top, and join with 3 sc through both layers. Fasten off and leave a tail.
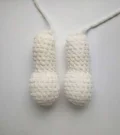
— 4. Ears (Make 4) :
Info :
Make 2 in light pink and 2 in cream. These are worked in turning rows using hdc, but sc is used for decreases.
Row 1 :
4 ch, starting in 2nd ch: 2 x inc, turn (4)
Row 2 :
2 ch, inc, 2 hdc, inc, turn (6)
Row 3 :
2 ch, [inc, 1 hdc] x3, turn (9)
Row 4 :
2 ch, [inc, 1 hdc] x4, inc, turn (14)
Row 5 :
2 ch, [inc, 2 hdc] x4, inc, 1 hdc, turn (19)
Row 6-10 :
19 hdc, turn (19)
Row 11 :
2 ch, [7 hdc, inc] x2, 3 hdc, turn (21)
Row 12 :
21 hdc, turn (21)
Row 13 :
2 ch, [7 hdc, dec] x2, 3 hdc, turn (19)
Row 14 :
2 ch, [6 hdc, dec] x2, 3 hdc, turn (17)
Row 15 :
2 ch, 8 hdc, dec, 7 hdc, turn (16)
Row 16 :
2 ch, 7 hdc, dec, 7 hdc, turn (15)
Row 17 :
2 ch, dec, 11 hdc, dec, turn (13)
Row 18-20 :
13 hdc, turn (13)
Row 21 :
2 ch, 5 hdc, 2 x dec, 4 hdc, turn (11)
Row 22 :
2 ch, [2 hdc, dec] x2, 1 hdc, dec, turn (8)
Row 23 :
2 ch, 1 hdc, 2 x dec, 1 hdc, dec, turn (5)
Row 24 :
2 ch, 2 hdc, dec, 1 hdc, turn (4)
Info :
Fasten off the pink pieces. For the cream pieces, do not fasten off. Place a pink ear on top of a cream ear and sc around the entire edge through both layers using the cream yarn. Leave a tail for sewing.
— 5. Tail :
Round 3 :
[inc, 1 sc] x6 (18)
Info :
Slst and fasten off. Stuff the tail before sewing it to the back.
— 6. Bow and Band :
Info :
Use bright pink yarn. Worked in turning rows.
Row 1 :
7 ch, then 6 sc starting in 2nd ch, turn (6)
Row 2-17 :
2 ch, 6 hdc, turn (6)
Info :
Fasten off with a 30cm tail. Sew ends together to make a loop. Now make the center band.
Row 1 :
3 ch, then 2 sc starting in 2nd ch, turn (2)
Row 2-7 :
2 ch, 2 hdc, turn (2)
Info :
Fasten off with a 30cm tail. Wrap this band around the center of the bow loop and sew to secure.
I hope you enjoy every single stitch of this bunny project! There's something so satisfying about working with such soft yarn and seeing those big, floppy ears come together. She’s the kind of project that makes you want to keep crocheting just one more round. Once she's finished, she is guaranteed to be the star of any nursery or toy collection. Don't forget to give her a little squeeze when you're done—she's incredibly soft and huggable! Happy crafting and I can't wait to see your finished bunnies. 🧶 ✨