🧶 Beautiful ✨ Detailed 💝 Adorable

Spike Stitch Crochet Tote Bag Pattern

Spike Stitch Crochet Tote Bag Pattern
4.5★Rating
5-8 HoursTime Needed
2.4KMade This
✂️

Intermediate Level

Ideal for those with basic crocheting experience, featuring slightly more advanced stitches and techniques to expand your skills.

⏱️

Weekend Treat

Takes 5-7 hours, making it an enjoyable project to finish over a couple of days.

Stylish Touch

An elegant detail to elevate any look, combining traditional techniques with contemporary design sensibilities.

About This Spike Stitch Crochet Tote Bag Pattern

Spike Stitch Crochet Tote Bag Pattern crochet pattern - detailed view

This bag makes a genuinely thoughtful handmade gift — the neutral tones work for almost anyone, and the sturdy double-strand construction means it'll hold up to real daily use for years.

Why You'll Love This Spike Stitch Crochet Tote Bag Pattern

I have to be honest — I picked this one up expecting it to feel like a bit of a slog at 58 rounds, and instead I ended up so completely absorbed in the spike stitch rhythm that I forgot to stop for coffee. There's something almost meditative about the alternating pattern once you get going, and seeing that texture build up is genuinely thrilling. I also love that you get two strap options in one pattern — I made the leather-strap version first and immediately wanted to start a second one with the crocheted handles just to compare.

Spike Stitch Crochet Tote Bag Pattern step 1 Spike Stitch Crochet Tote Bag Pattern step 2 Spike Stitch Crochet Tote Bag Pattern step 3 Spike Stitch Crochet Tote Bag Pattern step 4

Switch Things Up

I'll be straight with you — I almost didn't make this bag because I thought 58 rounds sounded like forever. I was wrong.

Once I got through the base and hit Round 7 with the spike stitch, something just clicked. The rhythm of alternating between a back-loop SC and a spike is so satisfying once you find it. It's one of those patterns where you look up and realise an hour has gone by and you genuinely didn't notice.

The two-tone colour scheme — beige for the body, cream for the upper section — is simple but it really works. I've seen people try this in terracotta and off-white, or dark navy with a pale grey band at the top, and both combinations look stunning. The neutral version feels very 'clean girl aesthetic' if that's your thing, while a bolder colour pairing gives it more personality.

One tip I'd pass along: wind your second strand into a small separate ball before you start the body rounds. Trying to work from two full skeins at once gets messy fast, and keeping that second strand tidy means you're not wrestling with tangles every few rounds.

I went with the faux leather strap option on my first make and I'm obsessed with it. The rivets feel very professional and the tan leather against the cream yarn looks genuinely expensive. That said, the crocheted strap version has a softer, more handmade charm — especially if you're gifting it to someone who appreciates that everything, right down to the handles, came from your hook.

This is one of those patterns I keep coming back to when I want something that looks impressive but doesn't require me to hold seventeen things in my head at once. It's the perfect balance.

Common Mistakes & How to Fix Them

✗ When crocheting the oval base, the increases at the short ends can easily become uneven if you lose track of which end has 2 repeats versus 4 — mark those corners in Round 1 so you always know where you are.✗ Starting the spike stitch in Round 7 requires inserting your hook one round below into the correct stitch position — going into the wrong stitch or the wrong row will throw off the woven appearance across the entire body section.✗ If you skip the recommended second strand of yarn for added structure, the bag body will come out floppy and won't hold its shape when filled — this is the single biggest factor in getting that firm, structured finish.✗ When working the BLO round that transitions from base to body (Round 6), it's easy to accidentally catch both loops out of habit — check each stitch individually until you get comfortable, because missing BLO here affects how cleanly the sides stand up.✗ For the crocheted strap option, placing your stitch markers at stitches 21, 49, 94, and 121 before Round 54 is critical — skipping this step and eyeballing the strap placement almost always results in handles that sit off-centre.✗ When chaining 100 for each crocheted handle in Round 54, it's very easy to let the chain twist before you skip the body stitches — always lay the chain flat against the bag opening and double-check before continuing.

Spike Stitch Crochet Tote Bag Pattern

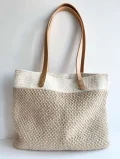
This tote bag is the kind of project that makes you want to clear your afternoon and just crochet. The spike stitch body creates this gorgeous woven-looking texture that honestly looks way more complicated than it is — and that's what makes it so satisfying to work up. You'll start from the base and build up through the body, watching that beautiful pattern emerge round by round. Choose between crocheted handles or faux leather straps depending on the vibe you're going for — both options are included. Either way, you end up with a sturdy, stylish bag that's built to actually be used.

Intermediate 5-8 Hours

Materials Needed for Spike Stitch Crochet Tote Bag Pattern

— Main Fabric

  • 01
    Approximately 300 metres of worsted weight yarn in beige for the main body and base
  • 02
    Approximately 100 metres of worsted weight yarn in cream or white for the upper body and handles
  • 03
    An optional second strand of matching worsted weight yarn held together throughout to give the bag a firmer, more structured fabric

— Tools Required

  • 01
    3.5mm crochet hook
  • 02
    Tapestry needle for weaving in ends
  • 03
    Scissors
  • 04
    Stitch markers (several — needed for strap placement)
  • 05
    Optional: faux leather bag strap measuring 80cm long by 18mm wide (one pair)
  • 06
    Optional: 8mm bag rivets for attaching pre-made leather straps

Progress Tracker

0% Complete

— 1. Base :

Info :

Using cream yarn, CH 55. The base is worked in joined rounds building an oval shape outward from this foundation chain.

Round 1 :

Starting in the 2nd CH from the hook: work INC, SC 52, then work 4 SC all into the final CH stitch. Continue working back along the other side of the foundation chain: SC 52, then work INC into the last stitch. (112)

Info :

From Round 2 onward, consider carrying a second strand of yarn inside your stitches to build a firmer structure. If you do this, check at the end of each round for any bunching or puckering and gently stretch the carried strand to release it.

Round 2 :

Work [INC] x2, SC 52, [INC] x4, SC 52, [INC] x2. (120)

Round 3 :

Work [SC 1, INC] x2, SC 52, [SC 1, INC] x4, SC 52, [SC 1, INC] x2. (128)

Round 4 :

Work [SC 2, INC] x2, SC 52, [SC 2, INC] x4, SC 52, [SC 2, INC] x2. (136)

Round 5 :

Work [SC 3, INC] x2, SC 52, [SC 3, INC] x4, SC 55, INC, SC 4. (143)

— 2. Body :

Round 6 :

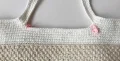
BLO SC across all 143 stitches. This round creates the folded edge between the base and the sides. (143)

Round 7 :

Repeat the following sequence to end of round: BLO SC, SPSC. (143)

Round 8 :

Repeat the following sequence to end of round: SPSC, BLO SC. (143)

Round 9 :

Repeat Round 7: work *BLO SC, SPSC* to end. (143)

Round 10 :

Repeat Round 8: work *SPSC, BLO SC* to end. (143)

Round 11 :

Repeat Round 7: work *BLO SC, SPSC* to end. (143)

Round 12 :

Repeat Round 8: work *SPSC, BLO SC* to end. (143)

Round 13 :

Repeat Round 7: work *BLO SC, SPSC* to end. (143)

Round 14 :

Repeat Round 8: work *SPSC, BLO SC* to end. (143)

Round 15 :

Repeat Round 7: work *BLO SC, SPSC* to end. (143)

Round 16 :

Repeat Round 8: work *SPSC, BLO SC* to end. (143)

Round 17 :

Repeat Round 7: work *BLO SC, SPSC* to end. (143)

Round 18 :

Repeat Round 8: work *SPSC, BLO SC* to end. (143)

Round 19 :

Repeat Round 7: work *BLO SC, SPSC* to end. (143)

Round 20 :

Repeat Round 8: work *SPSC, BLO SC* to end. (143)

Round 21 :

Repeat Round 7: work *BLO SC, SPSC* to end. (143)

Round 22 :

Repeat Round 8: work *SPSC, BLO SC* to end. (143)

Round 23 :

Repeat Round 7: work *BLO SC, SPSC* to end. (143)

Round 24 :

Repeat Round 8: work *SPSC, BLO SC* to end. (143)

Round 25 :

Repeat Round 7: work *BLO SC, SPSC* to end. (143)

Round 26 :

Repeat Round 8: work *SPSC, BLO SC* to end. (143)

Round 27 :

Repeat Round 7: work *BLO SC, SPSC* to end. (143)

Round 28 :

Repeat Round 8: work *SPSC, BLO SC* to end. (143)

Round 29 :

Repeat Round 7: work *BLO SC, SPSC* to end. (143)

Round 30 :

Repeat Round 8: work *SPSC, BLO SC* to end. (143)

Round 31 :

Repeat Round 7: work *BLO SC, SPSC* to end. (143)

Round 32 :

Repeat Round 8: work *SPSC, BLO SC* to end. (143)

Round 33 :

Repeat Round 7: work *BLO SC, SPSC* to end. (143)

Round 34 :

Repeat Round 8: work *SPSC, BLO SC* to end. (143)

Round 35 :

Repeat Round 7: work *BLO SC, SPSC* to end. (143)

Round 36 :

Repeat Round 8: work *SPSC, BLO SC* to end. (143)

Round 37 :

Repeat Round 7: work *BLO SC, SPSC* to end. (143)

Round 38 :

Repeat Round 8: work *SPSC, BLO SC* to end. (143)

Round 39 :

Repeat Round 7: work *BLO SC, SPSC* to end. (143)

Round 40 :

Repeat Round 8: work *SPSC, BLO SC* to end. (143)

Round 41 :

Repeat Round 7: work *BLO SC, SPSC* to end. (143)

Round 42 :

Repeat Round 8: work *SPSC, BLO SC* to end. (143)

Round 43 :

Repeat Round 7: work *BLO SC, SPSC* to end. (143)

Round 44 :

Repeat Round 8: work *SPSC, BLO SC* to end. (143)

Round 45 :

Repeat Round 7: work *BLO SC, SPSC* to end. (143)

Round 46 :

Repeat Round 8: work *SPSC, BLO SC* to end. (143)

Round 47 :

Repeat Round 7: work *BLO SC, SPSC* to end. (143)

Colour Change :

Switch to white or cream yarn for the upper body section.

Round 48 :

BLO SC across all 143 stitches. (143)

Round 49 :

SC 143. (143)

Round 50 :

SC 143. (143)

Round 51 :

SC 143. (143)

Round 52 :

SC 143. (143)

Round 53 :

SC 143. (143)

Info :

After Round 53, continue to either the pre-made bag strap section or the crocheted bag strap section depending on your preferred finish.

— 3. Pre-Made Bag Strap Option :

Round 54 :

SC 143. (143)

Round 55 :

SC 143. (143)

Round 56 :

SC 143. (143)

Round 57 :

SC 143. (143)

Round 58 :

SS 143. (143)

Info :

FO and weave in all ends. Attach the pre-made faux leather strap to each side of the bag opening, positioning each end approximately 4.5 inches in from the side of the bag, securing with the rivets.

— 4. Crocheted Bag Strap Option :

Info :

Continue crocheting from where you are until you reach the end of the bag opening, then place a stitch marker — this is your new end-of-round marker for Round 53. Before working Round 54, place individual stitch markers at the 21st, 49th, 94th, and 121st stitches of the upcoming round to mark where each strap will begin and end. Adjust markers if needed before proceeding so that the strap placement is even on both sides.

Round 54 :

SC 20 (or up to the stitch just before the first stitch marker), CH 100 making sure the chain stays flat without twisting, skip the next 29 sts (up to and including the stitch after the second marker), SC 43 (up to just before the third marker), CH 100 keeping the chain untwisted, skip the next 29 sts (up to and including the stitch after the fourth marker), SC 22. (285 including chains)

Round 55 :

SC 20, work 1 SC into each of the 100 CH stitches of the first handle, SC 43, work 1 SC into each of the 100 CH stitches of the second handle, SC 22. (285)

Round 56 :

SC 285. (285)

Round 57 :

SC 285. (285)

Round 58 :

SS 285. (285)

Info :

FO and weave in ends.

— 5. Finishing the Crocheted Straps :

Info :

Re-join your yarn to the first unworked stitch from Round 53 (the skipped stitches beside the handle chain). Work SS 29 across those skipped stitches, then continue slip stitching up along the chain edge of the handle. SS into the very first SS made and FO. Repeat this entire process on the second handle.

Assembly Instructions

  • Complete all 53 body rounds before deciding on your strap method — the bag structure should be fully finished up to Round 53 before any strap work begins.
  • For the pre-made strap version: work Rounds 54–57 in SC and finish with a slip stitch round (Round 58), then fasten off and weave in all ends securely.
  • Position each end of the pre-made leather strap approximately 4.5 inches in from either side of the bag, centred across the top opening, and secure each end firmly with the bag rivets through the crocheted fabric.
  • For the crocheted strap version: before Round 54, mark stitches 21, 49, 94, and 121 around the opening to pre-plan the strap positions — verify they sit evenly on both sides before continuing.
  • Work the handle chains in Round 54, keeping each 100-CH loop completely flat and untwisted before skipping the 29 body stitches beneath it.
  • After completing Round 58 and fastening off, re-attach yarn to the first skipped stitch beside each handle and work SS 29 across the gap, then slip stitch up along the chain edge of the handle to neaten and reinforce it.
  • Weave in all yarn ends thoroughly — at least two passes in different directions — since the bag will be in regular use and ends can work loose over time.

Important Notes

  • 💡Holding a second strand of yarn inside your stitches throughout the body is strongly recommended — without it the bag lacks the rigidity to hold its shape when in use, and the spike stitch texture won't look as defined.
  • 💡After every round where you're carrying a second strand, pause and tug that carried yarn gently to release any bunching — a few seconds per round saves you from a puckered, uneven fabric at the end.
  • 💡The spike stitch is always worked into the stitch one round below the current one — going two rounds down or into the wrong stitch position is the most common error and will visually disrupt the woven pattern.
  • 💡Round 6 is a BLO round that marks the transition from base to sides — working through both loops here instead of just the back loop will prevent the clean fold that helps the bag stand up straight.
  • 💡If you're using the crocheted strap option, count your stitches carefully in Round 54 to make sure each handle chain has exactly 100 chains and that each gap skips exactly 29 stitches — this keeps both straps the same length.
  • 💡The gauge listed (19 stitches and 18 rows to 10cm in SC and spike stitch) really matters here because the finished dimensions depend on it — if your tension runs loose, consider dropping to a 3mm hook to keep the fabric firm.

There's something really satisfying about finishing a bag you actually want to carry — and this one delivers every time. 🧶 The spike stitch texture gets so many compliments, and most people can't believe it's crocheted. Whether you go for the faux leather straps for that polished market-bag look or keep it all in yarn, the result is a sturdy, beautiful tote that holds its shape and takes a beating. Pop your hook in the car, finish a few rounds at a time, and before long you'll have something genuinely gorgeous to show for it. ✨ Happy making!

You ask,

we answer.

FAQs

Do I really need to crochet around a second strand of yarn for the bag body?

It's optional but highly recommended. Without it, worsted weight alone on a 3.5mm hook doesn't create enough density to keep the bag structured when it's loaded with your belongings. The double-strand method is what gives the spike stitch that crisp, woven look in the finished photos.

Can I use a cotton yarn instead of the suggested Lily Sugar n Cream?

Absolutely — any worsted weight cotton will work well and is actually ideal for bags since it's durable and holds its shape. Just swatch first: if your gauge is looser than 19 sts and 18 rows over 10cm, go down a hook size to keep the fabric from being too open.

The stitch count at the end of Round 5 reads 143 but the increases before it suggest a different number — is that correct?

The source pattern lists 143 at the end of Round 5, which is a slight change in the increase pattern from the previous rounds. Work the round exactly as written (including the final SC 4 section) and count to 143 before moving on — if your count differs, recount the short-end increases.

How do I keep the crocheted handles from looking sloppy on the inside?

The finishing step where you re-attach yarn to the 29 skipped stitches and slip stitch across them, then up the chain edge, is what neatens the inside of the handles. Take your time with this step and keep your slip stitches even — pulling them too tight will cause the handle edges to curl inward.

Can I make this bag larger or smaller?

You can adjust the starting chain length to change the bag width — a longer chain gives you a wider oval base. Just know that you'll also need to adjust the stitch counts in the increase rounds, the body rounds, and the strap placement markers proportionally, so it requires some maths to scale up or down cleanly.

Is this pattern suitable for someone who hasn't tried spike stitch before?

Yes — there's a full spike stitch tutorial included in the pattern with photos walking through every step. If you've worked basic SC comfortably before, the spike stitch will click very quickly. Most crafters feel confident with it by the end of Round 8.