About This Zesty Half Lemon and Lemon Slices Amigurumi Pattern
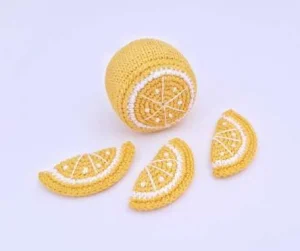
These bright citrus treats make the perfect addition to a child's play food set, a whimsical summer garland, or a colorful kitchen display that never fades.
Ideal for those with basic crocheting experience, featuring slightly more advanced stitches and techniques to expand your skills.
Fits nicely into a free afternoon — 2 to 5 hours of focused, enjoyable crocheting.
An adorable friend to cherish, handcrafted with love to bring comfort and joy for years to come.
These bright citrus treats make the perfect addition to a child's play food set, a whimsical summer garland, or a colorful kitchen display that never fades.
I absolutely adore how realistic these little slices look once you embroider the white segment lines! It is one of those incredibly satisfying projects where a few simple color changes and basic shapes come together to make something that looks wonderfully complex and professional.
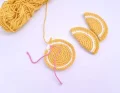
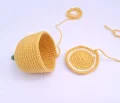
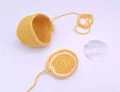
I still remember the first time I crocheted a set of these citrus slices. I wanted something cheerful to brighten up my kitchen window sill, and these did just the trick! There is something so incredibly therapeutic about working in clean, neat spirals, especially when you start seeing that bright yellow yarn take shape.
If you want to play around with this pattern, try switching up the colors! You can easily turn this into a lime by using lime green and off-white yarn, or a sweet pink grapefruit by using a soft coral pink for the segments and a soft cream for the pith. I have even made a set of sweet oranges using a vibrant mandarin shade. They look absolutely stunning when gathered together in a little wooden bowl on the dining table.
My favorite tip is to add a tiny drop of lemon essential oil to the fiberfill stuffing before you seal the half lemon. It gives the finished toy a subtle, natural scent that makes it feel even more magical when you handle it!
Bring a splash of summery brightness to your crochet collection with this delightful citrus set! You'll love crafting these realistic, textured lemon pieces, perfect for play kitchen toys, kitchen decor, or a cheerful desk companion. The pattern is designed to be engaging yet straightforward, guiding you through creating a plump half lemon and adorable individual slices.
Using green yarn, make 6 sc into a MR. (6)
Work 1 sc in each of the next 6 stitches. (6)
Work 1 sc in each of the next 6 stitches. (6)
Switch to yellow yarn.
Repeat the pattern of 1 sc followed by an inc a total of 3 times. (9)
Repeat the pattern of 2 sc followed by an inc a total of 3 times. (12)
Repeat the pattern of 1 sc followed by an inc a total of 6 times. (18)
Repeat the pattern of 2 sc followed by an inc a total of 6 times. (24)
Repeat the pattern of 3 sc followed by an inc a total of 6 times. (30)
Repeat the pattern of 4 sc followed by an inc a total of 6 times. (36)
Repeat the pattern of 5 sc followed by an inc a total of 6 times. (42)
Work 1 sc in each of the next 42 stitches. (42)
Repeat the pattern of 6 sc followed by an inc a total of 6 times. (48)
Work 1 sc in each of the next 48 stitches. (48)
Work 1 sc in each of the next 48 stitches. (48)
Work 1 sc in each of the next 48 stitches. (48)
Work 1 sc in each of the next 48 stitches. (48)
Work 1 sc in each of the next 48 stitches. (48)
Work 1 sc in each of the next 48 stitches. (48)
Work 1 sc in each of the next 48 stitches. (48)
Work 1 sc in each of the next 48 stitches. (48)
Work 1 sc in each of the next 48 stitches. (48)
Work 1 sc in each of the next 48 stitches. (48)
Fasten off, leaving a generous yarn tail for assembling the pieces later.
Using yellow yarn, make 6 sc into a MR. (6)
Work an inc in every stitch around. (12)
Repeat the pattern of 1 sc followed by an inc a total of 6 times. (18)
Repeat the pattern of 2 sc followed by an inc a total of 6 times. (24)
Repeat the pattern of 3 sc followed by an inc a total of 6 times. (30)
Repeat the pattern of 4 sc followed by an inc a total of 6 times. (36)
Switch to white yarn.
Repeat the pattern of 5 sc followed by an inc a total of 6 times. (42)
Switch to yellow yarn.
Repeat the pattern of 6 sc followed by an inc a total of 6 times. (48)
Fasten off and weave in the ends neatly.
Using yellow yarn, make 6 sc into a MR. (6)
Work an inc in every stitch around. (12)
Repeat the pattern of 1 sc followed by an inc a total of 6 times. (18)
Repeat the pattern of 2 sc followed by an inc a total of 6 times. (24)
Repeat the pattern of 3 sc followed by an inc a total of 6 times. (30)
Repeat the pattern of 4 sc followed by an inc a total of 6 times. (36)
Switch to white yarn.
Repeat the pattern of 5 sc followed by an inc a total of 6 times. (42)
Switch to yellow yarn.
Repeat the pattern of 6 sc followed by an inc a total of 6 times. (48)
Do not add any stuffing. Fold the circle exactly in half. Work 1 row of sc through both thicknesses to join the curved edges together, sealing the slice. Fasten off and weave in your ends.
I hope you have the absolute best time making these sunny little citrus treats! They are such a joy to stitch up and bring an instant smile to anyone who sees them. Keep them for your own kitchen display, or gift them to a friend who loves handmade charm. Don't forget to share your finished creations with our wonderful crafting community—we all love to see your unique stitches! Happy crocheting, and may your days be filled with bright, cozy crafting! 🧶🍋✨
Any clean, flexible plastic sheet works beautifully! You can recycle a plastic yogurt container lid, an old milk jug, or use a piece of a plastic craft sheet. Just make sure it is sturdy enough to hold its shape against the stuffing.
You definitely can, but cotton yarn is highly recommended for this project. Cotton gives the lemon pieces a crisp, clean stitch definition and a lovely matte texture that looks much more realistic than acrylic.
To get perfectly clean color transitions, change to the new color (white or yellow) during the final pull-through of the very last stitch of the previous round. This keeps the color line sharp and professional.
This usually happens if the plastic circle template inside is too small or too flexible, or if you stuffed the body too tightly before the plastic was secure. Try cutting a slightly larger, stiffer template and placing it carefully against the flat circle as you sew.
