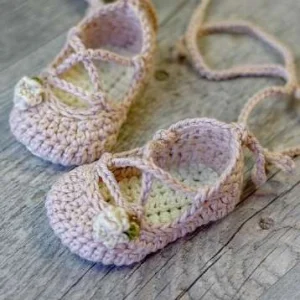
There is something so incredibly sweet about tiny handmade shoes, and these ballet-style flats are a total showstopper. You will love how the textured spike stitches give them a high-end look while keeping the construction sturdy enough for busy little feet. Whether you are prepping for a baby shower or just want a quick, satisfying project to clear out your cotton stash, these flats are a joy to hook up. Get ready to create a precious keepsake that looks much more complex than it actually is!
Progress Tracker
0% Complete
— 1. Newborn Size (3.75 inches) :
Round 1 :
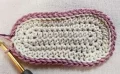
Using Color A, ch 11. Mark the lp on your hook. Work 2 hdc into the 2nd ch from the hook, then 8 hdc across. In the final ch, work 4 hdc. Turn to work along the opposite side of the chain, putting 8 hdc in the remaining loops. Work 2 hdc in the very last ch and sl st to the marked st to close. (24)
Round 2 :
ch 1 and mark your lp. sk the first st. Work 2 sc in each of the next 2 sts, then 8 sc. Work 2 sc in each of the next 4 sts, then 8 sc. In the final 2 sts, work 2 sc in each. sl st to the marked st. (32)
Round 3 :
ch 1 and mark your lp. Work 2 sc in each of the first 2 sts, then 8 sc. Work 2 hdc, then 2 hdc in each of the next 8 sts. Work 2 hdc, then 8 sc. In the last 2 sts, work 2 sc in each. sl st to the marked st. Fasten off Color A, leaving the active lp on your hook and a tail to weave in later. (44)
Round 4 :
Join Color B by pulling a lp through the active lp on your hook. Mark this lp. Work 44 bl sl st all the way around. sl st to the marked st to join. (44)
Round 5 :
Work this round into the spaces between the sl sts and the unworked loops from Round 3. ch 1 and mark your lp. Work 5 hdc, 1 sc, 5 sl st, 3 sc, 1 hdc, 14 dc, 1 hdc, 3 sc, 5 sl st, 1 sc, and 5 hdc. sl st to the marked st to join. (44)
Round 6 :
ch 2 and mark your lp. Work 3 dc, 3 hdc, then 5 spike st. Work 7 sc, 8 hdc, 7 sc, 5 spike st, 3 hdc, and 3 dc. sl st to the marked st to join. (44)
Round 7 :
ch 1 and mark your lp. sk the first st. Work 4 hdc, 4 sc, then [sk 1 st, 1 sl st] 4 times. Work 6 sc2tog across the toe. [1 sl st, sk 1 st] 4 times. Work 4 sc, 2 hdc, and 2 hdc in the final st. sl st to the marked st to join. (30)
Round 8 :
ch 1 and mark your lp. Work 3 bl sc, 3 bl sl st, ch 3, 1 bl sl st back into the same st. Work 6 bl sl st, ch 3, 1 bl sl st back into the same st. Work 7 bl sl st, ch 3, 1 bl sl st back into the same st. Work 6 bl sl st, ch 3, 1 bl sl st back into the same st. Finally, work 3 bl sl st, 2 bl sc, and sl st to the marked st. ch 4, sl st back into the same st to finish. Bind off.
— 2. 3-6 Months Size (4.25 inches) :
Round 1 :
With Color A, ch 13 and mark your lp. In the 2nd ch from hook, work 2 hdc. Work 10 hdc across. In the last ch, work 4 hdc. Work 10 hdc down the other side of the chain, then 2 hdc in the last ch. sl st to the marked st. (28)
Round 2 :
ch 1 and mark your lp. sk the first st. Work 2 sc in each of the next 2 sts, 7 sc, 3 hdc, and 2 hdc in each of the next 4 sts. Work 3 hdc, 7 sc, and 2 sc in each of the last 2 sts. sl st to the marked st. (36)
Round 3 :
ch 1 and mark your lp. Work 2 hdc in each of the first 2 sts, then 12 hdc. Work 2 hdc in each of the next 8 sts, then 12 hdc. In the last 2 sts, work 2 hdc in each. sl st to the marked st. Fasten off Color A. (48)
Round 4 :
Join Color B, pull through the active lp and mark it. Work 48 bl sl st around the sole. sl st to the marked st. (48)
Round 5 :
Work into the spaces between the sl sts and the loops from Round 3. ch 1 and mark your lp. sk the first st. Work 6 hdc, 1 sc, 6 sl st, 2 sc, 2 hdc, 14 dc, 2 hdc, 2 sc, 6 sl st, 1 sc, 4 hdc, and 2 hdc in the last st. sl st to the marked st. (48)
Round 6 :
ch 2 and mark your lp. Work 4 dc, 3 hdc, 6 spike st, 5 sc, 12 hdc, 5 sc, 6 spike st, 3 hdc, and 4 dc. sl st to the marked st. (48)
Round 7 :
ch 1 and mark your lp. sk the first st. Work 3 hdc, 8 sc, [sk 1 st, 1 sl st] 4 times. Work 5 sc2tog across the toe. [1 sl st, sk 1 st] 4 times. Work 8 sc, 1 hdc, and 2 hdc in the last st. sl st to the marked st. (35)
Round 8 :
ch 1 and mark your lp. Work 4 bl sc, 3 bl sl st, ch 3, 1 bl sl st back into the same st. Work 6 bl sl st, ch 3, 1 bl sl st back into same st. Work 10 bl sl st, ch 3, 1 bl sl st back into same st. Work 6 bl sl st, ch 3, 1 bl sl st back into same st. Work 3 bl sl st, 3 bl sc, sl st to marked st. ch 4, sl st back into same st. Bind off.
— 3. 6-12 Months Size (4.75 inches) :
Round 1 :
With Color A, ch 15 and mark your lp. Work 2 hdc in the 2nd ch from hook, 12 hdc across, and 4 hdc in the last ch. Work 12 hdc down the other side, 2 hdc in the last ch, and sl st to join. (32)
Round 2 :
ch 1 and mark your lp. sk the first st. Work 2 sc in each of the next 2 sts, 7 sc, 5 hdc, then 2 hdc in each of the next 4 sts. Work 5 hdc, 7 sc, and 2 sc in each of the last 2 sts. sl st to join. (40)
Round 3 :
ch 1 and mark your lp. Work 2 hdc in each of the first 2 sts, 14 hdc, then 2 hdc in each of the next 8 sts. Work 14 hdc, then 2 hdc in each of the last 2 sts. sl st to join. Fasten off Color A. (52)
Round 4 :
Join Color B, pull through the lp on hook and mark it. Work 52 bl sl st around. sl st to join. (52)
Round 5 :
Work between sl sts and Round 3 loops. ch 1 and mark your lp. sk the first st. Work 6 hdc, 1 sc, 7 sl st, 2 sc, 3 hdc, 14 dc, 3 hdc, 2 sc, 7 sl st, 1 sc, 4 hdc, and 2 hdc in the last st. sl st to join. (52)
Round 6 :
ch 2 and mark your lp. Work 4 dc, 3 hdc, 7 spike st, 4 sc, 3 hdc, 10 dc, 3 hdc, 4 sc, 7 spike st, 3 hdc, and 4 dc. sl st to join. (52)
Round 7 :
ch 1 and mark your lp. sk the first st. Work 4 hdc, 7 sc, [sk 1 st, 1 sl st] 4 times. Work 1 sc2tog, 5 hdc2tog, and 1 sc2tog across the toe. [1 sl st, sk 1 st] 4 times. Work 7 sc, 2 hdc, and 2 hdc in the last st. sl st to join. (37)
Round 8 :
ch 1 and mark your lp. Work 4 bl sc, 3 bl sl st, ch 3, 1 bl sl st back into same st. Work 7 bl sl st, ch 3, 1 bl sl st back into same st. Work 10 bl sl st, ch 3, 1 bl sl st back into same st. Work 7 bl sl st, ch 3, 1 bl sl st back into same st. Work 3 bl sl st, 3 bl sc, sl st to marked st, ch 4, sl st back into same st. Bind off.
— 4. Tiny Flower Accessory :
Info :
Use your 3.25mm hook and fingering weight yarn. Leave a 6-inch tail before starting.
Step 1 :
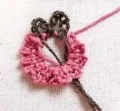
Create a magic ring and work over both the ring and the yarn tail.
Step 2 :
[ch 3 (or 4 for a larger flower), sl st back into the ring] repeat 10 to 12 times. Fasten off.
Step 3 :
Switch to your leaf color. Pull a lp through the ring, [ch 4 (or 5), sl st back into the ring] twice. Fasten off.
Step 4 :
Pull the center tails tight to close the ring completely. Arrange the petals and leaves, then tie the ends together and secure to the shoe.
— 5. Crochet Strap :
Info :
Use the 3.25mm hook for the strap.
Step 1 :
Create a foundation chain that reaches the desired length (36 inches for newborn, 42 inches for 3-6m, 48 inches for 6-12m).
Step 2 :
Fasten off and tie small knots at each end of the chain to prevent fraying, then trim the excess.
I honestly can't wait to see the color combinations you come up with for these little flats! Whether you're making them in classic ballet pink, a modern neutral, or even a bold festive red, they are sure to be the star of the baby shower. Don't forget that blocking is your best friend here—it really helps the shoes find their shape and look their absolute best before they meet those tiny toes. Happy making, and I hope these bring as much joy to you as they do to the little ones wearing them! 🧶✨