About This Sunny Sunflower Crochet Pattern
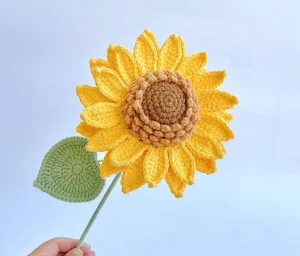
This stunning sunflower makes a wonderful everlasting gift for teachers, friends, or anyone who needs a little cheer, and looks spectacular arranged in a bud vase on a windowsill.
Ideal for those with basic crocheting experience, featuring slightly more advanced stitches and techniques to expand your skills.
Fits nicely into a free afternoon — 2 to 5 hours of focused, enjoyable crocheting.
Light and fresh designs for warmer days, capturing the renewal and brightness of the season.
This stunning sunflower makes a wonderful everlasting gift for teachers, friends, or anyone who needs a little cheer, and looks spectacular arranged in a bud vase on a windowsill.
I absolutely love how the wire in the petals and leaf lets you shape them so realistically! The textured seed stitches on the flower's center are incredibly satisfying to make and give the finished bloom such a professional, lifelike look.

I still remember the first time I tried crocheting a flower—it was a flat, sad little thing that looked nothing like the real deal! That is why I designed this sunflower to have so much rich, touchable texture. The secret really lies in those double-layered petals and the clever use of thin craft wire.
If you want to play around with the look, try using different shades of yellow for the inner and outer petal layers. A deep mustard gold on the bottom layer paired with a bright lemon yellow on top creates a gorgeous, natural depth that mimics real sunflowers in late summer.
For the center, don't worry if your seed stitches look a bit wild at first—the organic variation actually makes it look far more realistic! When assembling, make sure to take your time wrapping the green yarn around the stem. Adding a tiny drop of hot glue every few inches keeps everything perfectly secure so your beautiful bloom lasts a lifetime.
Brighten up your home with a gorgeous, everlasting touch of nature! This beautiful sunflower is designed with a deeply textured seed center and double-layered petals that hold their shape perfectly. It is a wonderfully rewarding project to work on and makes a magnificent handmade gift for someone special.
Every time you start a new round, chain 1 as the turning chain (this does not count as a stitch). Close each round by making a slip stitch through the first stitch of the round.
Work 6 sc in a magic ring (6)
Work 6 inc (12)
Repeat (1 sc, inc) 6 times (18)
Repeat (2 sc, inc) 6 times (24)
Repeat (3 sc, inc) 6 times (30)
From Round 6 onwards, work only in the back loops (the half-loops furthest from you). Close each round with a regular slip stitch through both loops and chain 1 to start. The front loops left from Rounds 5-8 will be used later for the seeds.
Repeat (2 sc, inc, 2 sc) 6 times (36)
Repeat (5 sc, inc) 6 times (42)
Repeat (3 sc, inc, 3 sc) 6 times (48)
Repeat (7 sc, inc) 6 times (54)
Work 54 sc (54). FO and cut yarn.
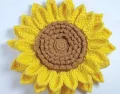
We will work 4 rounds of seeds using the unworked front loops from Rounds 5 to 8 of the flower heart. The seed counts per round are: Round 5 has 15 seeds, Round 6 has 18 seeds, Round 7 has 21 seeds, and Round 8 has 24 seeds.
Rejoin yarn to the first front loop of Round 5, ch 3, slst into the same loop, skip 1 loop, slst in next 2 loops, and repeat this pattern around. Close with a slst in the first space.
Move to the next round by slip stitching into the first loop of that round, then repeat the same stitch pattern to create the seeds. FO and weave the tail to the back.
Rejoin yellow yarn to the first stitch of Round 9 on the flower heart. ch 8, starting in the second chain from hook, work 7 sc down the chain, skip 1 stitch on the heart, slst in next 2 stitches. Repeat this sequence 18 times to create 18 petal bases. Close with a slst to the first stitch of the round. Do not cut yarn.
Lay your craft wire along the edge to encase it. For each of the 18 petals, work: 1 sc, 1 hdc, 3 dc, 1 sc, then in the tip space work [1 sc, ch 1 picot, 1 sc], then down the other side work 1 hdc, 3 dc, 1 hdc, 1 sc, skip 1 stitch, 1 slst. Repeat for all 18 petals. Close with a slst, FO and cut yarn and wire.
We will work the second layer of petals in the front loops that are facing us. Rejoin yellow yarn, ch 10, starting in the second chain from hook, work 9 sc down the chain, skip 1 stitch, slst in next 2 stitches. Repeat this sequence 18 times. Close with a slst. Do not cut yarn.
Lay your craft wire along the edge. For each of the 18 petals, work: 1 sc, 1 hdc, 5 dc, 1 sc, then in the tip work [1 sc, ch 1 picot, 1 sc], then down the other side work 1 hdc, 5 dc, 1 hdc, 1 sc, skip 1 stitch, 2 slst. Repeat for all 18 petals. Close with a slst, FO and cut yarn and wire.
Every time you start a new round, chain 1 as the turning chain (this does not count as a stitch). Close each round by making a slip stitch through the first stitch of the round.
Work 6 sc in a magic ring (6)
Work 6 sc (6)
Work 6 inc (12)
Repeat (1 sc, inc) 6 times (18)
Repeat (2 sc, inc) 6 times (24)
Repeat (3 sc, inc) 6 times (30)
Repeat (2 sc, inc, 2 sc) 6 times (36)
Repeat (5 sc, inc) 6 times (42)
Repeat (3 sc, inc, 3 sc) 6 times (48)
Repeat (7 sc, inc) 6 times (54)
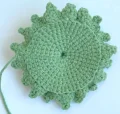
Work this round only in the front loops facing you. ch 1, then repeat around: [1 dc inc, ch 3 picot, 1 dc inc] in one stitch, [1 slst, ch 1] in the next, skip 1 stitch. Close with a slst to the first space, FO and cut yarn.
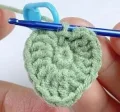
Work 7 sc in a magic ring (7)
ch 2 (does not count as a stitch), then work: [3 dc] in the first stitch, [1 dc inc] in each of the next 2 stitches, [3 tr] in the next, [1 dc inc] in each of the next 2 stitches, [3 dc, ch 2] in the last stitch, then slst into the first stitch of Round 1 to close.
ch 2 (does not count as a stitch), lay a 15cm piece of craft wire along the edge to encase it, then work: [1 sc, 1 hdc] in the first stitch, [3 dc] in the next, [1 dc inc] in each of the next 6 stitches, [3 dc] in the next, [1 dc inc] in each of the next 6 stitches, [3 dc] in the next, [1 hdc, 1 sc, ch 1] in the last, then slst into the first stitch of Round 2 to close.
ch 1 (does not count as a stitch), then work: 1 sc, 1 hdc, [1 dc inc] in each of the next 5 stitches, 11 dc, [1 dc, 1 tr, ch 2 picot, 1 tr, 1 dc] in the tip stitch, 11 dc, [1 dc inc] in each of the next 5 stitches, 1 hdc, 1 sc, ch 1, then slst into the first stitch of Round 3 to close. FO and wrap the wire ends with the remaining yarn tail.
I hope you have the absolute best time bringing this cheerful sunflower to life! There is nothing quite like watching those sunny yellow petals bloom under your hook. Once you finish wrapping that stem and shaping the leaves, you will have a beautiful piece of everlasting sunshine to brighten up any corner of your home. Happy crocheting, my lovely friends, and may your days be filled with warmth, creativity, and lots of beautiful stitches! 🧶✨
You can, but the petals and leaf will be very floppy and won't hold their shape. The wire is highly recommended to give the sunflower its realistic, upright look.
A sturdy 4-ply milk cotton or sport weight cotton yarn works beautifully because it provides excellent stitch definition, which makes the textured seed stitches pop.
Using three floral stems bundled together instead of just one provides the necessary structural support. Also, folding the top 5cm of the stem over before inserting it into the stuffed flower head prevents it from slipping.
Because of the metal craft wire and glue used in construction, spot cleaning with a damp cloth is highly recommended instead of fully submerging or machine washing the flower.
