🧶 Beautiful ✨ Detailed 💝 Adorable

The Camera Crochet Bag & Purse Pattern

The Camera Crochet Bag & Purse Pattern
4.7★Rating
5-7 HoursTime Needed
1.6KMade This
✂️

Intermediate Level

Ideal for those with basic crocheting experience, featuring slightly more advanced stitches and techniques to expand your skills.

⏱️

Weekend Treat

Takes 5-7 hours, making it an enjoyable project to finish over a couple of days.

Stylish Touch

An elegant detail to elevate any look, combining traditional techniques with contemporary design sensibilities.

About This The Camera Crochet Bag & Purse Pattern

The Camera Crochet Bag & Purse Pattern crochet pattern - detailed view

This bag makes a genuinely thoughtful handmade gift — stylish enough for a teenager, charming enough for a vintage-lover, and unique enough that nobody else at the party will have one.

Why You'll Love This The Camera Crochet Bag & Purse Pattern

I love this one because it doesn't just look cute in photos — it actually works as a real bag. The zipper closure means nothing falls out, and the long strap makes it easy to wear crossbody. Every time I pick it up I get a little thrill from how the lens sits on the front. There's something so satisfying about finishing that circular piece and seeing the whole camera illusion click into place. And honestly? The felt viewfinder detail is so fast to add but it makes such a big difference. This is the kind of make that gets carried, not just displayed.

The Camera Crochet Bag & Purse Pattern step 1 The Camera Crochet Bag & Purse Pattern step 2 The Camera Crochet Bag & Purse Pattern step 3 The Camera Crochet Bag & Purse Pattern step 4

Switch Things Up

I started this bag because I kept seeing camera-shaped bags in shops and thinking — I could just make that. Turns out, yes. You absolutely can, and yours will be better.

What surprised me most was how the two-tone construction does all the heavy lifting visually. The sage green body and the cream cover read immediately as a vintage camera body, even before you add the lens. I made my first version in those exact colors and was honestly a little stunned when it came together. The blsc ridge at Round 22 that creates the color-change line is such a small detail but it makes the transition look intentional and structured in a way that plain color changes don't.

The lens is where this pattern earns its intermediate rating. Working the color shifts in Round 5 — black, white, black again — takes a bit of focus, but it produces that authentic look of light catching the edge of a real camera lens. Don't rush that round. Go slowly, carry your colors neatly, and you'll get a result that genuinely looks dimensional.

For color variations: a black bag body with a white cover would look incredibly sleek. Or try a dusty rose body with an ivory cover for something more romantic. The wood button on the side is a small thing but it seals the whole design — don't skip it or substitute with a plastic button if you can help it. The warmth of wood against crocheted fabric is just right.

If you're gifting this, I'd tuck a little note inside about the felt viewfinder pieces — explain what they represent. People who aren't crocheters won't immediately see it, but once they do, the detail lands so well.

Common Mistakes & How to Fix Them

✗ When starting the bag base chain, placing the first round's corner increases in the wrong chain position will make the whole base skew — count carefully from the slip knot end before working your first sc 2.✗ The color switch to Color B at Round 22 uses back loop single crochet — if you accidentally work through both loops, you'll lose that visible ridge line that defines the camera body top edge.✗ When attaching Lens #2 to Lens #1, pulling the sewing yarn too tight puckers the white ring and distorts the circular shape — use a relaxed tension and pin both layers together before you start sewing.✗ The strap in Rows 2–200 uses ch 1 at the turn, but forgetting that turning chain and going straight into the first stitch causes the strap edges to curl inward — keep your tension even and always chain before turning.✗ Placing the camera lens too high or too low on the bag front throws off the whole camera illusion — use pins to position it before sewing and step back to eyeball the placement from a distance first.✗ When sewing the cover flap down at one edge, catching only a single strand instead of the full stitch on the bag body means the flap will pull loose with regular use — sew through both layers securely.

The Camera Crochet Bag & Purse Pattern

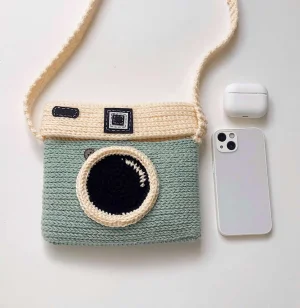
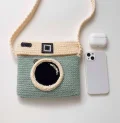
If you've ever wanted to carry your love of photography AND your love of crochet on your shoulder at the same time — this is your pattern. The Camera Bag is a mini crossbody purse shaped like a vintage camera, complete with a crocheted lens, a felt viewfinder, and a wood button detail that makes people stop and stare. It's genuinely functional too, sized to hold your phone, cards, and the little everyday essentials. You'll work through the main bag body, a flap cover, a long shoulder strap, and two lens pieces — each one satisfying to finish.

Intermediate 5-7 Hours

Materials Needed for The Camera Crochet Bag & Purse Pattern

— Main Fabric

  • 01
    Approximately 80g of 100% acrylic DK weight yarn in Color A (the main bag body color — shown as sage green)
  • 02
    Approximately 60g of 100% acrylic DK weight yarn in Color B (the cover and strap color — shown as cream/off-white)
  • 03
    Approximately 20g of 100% acrylic DK weight yarn in a dark color (shown as black, used for the camera lens center)
  • 04
    Small amount of white yarn for the outer ring of the camera lens
  • 05
    Black and white felt sheets for cutting the viewfinder detail pieces

— Tools Required

  • 01
    Crochet hook sized 3.75–4.5 mm (US sizes F-5, G-6, or 7)
  • 02
    Black plastic zipper approximately 9 inches long, or sew-on magnetic snaps as an alternative closure
  • 03
    Wooden button approximately 15–20 mm in diameter for the small lens detail
  • 04
    Black and white embroidery thread for finishing the felt viewfinder pieces
  • 05
    Yarn needle for sewing pieces together and weaving in ends
  • 06
    Embroidery needle for working with the embroidery thread on felt
  • 07
    Scissors

Progress Tracker

0% Complete

— 1. Bag Body :

Info :

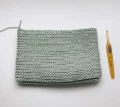
Use Color A. Make 1 bag body. Finished size approximately 21 cm wide x 21 cm tall. Begin with a foundation chain of 35, using a slip knot.

Round 1 :

Work 2 sc into the 2nd chain from the hook, then sc once in each of the next 32 chains, then work 3 sc into the final chain (the first chain of the base). Rotate your work and continue along the other side of the foundation chain, working 1 sc into each of the next 33 chains, then slst to join to the first st of the round. (70 sts)

Round 2 :

Ch 1, then work the following sequence twice: sc in the next st, 2 sc in the next st, sc in each of the next 32 sts, 2 sc in the next st. After completing both repeats, slst to join, then slst all the way around, and slst to join to the first sc of the round. (74 sts)

Round 3-21 :

Ch 1, sc in each st around, slst to join, then slst around, slst to join to the first sc of the round. (74 sts)

Round 22 :

Switch to Color B. Work blsc in every st around, slst to join. (74 sts)

Round 23 :

Ch 1, sc in each st around, slst to join. (74 sts)

Round 24 :

Ch 1, sc in each st around, slst to join. (74 sts)

Info :

Fasten off and weave in the yarn end securely.

— 2. Camera Lens #1 :

Info :

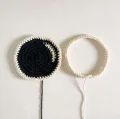
Make 1 lens. Start with black yarn and a magic ring.

Round 1 :

Using black yarn, work 9 sc into the magic ring, slst to join. (9 sts)

Round 2 :

Ch 1, work inc in each of the 9 sts around, slst to join. (18 sts)

Round 3 :

Ch 1, (sc 1, inc) repeated 9 times, slst to join. (27 sts)

Round 4 :

Ch 1, (sc 2, inc) repeated 9 times, slst to join. (36 sts)

Round 5 :

Ch 1. With black: (sc 3, inc) 2 times. Switch to white: (sc 3, inc) 2 times. Switch back to black: (sc 3, inc) 5 times. Slst to join. (45 sts)

Round 6 :

Ch 1, (sc 4, inc) repeated 9 times, slst to join. (54 sts)

Round 7 :

Switch to white yarn. Ch 1, sc in each st around, slst to join. (54 sts)

Info :

Fasten off and weave in the front yarn end. Leave the yarn tail at the back approximately 30 cm long — you'll use this to sew Lens #1 onto the bag.

— 3. Camera Lens #2 :

Info :

Make 1 lens ring. Use white yarn. Start by chaining 54 and joining with a slst to form a ring.

Round 1 :

Ch 1, sc in each st around the ring, slst to join. (54 sts)

Info :

Fasten off and leave a yarn tail of approximately 30 cm. Use this tail to sew Lens #2 onto the front of Lens #1, aligning the edges.

— 4. Shoulder Strap :

Info :

Make 1 strap using Color B. Leave a starting yarn tail of approximately 25–30 cm. Make a slip knot and chain 4.

Row 1 :

Work 1 sc into the 2nd chain from the hook, then sc in each of the next 2 chains, turn. (3 sts)

Row 2-200 :

Ch 1, sc across all 3 sts, turn. (3 sts)

Info :

Fasten off and leave a yarn tail of approximately 25–30 cm at the finishing end as well. Note: you can work 3–5 sc wide depending on your preferred strap width, and adjust the total number of rows to suit your body length.

— 5. Cover Flap :

Info :

Make 1 cover flap using Color B. Begin with a foundation chain of 35, using a slip knot.

Round 1 :

Work 2 sc into the 2nd chain from the hook, then sc once in each of the next 32 chains, then work 3 sc into the final chain (the first chain of the base). Rotate your work and continue along the other side of the foundation, working 1 sc into each of the next 33 chains, slst to join to the first st of the round. (70 sts)

Round 2 :

Ch 1, then work the following sequence twice: sc in the next st, 2 sc in the next st, sc in each of the next 32 sts, 2 sc in the next st. After completing both repeats, slst to join, then slst all the way around, and slst to join to the first sc of the round. (74 sts)

Round 3-8 :

Ch 1, sc in each st around, slst to join, then slst around, slst to join to the first sc of the round. (74 sts)

Info :

Fasten off and leave a yarn tail of approximately 50 cm. You'll use this long tail to sew the cover flap onto the top back edge of the bag.

Assembly Instructions

  • With the main bag body complete through Round 24, lay it flat and confirm the Color B blsc ridge at Round 22 sits cleanly at the top edge — this defines the boundary between the two-tone sections.
  • Attach the zipper along the top opening of the bag body, sewing it securely with embroidery thread or a yarn needle. Alternatively, sew on magnetic snaps at the center top edges on each side if you prefer that closure method.
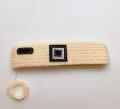
  • Cut the four felt viewfinder pieces to size (01: 3.7x3.7 cm, 02: 2.4x2.4 cm, 03: 1.5x1.5 cm, 04: 3.7x1.5 cm) and layer them at the center of the cover flap. Use embroidery thread to stitch them in place, following the viewfinder reference photo.
  • Using the 50 cm yarn tail, sew the cover flap onto the top back edge of the bag, working stitch by stitch across the full width so it sits flat and even.
  • Sew Lens #2 (the white ring) onto the front face of Lens #1, aligning both edges. Then hold the assembled lens against the front of the bag, centering it on the Color A section. Pin it in place and step back to confirm placement looks balanced before sewing down with the 30 cm yarn tail.
  • Thread the 25–30 cm yarn tails at each end of the strap onto a yarn needle and attach one end firmly to the top left side of the bag opening and the other end to the top right side, sewing through multiple sts to secure.
  • Finally, sew the wood button onto the front of the bag at the left side, roughly where a secondary lens would sit on a real camera body.

Important Notes

  • 💡The blsc round (Round 22 of the bag body) is worked through the back loop only — this is intentional and creates the visible ridge that separates the two yarn colors cleanly.
  • 💡When joining your foundation chain into a round for both the bag body and the cover, make sure you haven't twisted the chain before slipping to join — a twisted base is hard to spot early and impossible to fix later.
  • 💡The strap length of 200 rows is a starting suggestion — hold the strap against your body before finishing and add or remove rows to get the crossbody length that feels right for you.
  • 💡Cut your felt viewfinder shapes with sharp scissors and check against the measurements before stitching — felt doesn't forgive trimming if you go too small.
  • 💡Leave yarn tails the full recommended lengths (30 cm, 50 cm, 25–30 cm) before cutting — these tails do double duty as your sewing thread for assembly, and running short mid-seam is frustrating.
  • 💡If using a zipper, baste it lightly in position before doing your final sewing pass to make sure it sits centered and doesn't pull one side of the bag opening tighter than the other.

By the time you finish this one, you'll have a fully functional mini crossbody that looks like it came from a design studio — not a craft basket. That camera lens sitting on the front, the two-tone body, the little felt viewfinder detail... it all comes together in a way that's genuinely exciting. Wear it, gift it, or make three in different color combinations because you won't want to stop. 🧶 Happy making! ✨
You ask,

we answer.

FAQs

What finished size does this camera bag come out to?

The finished bag measures approximately 21 cm wide by 21 cm tall (about 8 inches square). That's a comfortable size for a phone, cards, and small essentials — big enough to be useful, small enough to stay cute.

Can I swap the zipper for a different closure?

Yes — the pattern actually offers this choice. You can use a standard black plastic zipper around 9 inches long, or substitute sew-on magnetic snaps instead. Magnetic snaps are a bit easier to attach if you haven't worked with zippers before.

Can I make the strap wider or longer?

Definitely. The pattern suggests working 3 stitches across for the strap width, but you can go up to 5 stitches for something chunkier. For length, 200 rows is the base but you should hold it against your body and adjust the row count to suit your height and preferred wearing style.

What yarn weight works best and can I substitute?

The pattern is designed for 100% acrylic DK or Light Worsted weight yarn. If you go up to a true worsted, the bag will come out noticeably larger and the fabric will be looser — great if you want a bigger bag, but the stitch definition may soften. Going down to fingering weight will make it much smaller and you'll need a tighter hook.

Is the felt for the viewfinder decorative only, or does it serve a function?

It's purely decorative — the felt pieces are layered and stitched onto the cover flap to mimic the viewfinder window you'd see on a real vintage camera. You cut four pieces in the specified sizes and stack them in the center of the cover. Embroidery thread is used to attach them and add a stitched border effect.