🧶 Beautiful ✨ Detailed 💝 Adorable

Tick the Rabbit Amigurumi Pattern

Tick the Rabbit Amigurumi Pattern
4.4★Rating
5-7 HoursTime Needed
1.9KMade This
✂️

Intermediate Level

Ideal for those with basic crocheting experience, featuring slightly more advanced stitches and techniques to expand your skills.

⏱️

Weekend Treat

Takes 5-7 hours, making it an enjoyable project to finish over a couple of days.

🐰

Whimsical Buddy

Playful characters full of personality, designed to spark imagination and become cherished playtime favorites.

About This Tick the Rabbit Amigurumi Pattern

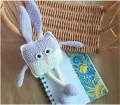
Tick the Rabbit Amigurumi Pattern crochet pattern - detailed view

Perfect for gifting to curious toddlers or as a unique nursery decoration, this rabbit's interactive stretching feature makes it a standout piece that kids will reach for again and again.

Why You'll Love This Tick the Rabbit Amigurumi Pattern

I absolutely adore how this pattern plays with the traditional amigurumi shape. Instead of just sewing limbs onto a round ball, you're creating a mechanism! It’s incredibly satisfying to pull the legs and watch the ears shorten—it’s like magic made of yarn. Plus, the flat body is a nice break from constant round-shaping.

Tick the Rabbit Amigurumi Pattern step 1 Tick the Rabbit Amigurumi Pattern step 2 Tick the Rabbit Amigurumi Pattern step 3 Tick the Rabbit Amigurumi Pattern step 4

Switch Things Up

I’ve always been a fan of amigurumi that does more than just sit on a shelf. When I first came across the concept of sliding limbs, I knew I had to share it with you all. It’s such a clever way to make a toy interactive without needing any complicated hardware or wires. Tick the Rabbit is one of those projects that looks impressive but is actually quite soothing to make.

One tip I’ve learned while making a few of these: keep your tension consistent on the long white stretches of the legs. If you crochet too tightly there, the lilac feet might snag as they slide through the body. I also love playing with the colors! While the lilac and white look classic and clean, imagine a mint green bunny or even a bright sunny yellow one for Spring.

This project is perfect for a weekend where you want to just zone out and count rounds. Once you get past the initial shaping of the ears, those 52 rounds of white are pure crochet bliss. It’s the kind of project you can work on while listening to a podcast or watching your favorite show. I can’t wait to see your versions!

Common Mistakes & How to Fix Them

✗ Stuffing the white middle section of the limbs will prevent them from sliding through the body, so be sure to leave that part completely empty.✗ If you forget to install the safety eye backs before sewing the white eye circles to the body, you won't be able to secure them properly later.✗ Make sure your gaps in the body joining rounds are exactly 3 stitches wide as instructed, or the legs might get stuck or feel too loose.✗ When working the body panels, don't miss the turning chain at the end of each row, or your rectangle will slowly turn into a triangle.

Tick the Rabbit Amigurumi Pattern

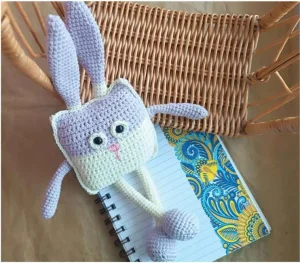
Get ready to create a toy that’s as fun to play with as it is to make! Tick the Rabbit features a clever sliding limb design, allowing the ears and legs to stretch up and down through the body. It’s a fantastic sensory project that results in a quirky, flat-bodied bunny perfect for little hands to tug on. You'll love the simple construction and the way the personality shines through once those big white eyes are attached.

Intermediate 5-7 Hours

Materials Needed for Tick the Rabbit Amigurumi Pattern

— Main Fabric

  • 01
    Approximately 50g of sport weight cotton blend yarn in Lilac for the main body and outer limbs
  • 02
    About 25g of sport weight cotton blend yarn in White for the eyes and the sliding leg sections
  • 03
    A small amount of thin pink cotton thread for the nose details

— Tools Required

  • 01
    2.0 mm crochet hook for the detailed limb work and eyes
  • 02
    3.0 mm crochet hook for the larger body panels
  • 03
    Pair of 8 mm safety eyes
  • 04
    High-quality polyester fiberfill
  • 05
    Large-eye tapestry needle for assembly
  • 06
    Stitch markers to track your rounds
  • 07
    Sharp crafting scissors

Progress Tracker

0% Complete

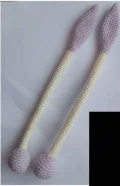
— 1. Ears and Legs (Make 2) :

Info :

Start with your 2.0 mm hook and the lilac yarn. These pieces serve as both the ears and the legs.

Round 1 :

Work 6 sc into a mr (6)

Round 2 :

Repeat (1 sc, inc) 3 times (9)

Round 3-4 :

Work 1 sc in each st around (9)

Round 5 :

Repeat (2 sc, inc) 3 times (12)

Round 6 :

Repeat (3 sc, inc) 3 times (15)

Round 7-8 :

Work 1 sc in each st around (15)

Round 9 :

Repeat (4 sc, inc) 3 times (18)

Round 10-17 :

Work 1 sc in each st around (18)

Round 18 :

Repeat (dec, 4 sc) 3 times (15)

Round 19-20 :

Work 1 sc in each st around (15)

Round 21 :

Repeat (dec, 3 sc) 3 times (12)

Round 22-23 :

Work 1 sc in each st around (12)

Note :

The stitch count drops by 2 in the next round to allow for the sliding transition. Work 2 dec evenly to reach the count.

Round 24 :

Work 10 sc around (10)

Info :

Stuff this lilac section firmly. Switch to white yarn for the stretchy middle part.

Round 25-76 :

Work 1 sc in each st around for 52 rounds. Do not stuff this section (10)

Info :

Switch back to lilac yarn for the foot section.

Round 77 :

Repeat (inc, 4 sc) twice (12)

Round 78 :

Repeat (1 sc, inc) 6 times (18)

Round 79 :

Repeat (2 sc, inc) 6 times (24)

Round 80 :

Repeat (3 sc, inc) 6 times (30)

Round 81-84 :

Work 1 sc in each st around (30)

Round 85 :

Repeat (dec, 3 sc) 6 times (24)

Round 86 :

Repeat (dec, 2 sc) 6 times (18)

Round 87 :

Repeat (dec, 1 sc) 6 times (12)

Info :

Stuff the foot firmly.

Round 88 :

Work 6 dec. Fasten off and close the hole (6)

— 2. Arms (Make 2) :

Info :

Use the 2.0 mm hook and lilac yarn.

Round 1 :

Work 5 sc in a mr (5)

Round 2 :

Work 5 inc (10)

Round 3-9 :

Work 1 sc in each st around (10)

Round 10 :

Work 1 dec, then 8 sc (9)

Round 11-13 :

Work 1 sc in each st around (9)

Info :

Stuff the arm up to this point.

Round 14 :

Work 1 dec, then 7 sc (8)

Round 15-20 :

Work 1 sc in each st around (8)

Finishing :

Flatten the top and work 4 sc through both layers to close. Leave a long tail.

— 3. Eyes (Make 2) :

Info :

Use the 2.0 mm hook and white yarn.

Round 1 :

Work 6 sc in a mr (6)

Round 2 :

Work 6 inc (12)

Finishing :

Secure the 8mm safety eyes into the center of the ring. Fasten off with a sewing tail.

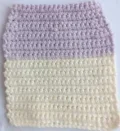
— 4. Body - Solid Panel :

Info :

Use the 3.0 mm hook and lilac yarn. Work in rows.

Row 1 :

ch 25, starting in 2nd ch from hook work 24 sc. ch 1 and turn (24)

Row 2-19 :

Work 24 sc across, ch 1 and turn (24)

Row 20 :

1 sc, dec, 18 sc, dec, 1 sc, ch 1 and turn (22)

Row 21 :

Work 22 sc across, ch 1 and turn (22)

Row 22 :

1 sc, dec, 16 sc, dec, 1 sc, ch 1 and turn (20)

Row 23-25 :

Work 20 sc across, ch 1 and turn (20)

Finishing :

Fasten off and cut the yarn.

— 5. Body - Two-Tone Panel :

Info :

Follow the same pattern as the Solid Panel but change colors as follows.

Row 1-16 :

Work in white yarn (24)

Row 17-25 :

Switch to lilac yarn and complete the remaining rows as per the Solid Panel instructions.

Assembly Instructions

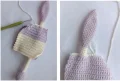
  • Hold the two body panels together and use a 2.0 mm hook to join the top edge, starting from the corner.
  • While joining the top, work 4 sc through both layers, then 3 sc through the front panel only to leave a gap for the ear-leg piece.
  • Slide the first ear-leg piece through the gap, then join the next 5 stitches through both layers before creating a second 3-stitch gap for the other ear.
  • Continue joining down the side edge with 24 sc through both layers, then work across the bottom edge leaving identical 3-stitch gaps for the legs.
  • Stuff the body through the remaining open side, then crochet that final side closed with 24 sc.
  • Sew the white eye circles onto the lilac portion of the front panel between rows 17 and 20.
  • Embroider a pink nose centered between the eyes and sew the arms to the back panel between rows 14 and 17.

Important Notes

  • 💡Use a smaller hook for the limbs to ensure the fabric is dense enough to hold stuffing without stretching too much.
  • 💡The white section of the legs must remain unstuffed; this is critical for the sliding mechanism to function.
  • 💡When joining the panels, ensure the two-tone panel is facing forward so the white belly is visible.
  • 💡If your stitches are naturally loose, consider sizing down your hook further to prevent the fiberfill from showing through the body.
  • 💡Double-check that your gaps for the ears and legs align vertically so the pieces slide straight through.

You've done it! Your Tick the Rabbit is ready for some serious playtime. There is something so magical about seeing those limbs slide back and forth for the first time—it really brings the whole project to life. Whether you made this for a little one or as a quirky addition to your own collection, I hope you enjoyed every stitch. Don't forget to give those ears a good stretch! If you loved this project, I'd love to see your finished bunny in the wild. Happy crocheting! 🧶✨
You ask,

we answer.

FAQs

Can I use a different yarn weight for this rabbit?

You can use worsted weight yarn, but keep in mind the rabbit will turn out significantly larger. You'll also need to increase your hook sizes accordingly and may need more stuffing for the head and feet.

Why won't my rabbit's legs slide easily?

This usually happens if the white section was stuffed even slightly, or if the gaps left during the body joining are too narrow. Make sure those gaps are a full 3 stitches wide.

How do I make sure the face looks centered?

I recommend pinning the eye circles in place before sewing. Line them up horizontally between rows 17 and 20, leaving about 2-3 stitches between them for the nose.

Is it okay to use felt instead of crocheted eyes?

Definitely! If you prefer a different look, you can cut circles from white felt and glue or sew them on. Just make sure the safety eyes are securely attached through the felt and the body panel.